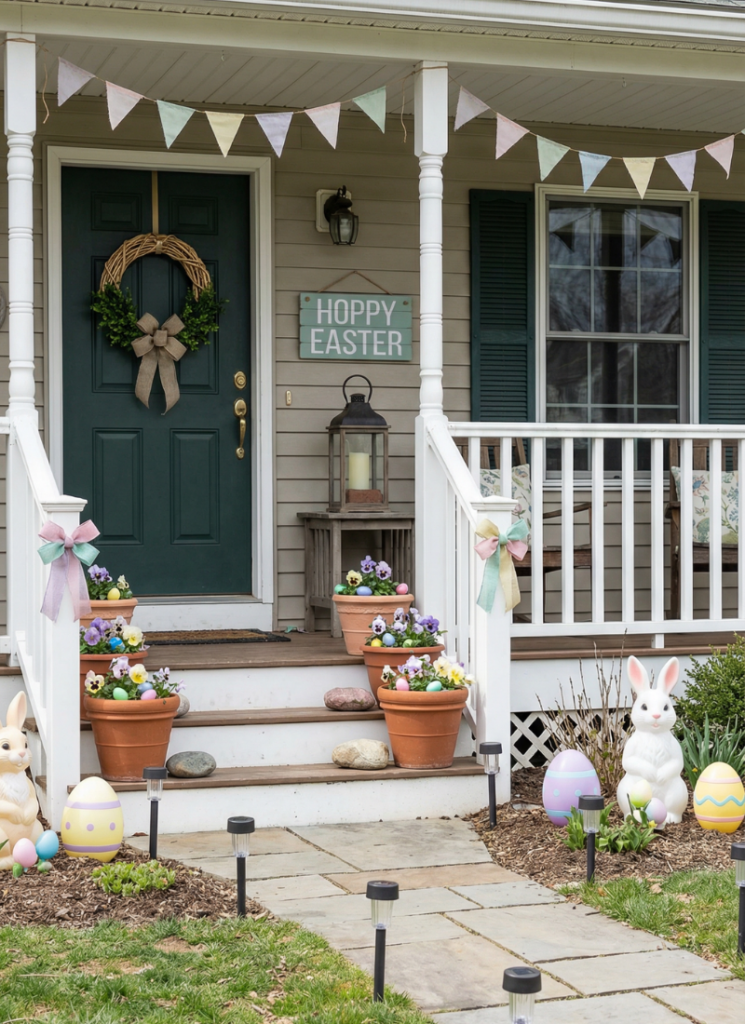
Easter outdoor decorations that look cute from the street and don’t blow into the neighbor’s yard. Porch, garden, and hosting upgrades with real costs, exact materials, and weather-proof securing tricks.
If you want your place to look festive from the street without spending a lot, chasing decor across the lawn, or watching it melt in the first drizzle… hi.
Same. I’m going for: affordable, outdoor-safe, and cute at a drive-by speed (because let’s be honest, that’s most of our “audience”).
Also, I’m not trying to build a theme park. I want “soft spring energy” with anchors and common sense.
The kind of setup you can do after dinner while your kid asks for a snack they already have in their hand.
Quick-picks Cheat Sheet (for the skimmers and the tired)
- Best $10 porch upgrade: a door hook + a faux greenery bundle you zip-tie into place
- Best no-dig garden idea: “egg pops” on bamboo skewers in your mulch
- Best windy-day decor: a rail garland that’s secretly held on like it owes you money
- Best last-minute hosting fix: a “guest flow path” with solar stakes and a basket drop zone
- Best kid-friendly setup: towel station + muddy-shoe corral
- Best eco-friendly option: potted bulbs you replant + reusable fabric bows
Your time plan (do this, then this)
30 minutes: door hook + secured wreath + lantern “egg glow”
60 minutes: add weighted planter picks + doormat sandwich
1 afternoon: rail garland + egg pops + guest path lights
If you’re short on time, don’t spread yourself thin. Three strong moments beat nine floppy ones.
Wind / Rain / Sun mini guide (because weather is the real boss)
Best in wind: zip-tied rail garland, weighted planters, lantern with a brick inside
Worst in wind: long ribbon tails, lightweight signs, stacked decor that can topple
Best in rain: faux greenery, sealed wood, plastic eggs, solar stake lights
Worst in rain: paper, untreated fabric bows, untreated wood, anything held only by adhesive
Best in sun: UV-rated faux greenery, sealed items, rotate bright eggs every few days
Worst in sun: cheap ribbon dye, neon plastics that fade fast, anything “hot glued outdoors”
Choose your lane (so “affordable” stays true)
- $0–$10: Use what you have, steal from your craft drawer, lean on zip ties and baskets.
- $10–$25: One new hero item (door hook, planter picks, small sign) plus basics.
- $25–$60: One sturdy, reusable statement (weighted planter, outdoor-safe garland, sealed wood sign).
If you pick one lane and commit, the whole thing looks intentional. If you mix everything at once… it can get “yard sale bunny,” fast.
Supplies Quick Checklist (I keep these in a sad plastic bin)
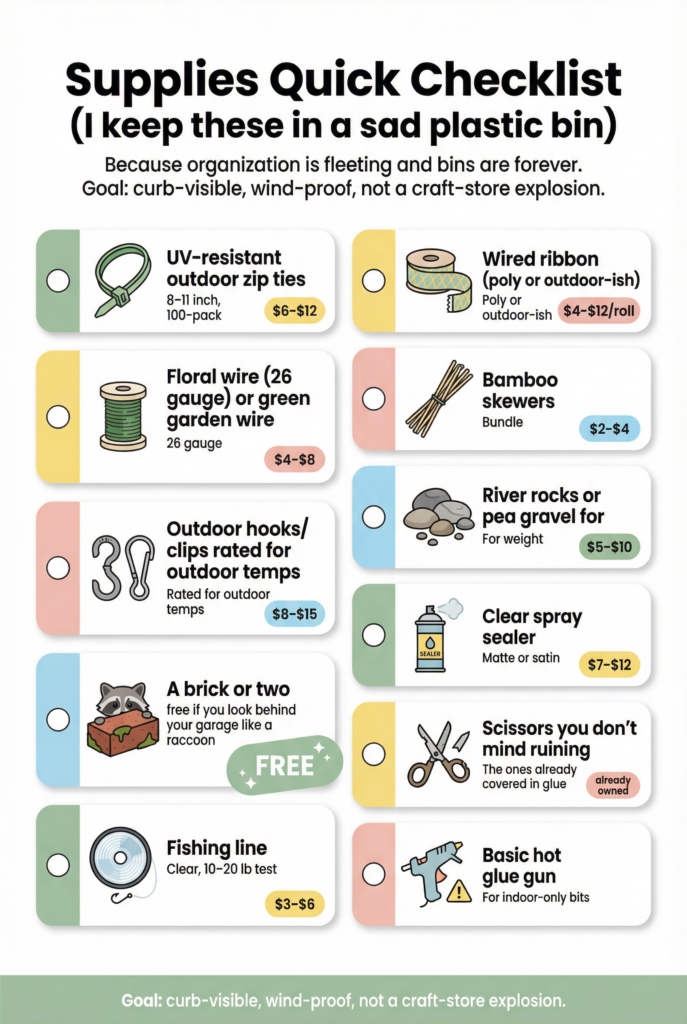
- UV-resistant outdoor zip ties (8–11 inch, 100-pack usually $6–$12)
- Floral wire (26 gauge) or green garden wire ($4–$8)
- Outdoor hooks/clips rated for outdoor temps ($8–$15)
- A brick or two (free if you look behind your garage like a raccoon)
- Fishing line (clear, 10–20 lb test, $3–$6)
- Wired ribbon (poly or outdoor-ish, $4–$12 a roll)
- Bamboo skewers ($2–$4)
- River rocks or pea gravel for weight ($5–$10)
- Clear spray sealer, matte or satin ($7–$12)
- Scissors you don’t mind ruining
- A basic hot glue gun for indoor-only bits
Before You Decorate (rules that prevent 90% of outdoor fails)
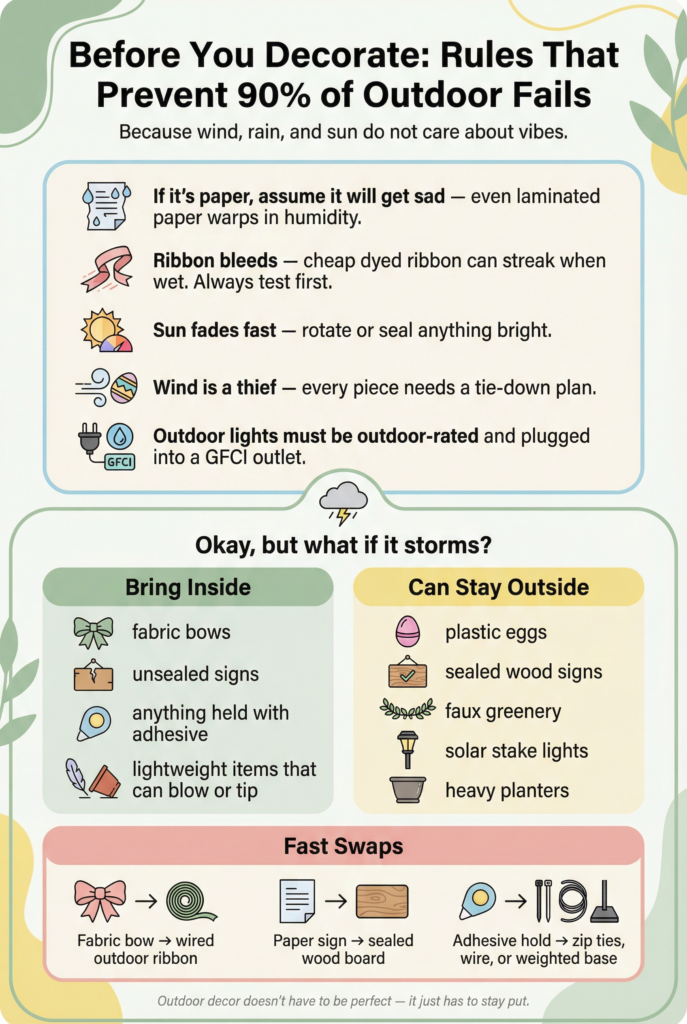
- If it’s paper, assume it will get sad. Even “laminated” paper gets weird in humidity.
- Ribbon bleeds. Cheap dyed stuff can streak when wet. Test first.
- Sun fades fast. Rotate or seal anything bright.
- Wind is a thief. Every piece needs a tie-down plan.
- Outdoor lights must be outdoor-rated and plugged into a GFCI outlet.
Now the “okay but what if it storms” part, because we live in reality:
- Bring inside: fabric bows, signs that aren’t sealed, anything held with adhesive, anything lightweight that can blow or tip.
- Can stay out: plastic eggs, sealed wood, faux greenery, solar stake lights, heavy planters.
- Fast swaps: fabric bow → wired outdoor ribbon, paper sign → sealed wood board, adhesive hold → zip ties/wire/weighted base.
Porch and Patio Seasonal Touches
Your porch is the fastest win because it’s already framed like a little set. Door, mat, planters, maybe a chair. You don’t need more stuff, you need better placement and weight.
I start with one tall thing, one soft thing, and one graphic thing.
Then I walk to the curb and judge it like I’m late for school pickup. If you can see the vibe from the driveway, you’re done. If you can only see it up close, it’s not pulling its weight.
This is also where size matters, quietly but aggressively. An undersized wreath disappears. Tiny picks get eaten by your giant pots.
So I use a couple “rules” and pretend I’m a professional instead of a person who has re-hung the same bow three times at 9:12 p.m. because it “looked mad.”
Sizing + placement rules I actually use:
- Wreath size: standard door = 18–22 inch wreath reads best from the curb.
- Planter pick height: picks should be about 1.5x the pot height (so a 16 inch pot wants 24 inch-ish picks).
- Door hardware: hang decor so the center lands around eye level from the sidewalk, not your face at the door.
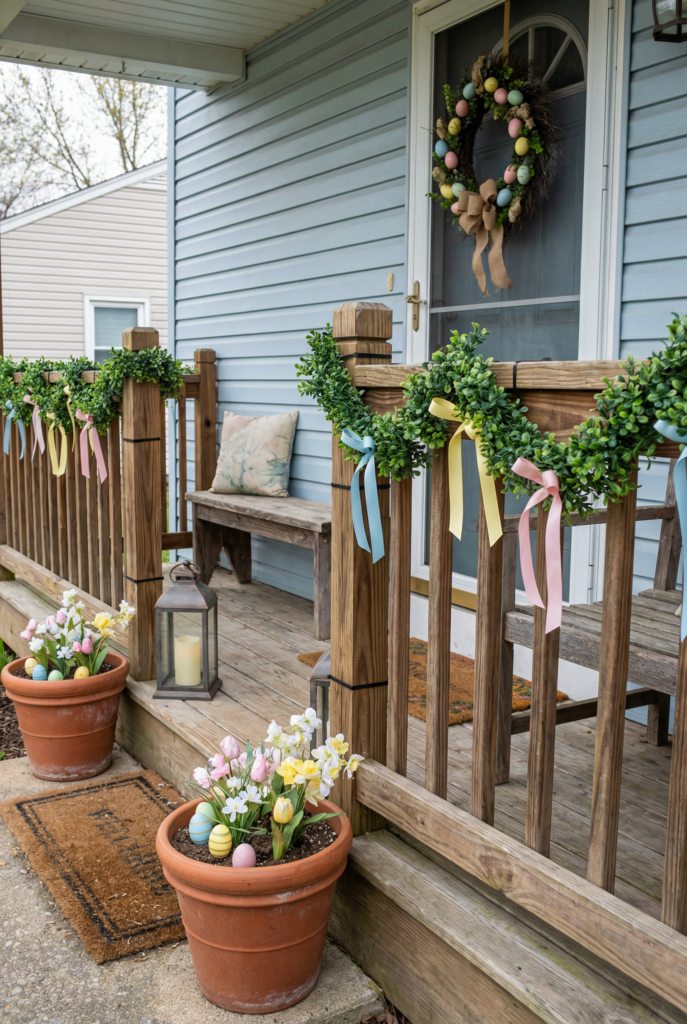
Project 1: The “my door looks cared about” wreath situation
Payoff: Your front door instantly looks springy and intentional.
Cost: $10–$25 (or $0 if you already have a base)
Time: 15–25 minutes
Skill level: Beginner
Weather rating: sun-safe medium, rain-safe medium, wind-safe high
Materials:
- 1 wreath base (grapevine, foam, or wire form), $5–$15
- Faux greenery bundle (1–2 bundles), $5–$20
- 2–4 plastic eggs or one small bunny pick (optional), $1–$6
- Outdoor hook or over-the-door wreath hanger, $6–$15
- 2 UV zip ties or floral wire, $1–$3 worth
Steps:
- Fluff greenery like you’re waking it up.
- Lay it on the base and attach in 2–3 spots with zip ties. Trim tails flush.
- Add one small accent (egg cluster or a tiny bunny pick). Keep it simple.
- Hang it on an outdoor hook or hanger.
- Add a hidden backup: loop fishing line from the wreath frame to the inside door hardware so wind can’t rip it off.
Securing method: Zip ties on the wreath, plus hidden fishing line as backup.
Quick win: If you only do one thing, do the door.
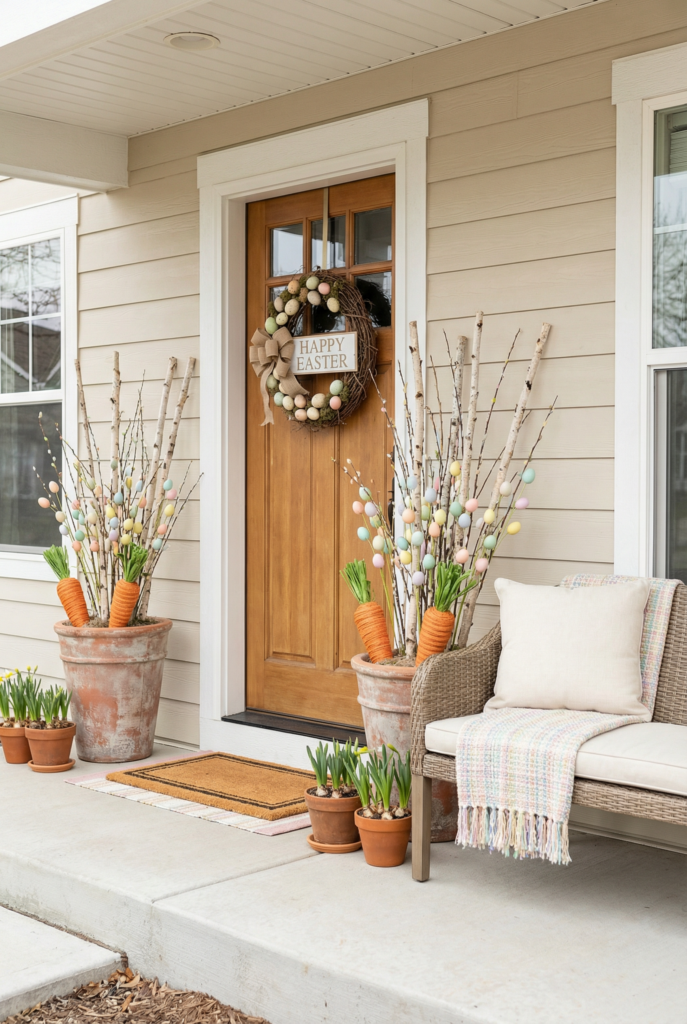
Project 2: Planter picks that look way pricier than they are
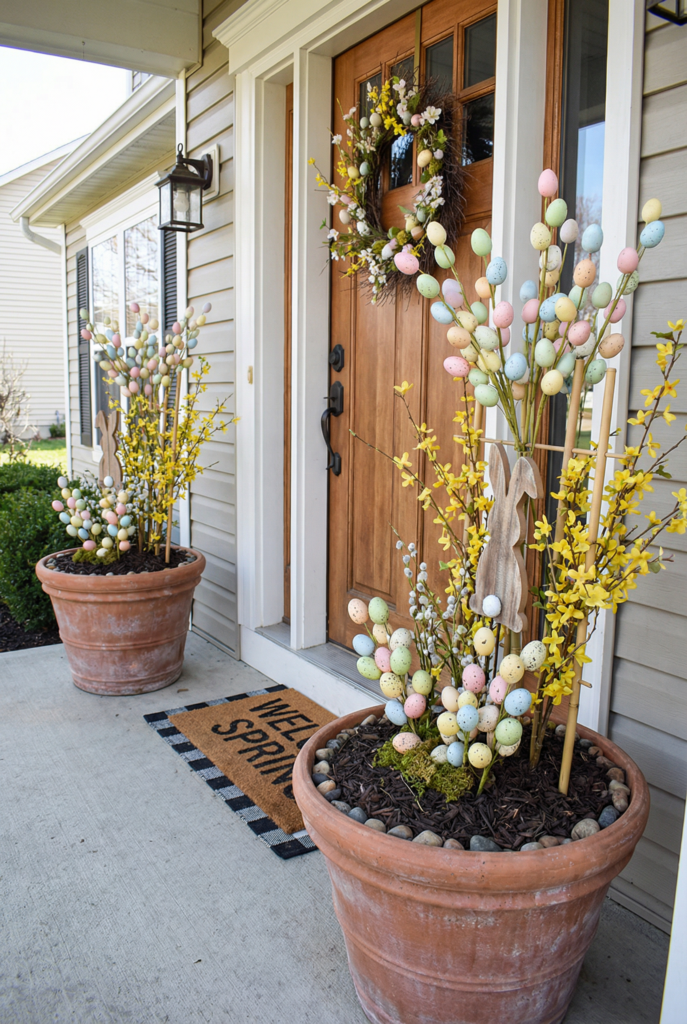
Payoff: Your planters become the star without buying new pots.
Cost: $10–$25
Time: 20–35 minutes
Skill level: Beginner
Weather rating: sun-safe medium, rain-safe medium, wind-safe high
Materials:
- 2–6 faux picks (egg sprays, bunny picks, spring stems), $1–$6 each
- River rocks or pea gravel for weight, $5–$10
- Bamboo skewers or thin stakes, $2–$4
- Floral wire (optional but helpful), $4–$8
Steps:
- Add weight to the bottom of the planter if it’s light.
- Stick taller picks in the back, shorter in front.
- Push bamboo skewers deep, then wire-tie pick stems to skewers so wind can’t yank them out.
- Angle picks slightly toward the street so they read from the curb.
- Step back and remove one thing. Always remove one thing.
Securing method: Wire stems to hidden skewers.
Quick win: Weight the pot first. Everything else is easier after that.
Project 3: Lantern “egg glow”
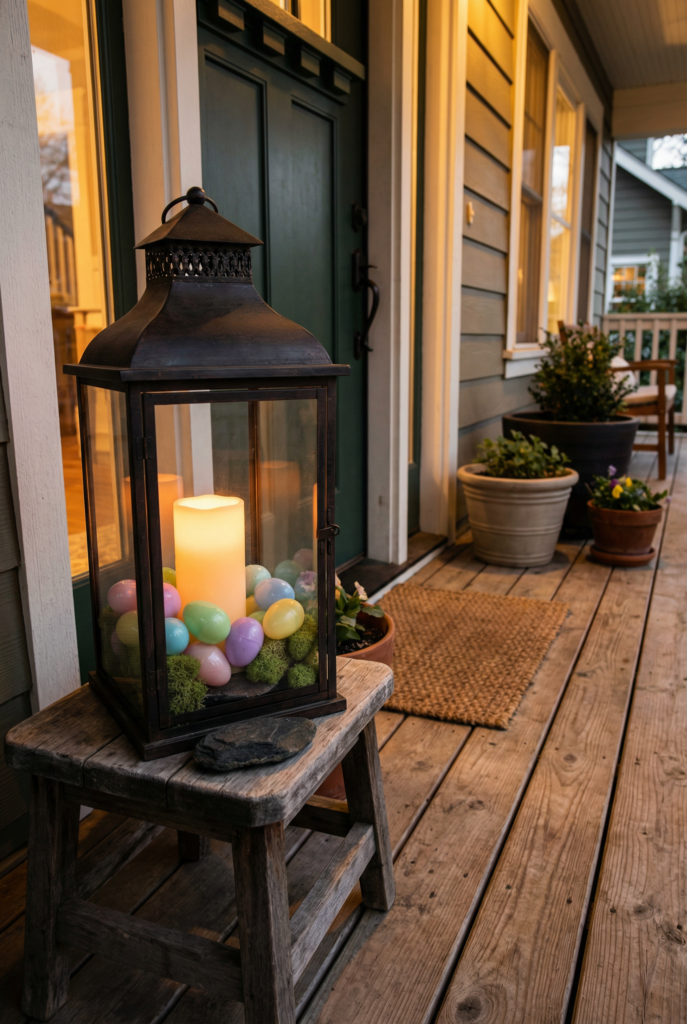
Payoff: Your porch looks intentional after dark with almost no effort.
Cost: $0–$10 (or $10–$25 if you need the LED candle)
Time: 10–15 minutes
Skill level: Beginner
Weather rating: sun-safe high, rain-safe medium (best under cover), wind-safe high
Materials:
- 1 lantern (thrifted or already owned), $0–$20
- LED pillar candle, $6–$12
- Plastic eggs or faux moss, $1–$6
- 1 brick or flat rock, free to $3
Steps:
- Put the LED candle in first. That’s the “center.”
- Add 6–10 plastic eggs around it (or one small cluster).
- If eggs rattle, tuck filler underneath.
- Put a brick inside the lantern base to stop tipping.
- Place it on the ground by the door or on a sturdy stool.
Securing method: Brick inside the lantern base.
Quick win: This makes guests feel welcomed before the door even opens.
Project 4: The doormat sandwich
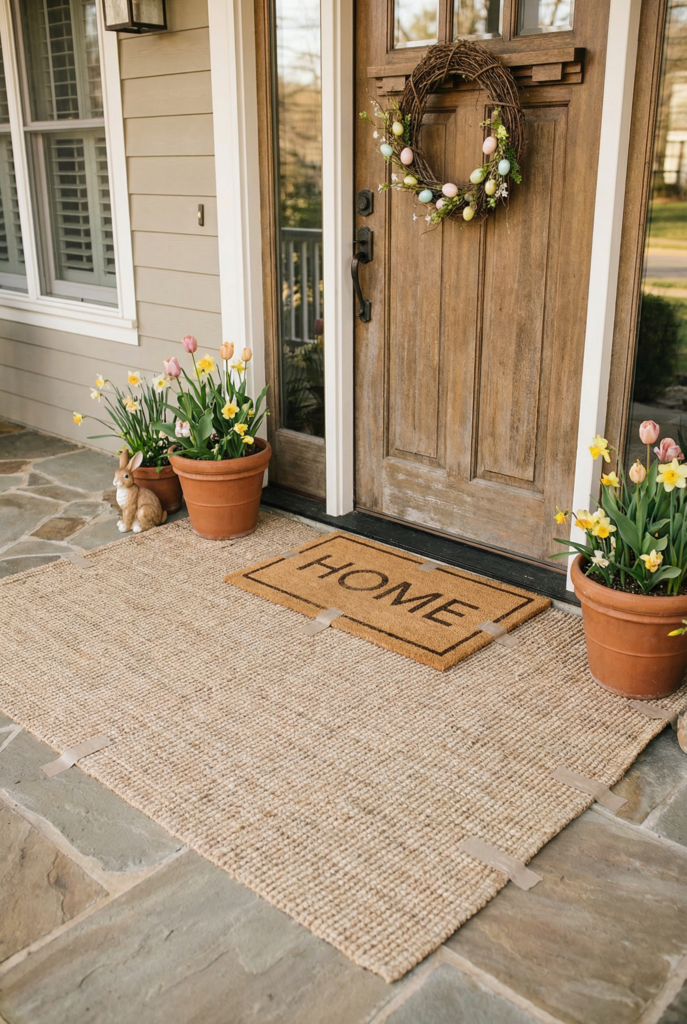
Payoff: Your porch looks styled with almost zero crafting.
Cost: $10–$25
Time: 5–10 minutes
Skill level: Beginner
Weather rating: sun-safe high, rain-safe medium, wind-safe high
Materials:
- 1 plain outdoor rug (2×3 or 3×5), $10–$20
- 1 coir doormat (existing or new), $8–$18
- Rug grippers or outdoor rug tape, $6–$10
Steps:
- Lay the bigger rug down first.
- Put the doormat on top and scoot it slightly toward the door.
- Add grippers so it doesn’t creep.
- If it’s windy, tuck rug corners under planter edges.
Securing method: Rug grippers + “pinned” corners under planters.
Quick win: Layering hides stains and makes everything feel planned.
Project 5: The eco-friendly porch moment (real plants + reusable bows)
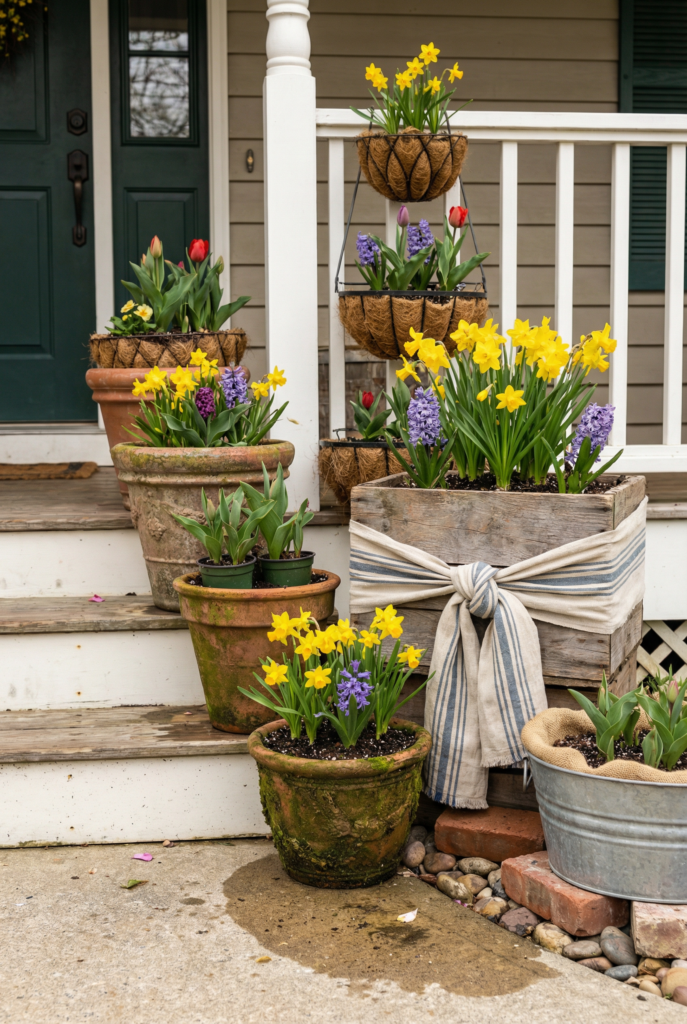
Payoff: You get spring joy now and plants you can keep later.
Cost: $25–$60
Time: 30–45 minutes
Skill level: Beginner
Weather rating: sun-safe high, rain-safe high, wind-safe high
Materials:
- 2–3 small pots of bulbs (daffodils, hyacinth, tulips), $6–$12 each
- 2 heavier planters or baskets with liners, $0–$25 each
- Fabric bows (linen/cotton) or thrifted scarves, $0–$15
- Brick or rocks for weight, free to $10
Steps:
- Drop nursery pots into heavier planters (fast) or repot into soil (prettier).
- Water lightly and wipe drips so nothing stains.
- Tie fabric bows tight (double knot, not floppy).
- Add a brick under the liner if the basket is light.
- After the holiday, plant bulbs in your yard or a bigger pot.
Securing method: Brick under the liner, plus tight knots that won’t loosen in wind.
Quick win: Living plants make everything else look more expensive.
Low-cost Garden Accents
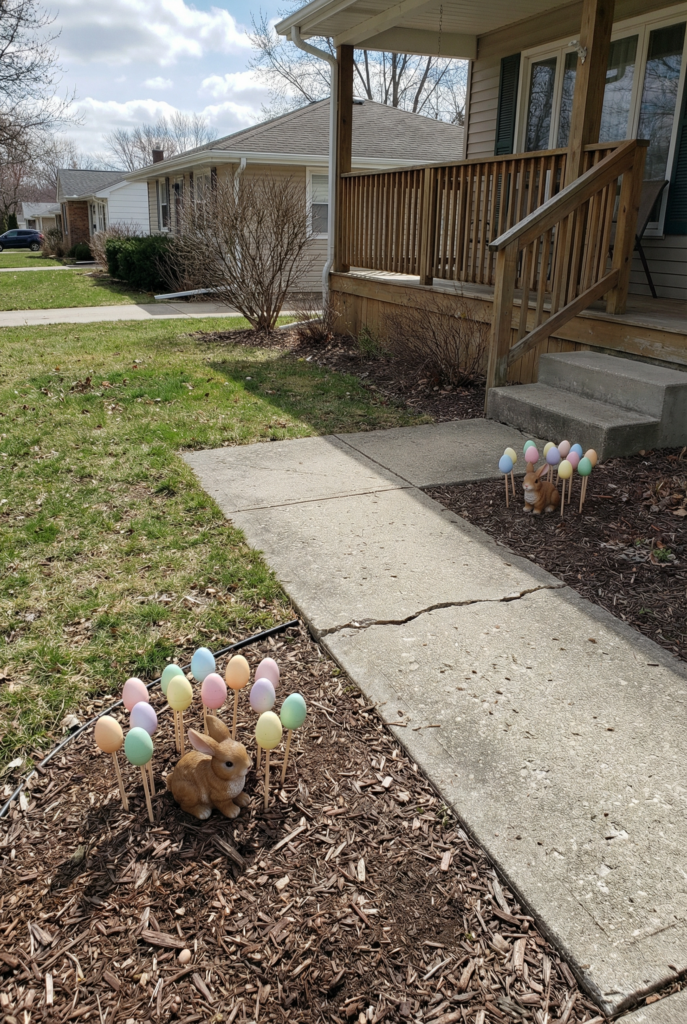
Outside, think clusters and lines. One bunny alone looks lost. A group near the walkway looks intentional.
The trick is scale and spacing. Too spread out looks random. Too tight looks like a display rack.
I like one “moment” near the walkway, one near the steps, and then I stop before I accidentally become the person with 47 stakes and a giant inflatable.
And if you want it to read from the street, your accents need to sit where the eye naturally goes: along the path, at the base of steps, near a porch post.
Not in the middle of the yard where no one stands. Also, outdoor stuff should be low and stable. If it’s tall and light, it becomes a sail. If it’s short and weighted, it becomes “charming.”
This is not deep philosophy, it’s physics.
Sizing + placement rules I use:
- Egg pops spacing: cluster 7–11 eggs per bed, keep them 4–6 inches apart.
- Walkway placement: keep accents 12–18 inches off the edge so they don’t get kicked or run over.
Project 6: No-dig egg pops
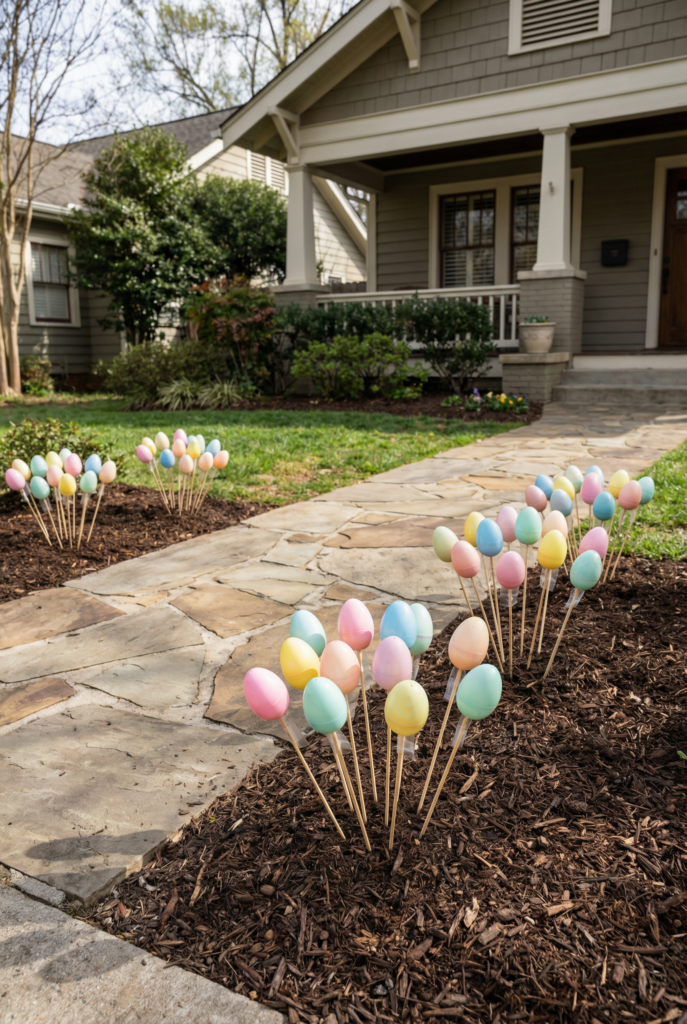
Payoff: Instant color in the yard with almost no effort.
Cost: $0–$10
Time: 15–25 minutes
Skill level: Beginner
Weather rating: sun-safe medium, rain-safe high, wind-safe high
Materials:
- Plastic eggs, $1–$6
- Bamboo skewers or thin garden stakes, $2–$4
- Clear outdoor tape (or strong clear tape), $3–$6
- Optional clear spray sealer, $7–$12
Steps:
- Close eggs and tape the seam if they pop open easily.
- Tape a skewer to the back of each egg (two tape wraps minimum).
- Push skewers deep into mulch, angled slightly forward.
- Cluster 7–11 eggs, spaced 4–6 inches apart.
- Rotate bright colors every few days in full sun to reduce uneven fading.
Securing method: Deep skewer placement + seam tape.
Quick win: Do one bed near the walkway and call it done.
Related posts: How to Decorate Easter Eggs 18 Ideas (Without Losing Your Mind or Your Kitchen)
Project 7: Carrot patch basket that doesn’t tip
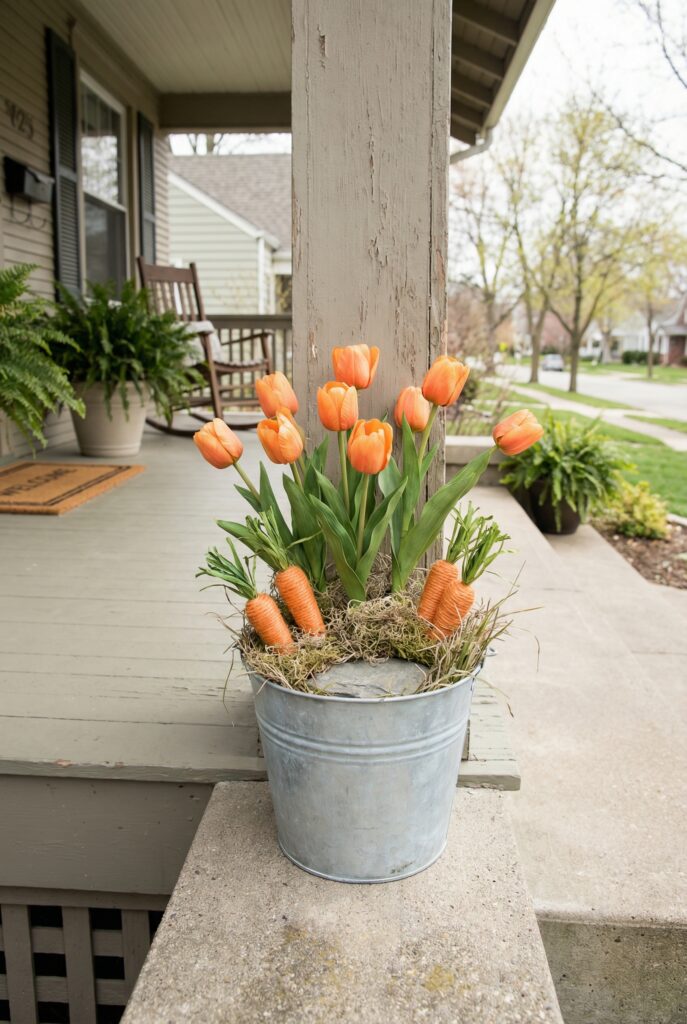
Payoff: Whimsy by the steps, but stable enough to survive real wind.
Cost: $10–$25
Time: 25–40 minutes
Skill level: Beginner
Weather rating: sun-safe medium, rain-safe medium, wind-safe high
Materials:
- Basket or galvanized bucket, $5–$30
- Brick or flat rock, free to $3
- Faux carrots or orange tulips, $4–$15
- Moss or filler grass, $3–$8
Steps:
- Put the brick in the bottom first. Always first.
- Cover brick with filler so it looks cute, not like construction.
- Add carrots or tulips, taller in back.
- Place at the base of steps or by a porch post (not in traffic).
- If you have critters, skip real carrots. They will treat it like a buffet.
Securing method: Brick-in-basket, disguised with filler.
Quick win: Hidden weight makes it look expensive because it stays upright.
Project 8: Garden flag that stops the dreaded spinning
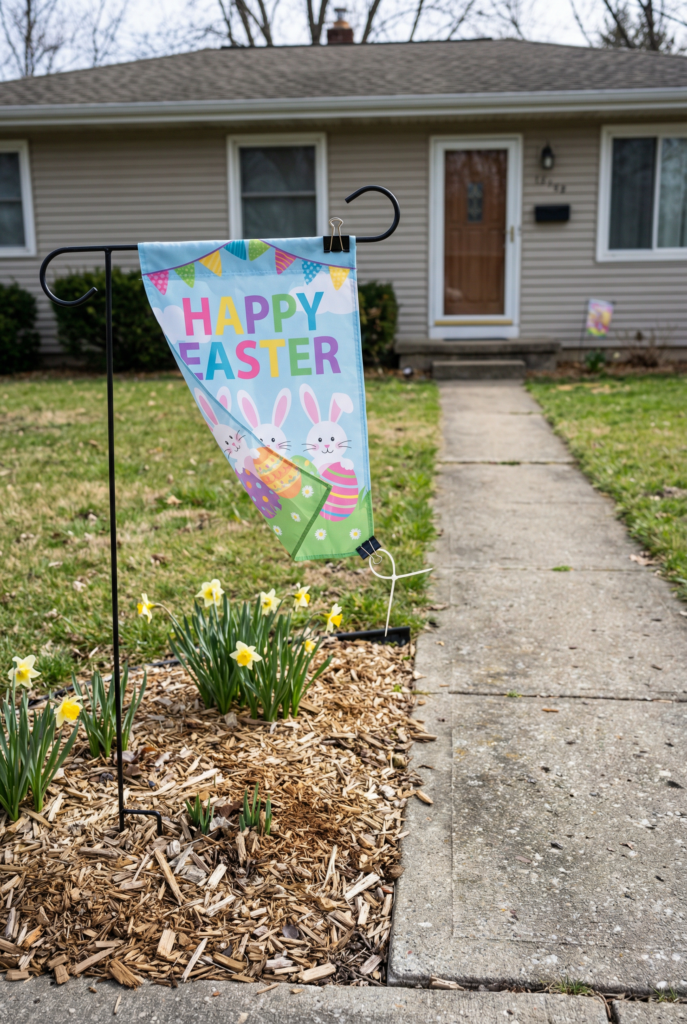
Payoff: Your flag faces the street instead of flapping sideways like it’s avoiding eye contact.
Cost: $10–$25
Time: 10–20 minutes
Skill level: Beginner
Weather rating: sun-safe medium, rain-safe medium, wind-safe high
Materials:
- Flag + stake set, $10–$20
- 2 zip ties, $0.25 worth
- 1 binder clip or mini carabiner, $1–$4
Steps:
- Hang the flag normally.
- Clip the bottom corner of the flag to the stake.
- Add a zip tie loop loosely above the clip as a stopper so it can’t slide.
- Adjust tension so it holds without ripping.
- Replace the clip if it rusts. Outdoor life is a little rude.
Securing method: Binder clip + zip tie stopper.
Quick win: One flag is enough. Don’t turn your yard into a showroom.
Weather-Friendly Outdoor Easter decor (wind, rain, sun)
This is where I stop pretending outdoor decor is “just styling.” It’s endurance.
Wind wants to throw everything off your porch. Rain wants to dye-streak your steps. Sun wants to bleach your cute colors into sadness.
So I pick materials that can handle it, and I secure everything with an obvious method plus a backup. If something is held only by adhesive, I assume it will fail the second I’m inside making deviled eggs.
I also trim ribbon tails and avoid anything that needs to be perfect.
Outside is allowed to look a little lived-in. It’s fine. It’s charming. It’s real.
And if you live somewhere windy, your “decor style” becomes “what stays put,” which is not depressing, it’s just practical.
Sizing + placement rules I actually use:
- Railing garland ties: zip ties every 8–12 inches, and corners get 2 ties.
- Ribbon tails outside: keep tails under 6 inches if it’s exposed to wind.
Related: 29 Egg-cellent Easter Decor Ideas to Brighten Your Space!
Project 9: Wind-proof rail garland that doesn’t flap itself to death
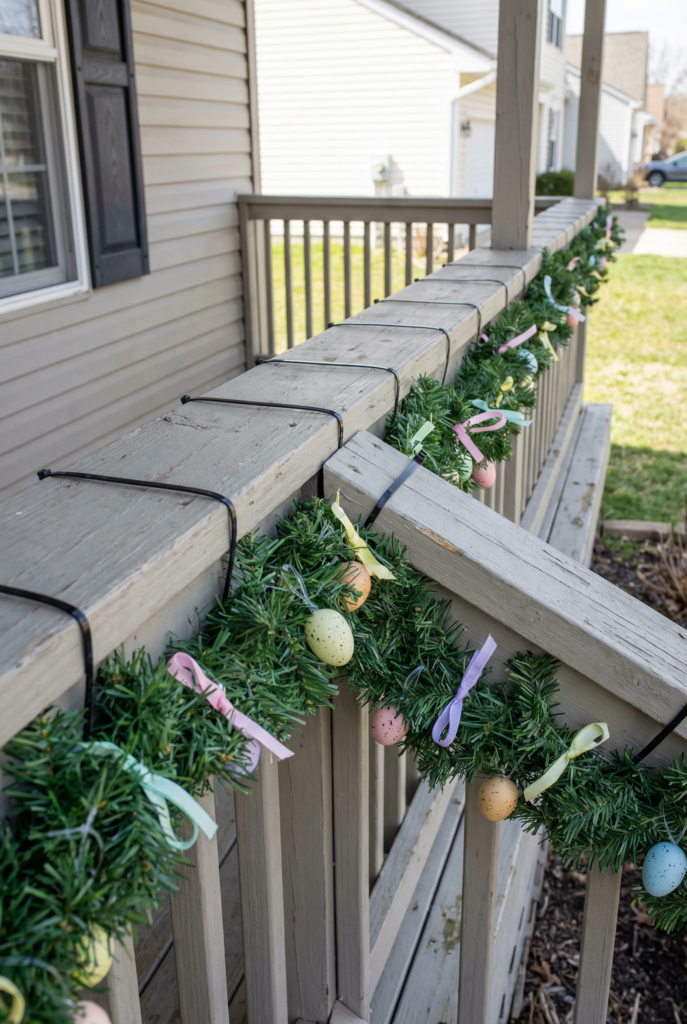
Payoff: Your porch railing looks festive and stays put.
Cost: $10–$25
Time: 25–45 minutes
Skill level: Beginner
Weather rating: sun-safe medium, rain-safe medium, wind-safe very high
Materials:
- Faux greenery garland (4–6 ft), $10–$25
- Wired ribbon (1 roll), $4–$12
- 10–14 UV zip ties, $1–$3 worth
- Fishing line (optional for accents), $3–$6
Steps:
- Drape garland and find the center.
- Zip tie at the center first.
- Work outward with zip ties every 8–12 inches.
- Add ribbon in short tied segments (no long tails).
- If adding eggs or small accents, tie them on with fishing line in two spots each.
Securing method: Zip ties every 8–12 inches (corners get 2 ties), plus fishing line for accents.
Quick win: Short ribbon tails look more expensive and survive wind.
Related: How to Decorate an Easter Table: Step-by-Step Guide That Feels Expensive on a Budget
Project 10: Rain-safe painted wood sign (no soggy cardboard)
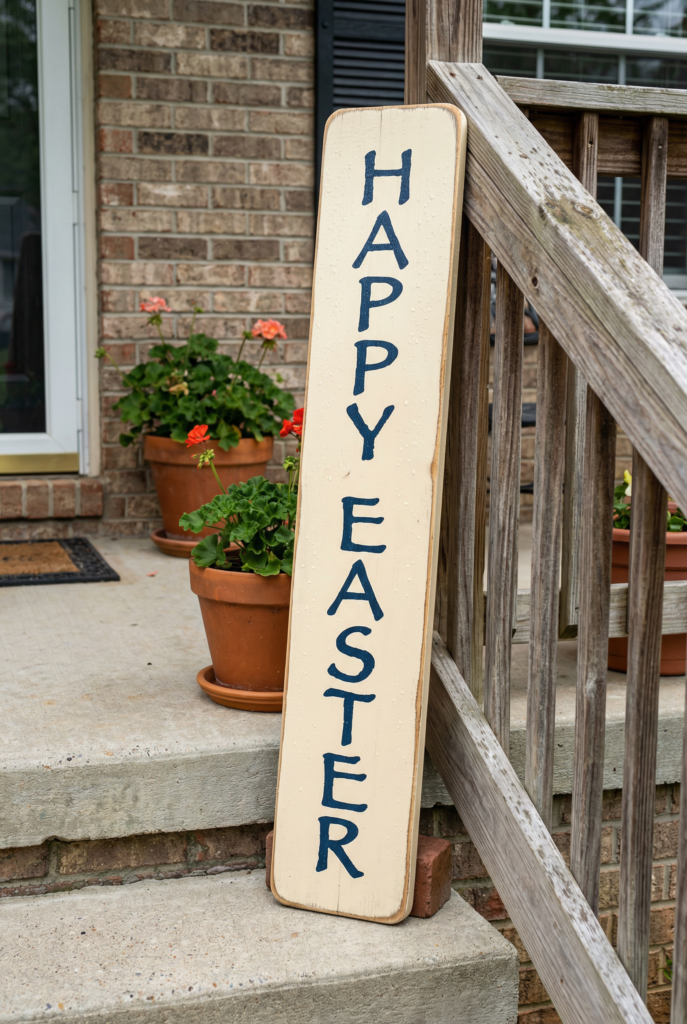
Payoff: A sign that looks cute all season and doesn’t warp in a week.
Cost: $10–$25
Time: 45–90 minutes (includes dry time)
Skill level: Beginner
Weather rating: sun-safe high (sealed), rain-safe high, wind-safe high
Materials:
- Pine board (1×8 or 1×10, 24–36 inches), $6–$15
- Exterior paint or sample paint, $5–$10
- Brush or foam roller, $2–$8
- Clear outdoor spray sealer, $7–$12
- Outdoor hook or thick twine, $6–$15
Steps:
- Lightly sand to smooth rough spots.
- Paint background (cream is forgiving). Let dry fully.
- Add letters with a stencil or freehand (imperfect is fine).
- Seal with 2–3 light coats outside, letting it dry between coats.
- Hang with an outdoor hook, or lean it with a brick behind it so it can’t slide.
Securing method: Outdoor hook, or lean-and-brick so it can’t slide or tip.
Quick win: Sealing is the difference between “DIY” and “why is it bubbling.”
Project 11: Sun-safe egg topiary that won’t fade in three days
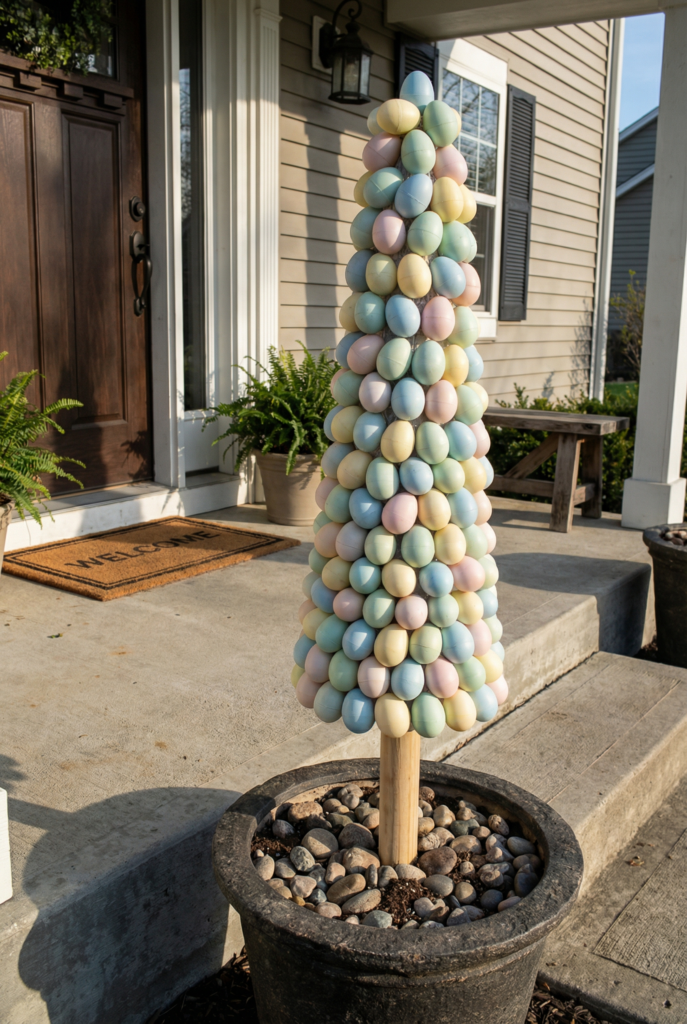
Payoff: One big statement piece that looks store-bought.
Cost: $25–$60
Time: 45–75 minutes
Skill level: Intermediate (mostly patience)
Weather rating: sun-safe medium-high, rain-safe high, wind-safe high
Materials:
- Foam cone or ball, $8–$18
- Wooden dowel (optional but helpful), $2–$6
- 20–40 plastic eggs (small), $3–$12
- Strong clear outdoor tape or exterior-safe adhesive, $5–$12
- Heavy planter + rocks for weight, $10–$35
Steps:
- Weight the planter with rocks first.
- Insert dowel through foam and into the planter base for stability.
- Attach eggs in a spiral starting at the bottom.
- Keep seams facing down so it looks cleaner.
- Seal lightly if it sits in full sun and you want color to last longer.
Securing method: Weighted planter + dowel through foam into the base.
Quick win: One anchored hero beats five loose pieces.
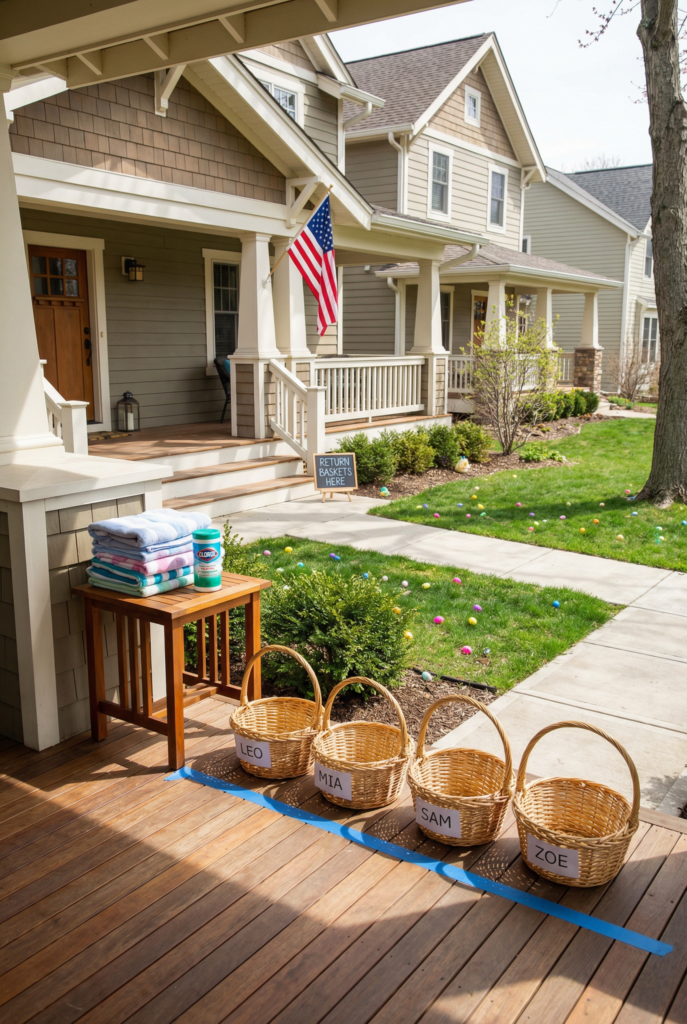
Quick Upgrades for Gatherings (guest flow + egg hunt layout)
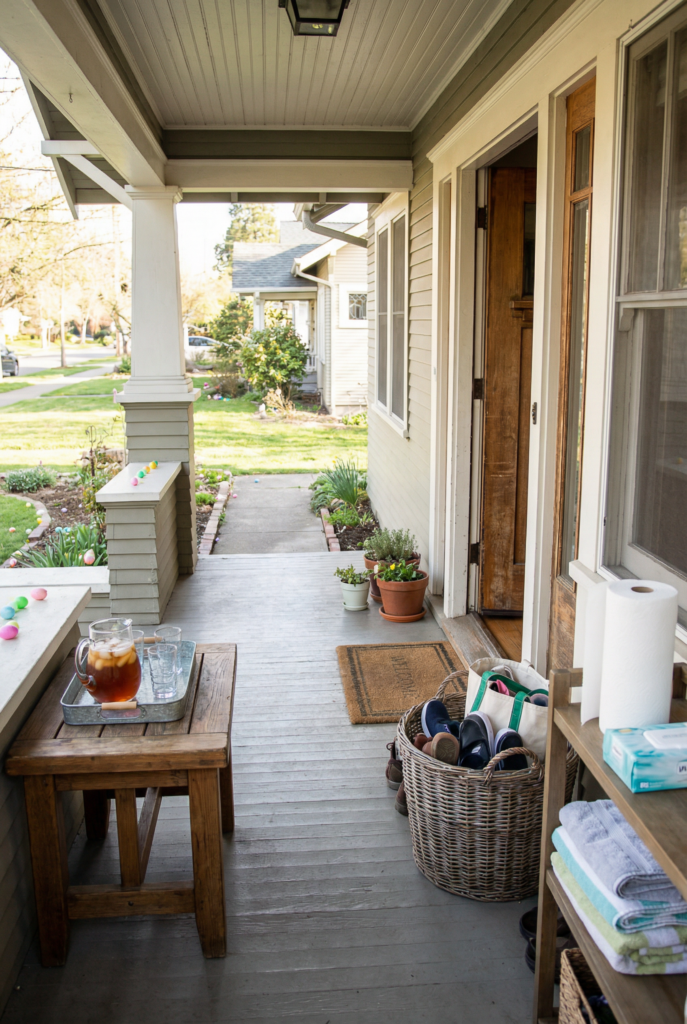
When people are coming over, the goal isn’t perfection. It’s flow. Where do they put shoes. Where do they put drinks. Where do kids run.
If you solve those three, your house feels calmer, and the decor looks better because no one is tripping over it.
I keep party-day decor low, stable, and out of the swing-zone of the front door. Nothing tall right where people cluster. Nothing fragile on steps where a toddler will sit like it’s a bleacher.
And I always build in one “real life” station: wipes, towels, a basket for bags, somewhere for muddy shoes. It’s not glamorous, but it makes the whole day feel smoother.
Also, I’m not above using a laundry basket as a “staging area” and calling it a system. It works.
Project 12: Five-minute guest path that makes everything feel hosted

Payoff: Guests know where to go and it looks intentional without extra clutter.
Cost: $0–$10 (or $10–$25 if you buy solar lights)
Time: 10–20 minutes
Skill level: Beginner
Weather rating: sun-safe high, rain-safe high, wind-safe high
Materials:
- 4–8 solar stake lights, $12–$25 (or stakes you already have)
- 1 basket or tub for a drop zone, $0–$15
- Optional chalk for pavers, $1–$3
Steps:
- Place stake lights along the natural path, not perfectly symmetrical.
- Push stakes deep and angle slightly inward so they don’t lean.
- Put a basket by the door for bags, eggs, and general chaos.
- Keep the door area clear so people can actually open it.
- Turn lights on before guests arrive so you don’t forget later.
Securing method: Stakes pushed deep + angled inward so they stay upright.
Quick win: A drop zone basket saves your entry from becoming a pile.
Project 13: Egg hunt setup that doesn’t turn into adult chaos
Payoff: Kids have fun, adults aren’t yelling “stay in the yard” every 30 seconds.
Cost: $0–$10
Time: 15–30 minutes
Skill level: Beginner
Weather rating: sun-safe high, rain-safe medium, wind-safe high
Materials:
- Plastic eggs (filled), $3–$12
- 2–4 baskets or totes, $0–$20
- Painter’s tape for a start line, $4–$7
- Towels + wet wipes, $0–$6
Steps:
- Create a start line on the porch with painter’s tape.
- Assign a basket per kid (marker label if needed).
- Hide eggs in zones: easy near the porch, harder farther out.
- Put towels and wipes by the door because grass is never “dry” the way you hope.
- After, do a “return baskets here” station so eggs don’t migrate into bedrooms forever.
Securing method: Weight baskets with a few filled eggs at the bottom so wind doesn’t flip them.
Quick win: Towels at the door prevent the post-hunt mud parade.
A Quick Eco-friendly Reuse Block (because I hate buying trash)
If you want your decor to feel less disposable without getting preachy, here’s what I actually re-use year after year: potted bulbs that get replanted, fabric bows that store flat in a drawer, and sturdy plastic eggs that come out for hunts and then go right back into the bin.
I skip glitter outside (it becomes “sparkle litter”) and I avoid cheap felt shapes that shred in wind like a tiny craft tragedy.
If I’m spending money, I’d rather spend it on one reusable base (a good hook, a heavy planter, a lantern) than five flimsy things that end up in the gutter.
Shopping list by store (so you don’t overpay)
Dollar store:
Plastic eggs, baskets, basic ribbon (use inside or short tails outside), garden stakes, small bunny picks, filler grass.
Hardware store:
UV zip ties, outdoor-rated hooks/clips, floral wire, clear spray sealer, gravel/rocks, exterior paint samples, fishing line.
Thrift store:
Lanterns, baskets, heavier planters, trays, small stools, frames/boards you can turn into a sign.
(And yes, I have absolutely bought a lantern for $6 and then carried it like a trophy.)
FAQ
How to decorate your front porch for Easter?
Start with one anchor and add two smaller touches. Secure everything like it’s windy. Door decor plus one weighted planter is enough to look “done.”
What Easter themed decor is trending now?
Quiet spring neutrals mixed with small pops of color. Calm bases like warm cream and sage, then one or two playful accents so it still feels festive.
What are the four colors of Easter?
Quiet spring neutrals mixed with small pops of color. Calm bases like warm cream and sage, then one or two playful accents so it still feels festive.
What are some outdoor Easter decoration ideas?
Door decor, weighted planters, secured railing garlands, lantern glow, egg pops in mulch beds, and a simple guest path with solar stakes.
What are some cheap Easter decor ideas?
Layered mats, lantern filler, egg pops, and using weight and zip ties instead of buying more stuff. Cheap decor that stays put looks better than expensive decor that blows away.
What is the popular color for Easter?
White and soft yellow feel fresh and classic, and they play well with greenery and natural textures.
What are the trending colors for Easter in 2026?
Creamy whites, sage greens, and earthy clay tones are everywhere right now, with optional brighter accents if you want more punch. If you still want it to feel “Easter,” use the trendier shades as accents rather than the whole base.
If you do nothing else, pick a lane, anchor the big stuff, and give every decorative thing a backup plan. Outdoor decorating isn’t about being precious. It’s about being cute and slightly tactical. And if you’re still ignoring a questionable porch light, I see you.