Valentine’s Day is the perfect occasion to whip up some delightful pastry hearts. I’ll guide you through making these charming desserts that are as delicious as they are beautiful. With their flaky layers and sweet fillings, these pastry hearts are sure to impress your loved ones and add a touch of romance to your celebration.

Valentine’s Day is the perfect time to show your loved ones how much you care, and what better way to do that than with delicious, heart-shaped treats?
These Pastry Hearts with Skewers are filled with creamy Nutella and decorated with powdered sugar and festive decorations.
They’re easy to make and absolutely delightful!
Ingredients
- 2 sheets of puff pastry (frozen, then thawed)
- 1/2 cup Nutella (or your favorite filling)
- Powdered sugar (for dusting)
- Festive decorations (optional, like sprinkles or little hearts or edible glitter)
Tools
- Wooden skewers
- Baking sheet
- Parchment paper
- Rolling pin
- Pastry brush (optional)
Instructions
Preheat the Oven
The first step in creating these delightful treats is to preheat your oven to 400°F (200°C).
This temperature is perfect for achieving a golden brown and puffed pastry.
While the oven is heating up, line a baking sheet with parchment paper.
This will prevent the pastry hearts from sticking to the tray and ensure they bake evenly.
Prepare the Puff Pastry
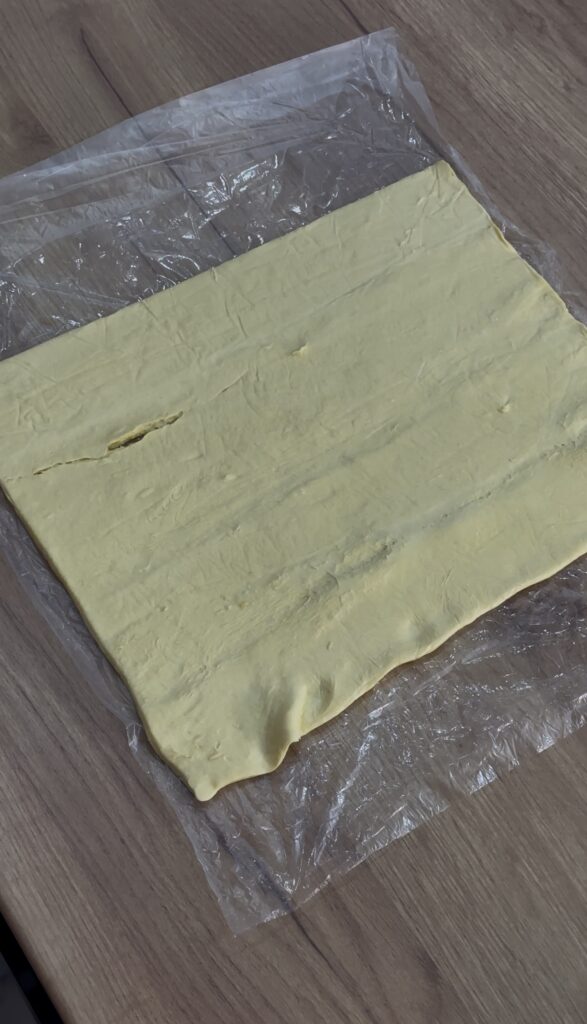
Next, on a lightly floured surface (if needed), roll out the thawed puff pastry sheets.
Rolling out the sheets will help smooth out any creases that might have formed during thawing.
This step is crucial for achieving an even texture in your pastry hearts, which will make them look and taste better.
Spread the Nutella

Once your puff pastry is ready, it’s time to add the filling.
Spread a generous layer of Nutella over one sheet of puff pastry, ensuring an even coating.
The Nutella will serve as the delicious filling for your pastry hearts, adding a rich, chocolaty flavor that pairs perfectly with the flaky puff pastry.
Layer the Puff Pastry
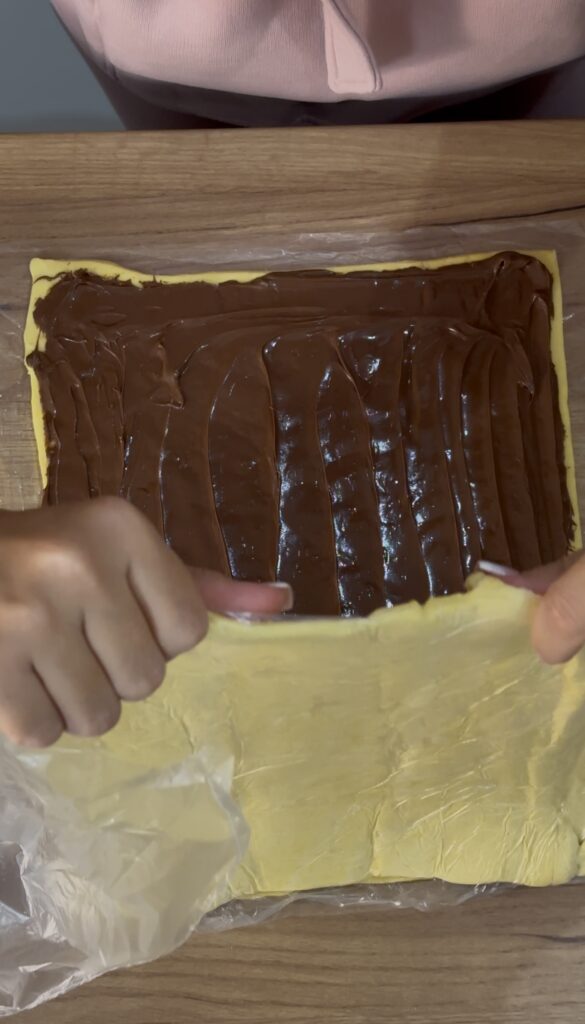
After spreading the Nutella, carefully place the second puff pastry sheet on top of the Nutella-covered sheet.
Press gently to adhere the two sheets together.
This will create a sandwich-like effect, with the Nutella in the middle, ready to be transformed into heart shapes.
Cut into Strips
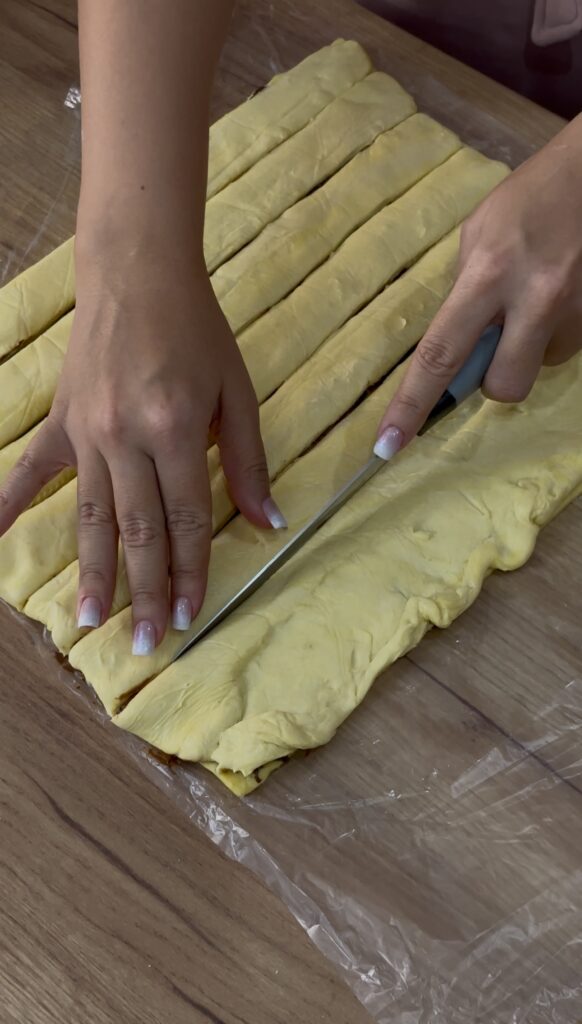
Using a sharp knife or a pizza cutter, cut the layered puff pastry into thin strips, about 1 inch wide.
These strips will be the foundation for your heart shapes.
Cutting the pastry into strips ensures that each heart will have a uniform size and shape.
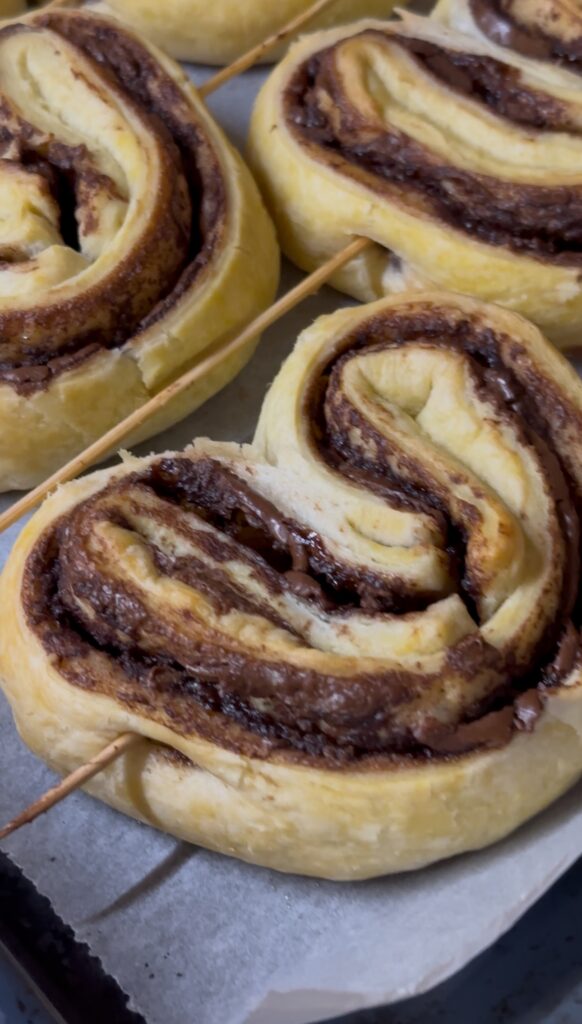
Form the Hearts
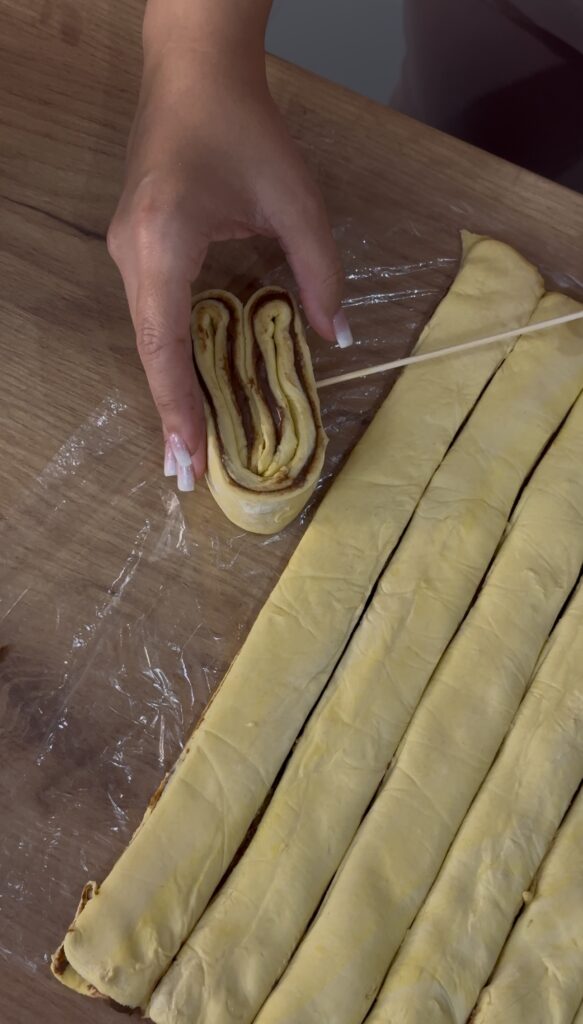
To form the hearts, take each strip and fold it from both ends towards the middle.
This folding technique will create a heart shape, perfect for Valentine’s Day.
Once you have your heart shape, prick each heart in the middle with a wooden skewer to secure the shape.
This step is important to ensure that the hearts maintain their shape during baking.
Arrange on the Baking Sheet
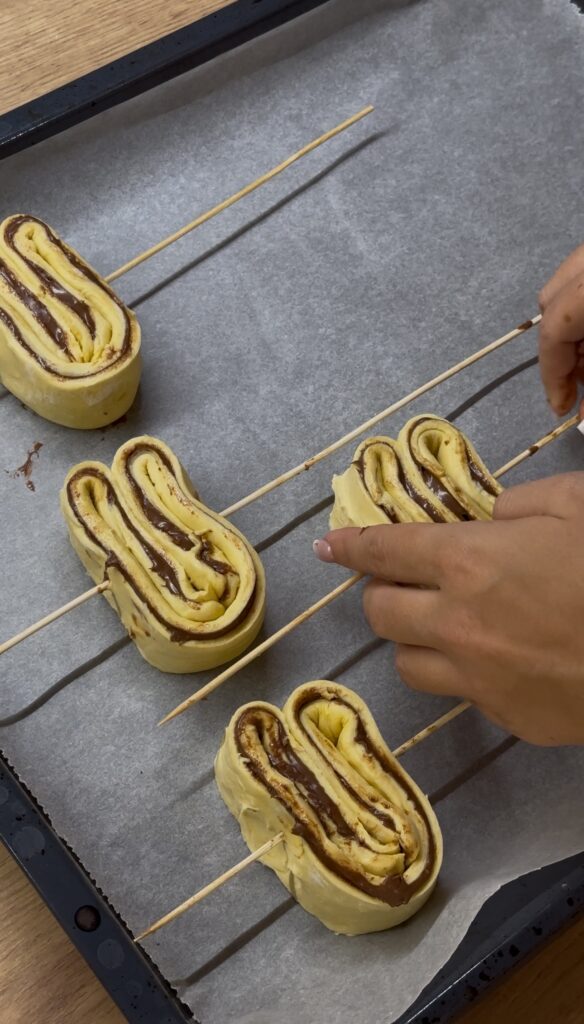
Arrange the hearts on the prepared baking sheet, making sure to leave some space between each heart.
This will allow the pastry to puff up and expand during baking without sticking to each other.
Proper spacing is key to achieving evenly baked hearts.
Bake the Pastry Hearts
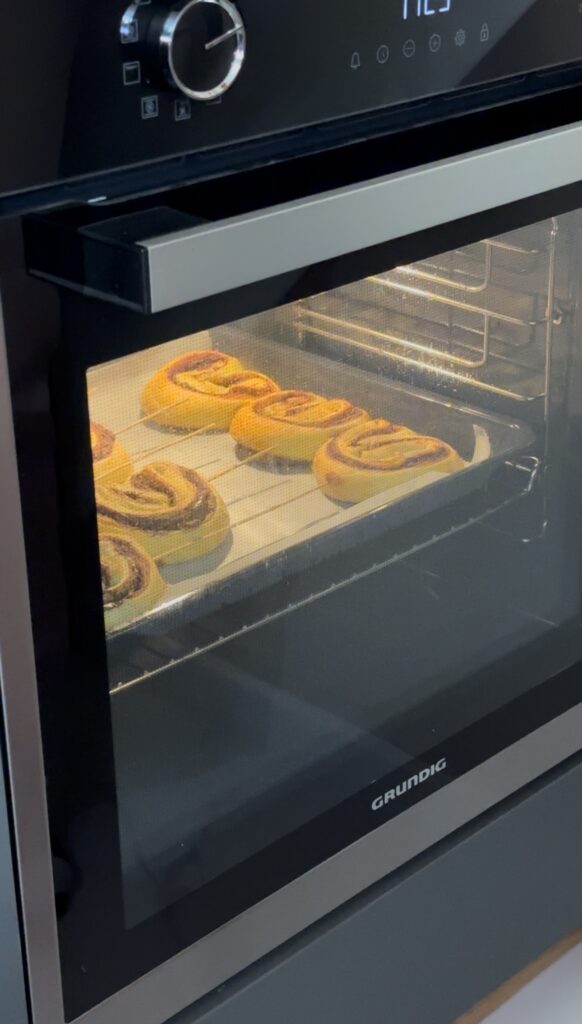
Place the baking sheet in the preheated oven and bake the pastry hearts for 15-20 minutes (depends on the oven).
Keep an eye on them to ensure they don’t over-bake.
The hearts are ready when the pastry is golden brown and puffed.
Baking them to perfection will give you a delightful, flaky texture.
Cool the Pastry Hearts
Once baked, remove the pastry hearts from the oven and let them cool on the baking sheet for a few minutes.
This initial cooling period will allow the pastry to set slightly.
Then, transfer them to a wire rack to cool completely.
Cooling on a wire rack ensures that the pastry remains crisp and doesn’t become soggy.
Decorate the Pastry Hearts
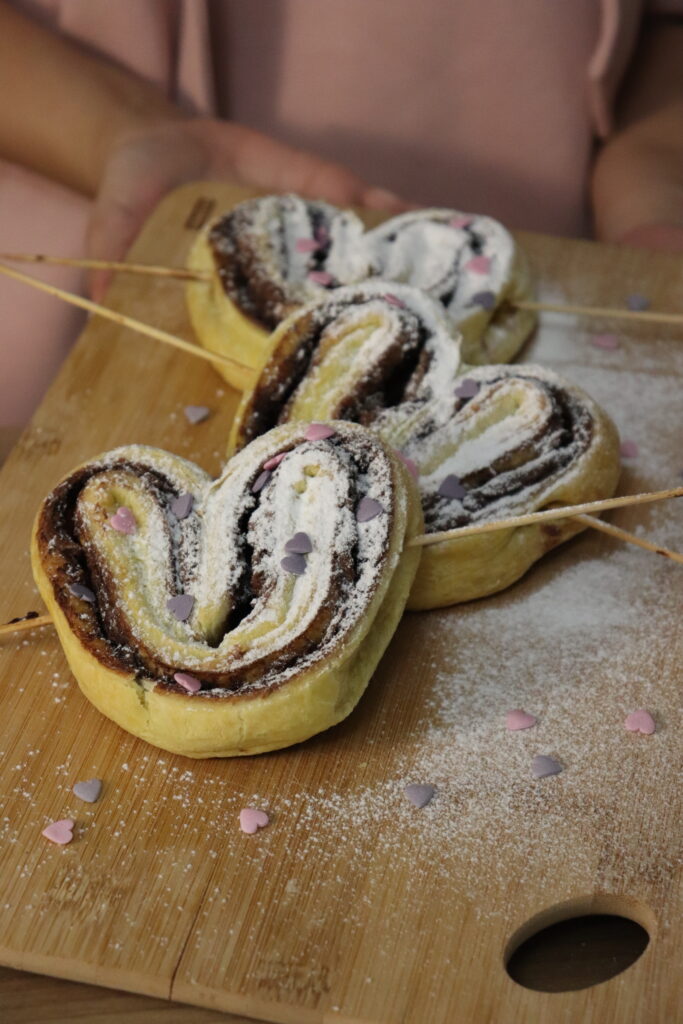
When the pastry hearts are completely cool, it’s time to decorate!
Dust them with powdered sugar for a touch of sweetness and a beautiful, snowy appearance.
If desired, add any additional festive decorations, such as sprinkles or edible glitter, to make your pastry hearts extra special.
Decorating is a fun way to add a personal touch to your treats.
Serve
Finally, serve the Pastry Hearts on skewers as a fun and festive Valentine’s Day treat!
These delightful treats are sure to impress your loved ones and make your Valentine’s Day celebration even more special.
The skewers make them easy to handle and add a playful element to the presentation.
Tips
- Thawing Puff Pastry: Make sure to thaw the puff pastry according to the package instructions. This usually involves letting it sit at room temperature for about 20-30 minutes.
- Sealing the Edges: Ensure the edges are well sealed to prevent the Nutella from leaking out during baking.
- Decorations: Get creative with your decorations! Use red and pink sprinkles, heart-shaped candies, or edible glitter to make your Pastry Hearts extra special.
These Pastry Hearts with Skewers are sure to be a hit on Valentine’s Day!
Enjoy making and sharing these sweet treats with your loved ones. Happy Valentine’s Day!
Print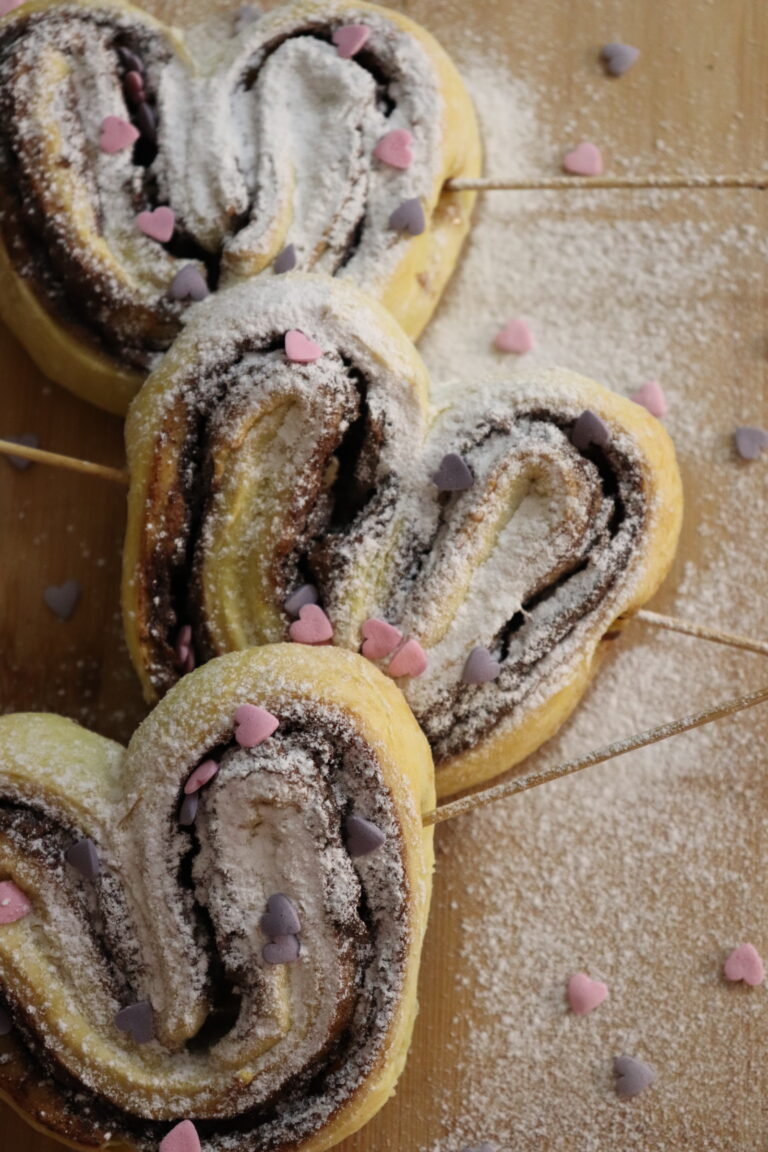
Valentine’s Day Pastry Hearts with Skewers 2025
These Pastry Hearts with Skewers are filled with creamy Nutella and decorated with powdered sugar and festive decorations. They’re easy to make and absolutely delightful, making them the perfect addition to your Valentine’s Day celebration!
- Total Time: 35-40 min
- Yield: 8–10 1x
Ingredients
- 2 sheets of puff pastry (frozen, then thawed)
- 1/2 cup Nutella (or your favorite filling)
- Powdered sugar (for dusting)
- Festive decorations (optional, like sprinkles or edible glitter)
Instructions
- Preheat the Oven: Preheat your oven to 400°F (200°C). Line a baking sheet with parchment paper to prevent sticking and ensure even baking.
- Prepare the Puff Pastry: On a lightly floured surface, roll out the thawed puff pastry sheets to smooth out any creases.
- Spread the Nutella: Spread a generous layer of Nutella over one sheet of puff pastry, ensuring an even coating.
- Layer the Puff Pastry: Place the second puff pastry sheet on top of the Nutella-covered sheet, pressing gently to adhere.
- Cut into Strips: Using a sharp knife or a pizza cutter, cut the layered puff pastry into thin strips, about 1 inch wide.
- Form the Hearts: Fold each strip from both ends towards the middle to form a heart shape. Prick each heart in the middle with a wooden skewer to secure the shape.
- Arrange on the Baking Sheet: Arrange the hearts on the prepared baking sheet, leaving some space between each heart to allow for puffing during baking.
- Bake the Pastry Hearts: Bake the pastry hearts in the preheated oven for 12-15 minutes, or until the pastry is golden brown and puffed.
- Cool the Pastry Hearts: Remove the pastry hearts from the oven and let them cool on the baking sheet for a few minutes. Then transfer them to a wire rack to cool completely.
- Decorate the Pastry Hearts: Once completely cool, dust the pastry hearts with powdered sugar. Add any additional festive decorations, such as sprinkles or edible glitter, if desired.
- Serve: Serve the Pastry Hearts on skewers as a fun and festive Valentine’s Day treat!
Notes
- Thawing Puff Pastry: Thaw the puff pastry according to the package instructions, usually at room temperature for about 20-30 minutes.
- Alternative Fillings: Feel free to use other fillings such as fruit preserves, cream cheese, or peanut butter. Ensure the filling is not too runny.
- Storage: Store the pastry hearts in an airtight container at room temperature for up to a day. For longer storage, freeze them and reheat in the oven before serving.
- Preventing Sogginess: Ensure the pastries are completely cool before storing and use a wire rack for cooling to allow air circulation.
- Decorations: Get creative with your decorations! Use colored sugar, edible glitter, chocolate drizzle, or small candies to make your pastry hearts extra special.
- Prep Time: 20 min
- Cook Time: 15-20 min
- Category: Dessert
- Method: Baking
Frequently Asked Questions
1. Can I use other fillings besides Nutella?
Absolutely! You can use any filling you prefer, such as fruit preserves, cream cheese, or even peanut butter. Just make sure the filling is not too runny to prevent it from leaking out during baking.
2. How far in advance can I make these pastry hearts?
You can make these pastry hearts a day in advance. Store them in an airtight container at room temperature. If you need to store them longer, consider freezing them and reheating in the oven before serving.
3. Can I use homemade puff pastry?
Yes, you can use homemade puff pastry if you prefer. Just make sure it is rolled out to the same thickness as store-bought puff pastry to ensure even baking.
4. How can I prevent the pastries from becoming soggy?
To prevent the pastries from becoming soggy, make sure they are completely cool before storing them. Use a wire rack for cooling to allow air to circulate around the pastries. Also, avoid overfilling with Nutella or other fillings.
5. What other decorations can I use besides powdered sugar?
You can get creative with your decorations! Consider using colored sugar, edible glitter, chocolate drizzle, or even small candies. The goal is to make your pastry hearts look festive and appealing.