As the warm weather rolls in, it’s the perfect time to dive into some fun and creative projects. If you’re looking for inspiration, these summer craft ideas and DIY summer crafts will help you make the most of the season while adding a personal touch to your home.
Summer 2025 is almost here, and it’s the perfect time to get creative!
If you’re looking for fun summer craft ideas to try when the weather heats up, you’ve come to the right place.
These 27 summer crafts offer something for everyone, from beautiful DIY planters to beachy wall art and marbled jewelry dishes.
Whether you’re staying indoors to escape the heat or enjoying the sunshine outdoors, these projects will keep your hands busy and your creativity flowing.
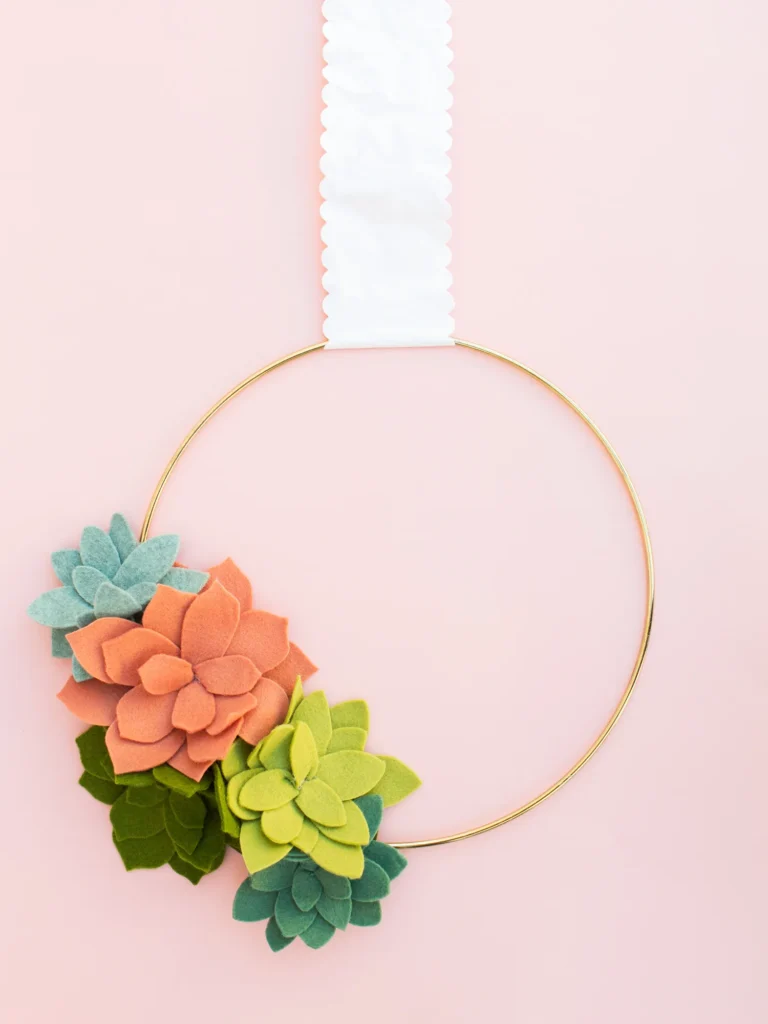
Kids can enjoy making garden suncatchers or playing with homemade sand, while adults might prefer creating floral wreaths or customizing a straw hat with fresh flowers.
Many of these crafts use inexpensive materials you might already have at home. You don’t need to be an expert crafter to make something special this summer.
These projects are simple enough for beginners but still exciting for those with more experience.

27 Summer Craft Ideas
Choosing the Right Materials
When planning your summer crafts, select materials that work well in warm weather.
Some supplies like chocolate or certain glues might melt, so opt for heat-resistant alternatives.
Waterproof materials are perfect for outdoor summer projects. Consider using:
- Acrylic paints instead of oils (they dry faster)
- Quick-drying glues and adhesives
- Natural materials like shells, stones, and flowers
- Recyclables like paper rolls and plastic bottles
Budget-friendly options are important too! Look around your home for supplies before buying new ones.
Old t-shirts can become tie-dye projects. Empty jars transform into lanterns. Popsicle sticks from summer treats make great craft sticks.
Suncatcher Masterpieces
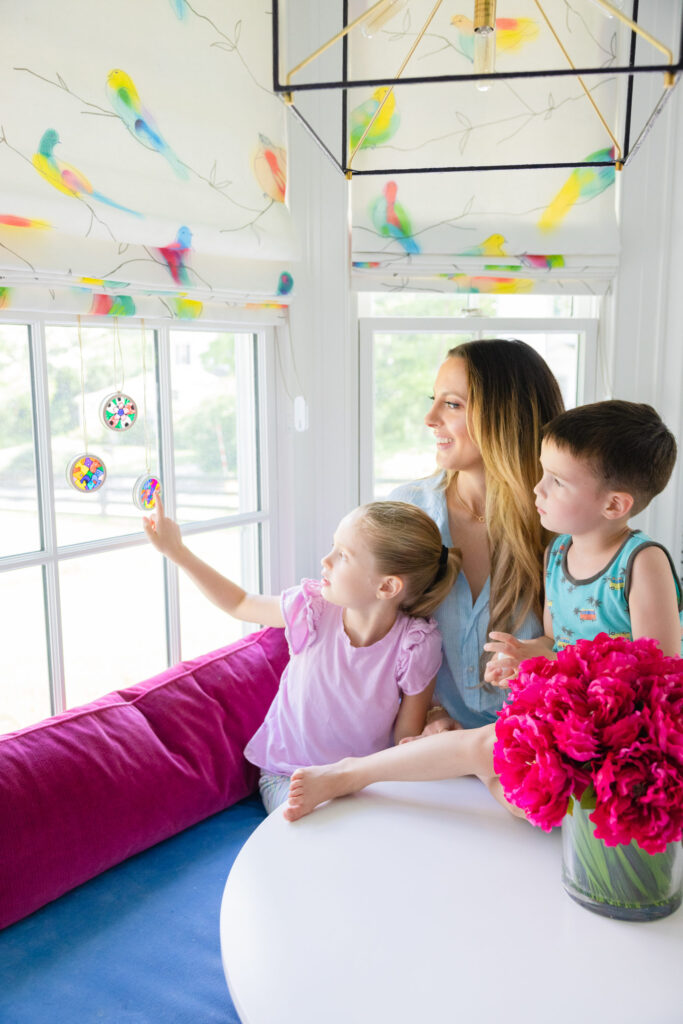
Suncatchers are magical window decorations that transform sunlight into colorful displays.
To make a garden suncatcher, collect clear plastic lids and help your kids arrange colorful tissue paper pieces inside them.
When dry, hang them in windows where sunlight can shine through!
Another easy option is using clear contact paper. Cut out a sun shape, peel off the backing, and let your kids stick colorful tissue paper bits onto the sticky side.
Add another piece of contact paper on top to seal everything in.
Glittering Sun Mosaics

Sun mosaics bring sparkle and shine to summer decorations.
Start with a circle cut from cardboard or a paper plate for the sun base.
Help your kids glue yellow, orange, and red pieces of paper around the edges to form sun rays.
For extra pizzazz, use glitter glue or metallic paper to make your sun sparkle.
You can also try painting pasta shapes in bright colors and arranging them in a circular pattern to create a 3D sun mosaic.
Paper plate suns are super simple! Cut triangles around the edge of a yellow plate and decorate with markers, paint, or even buttons.
You can hang these sunny creations in your room or give them as cheerful gifts to brighten someone’s day.
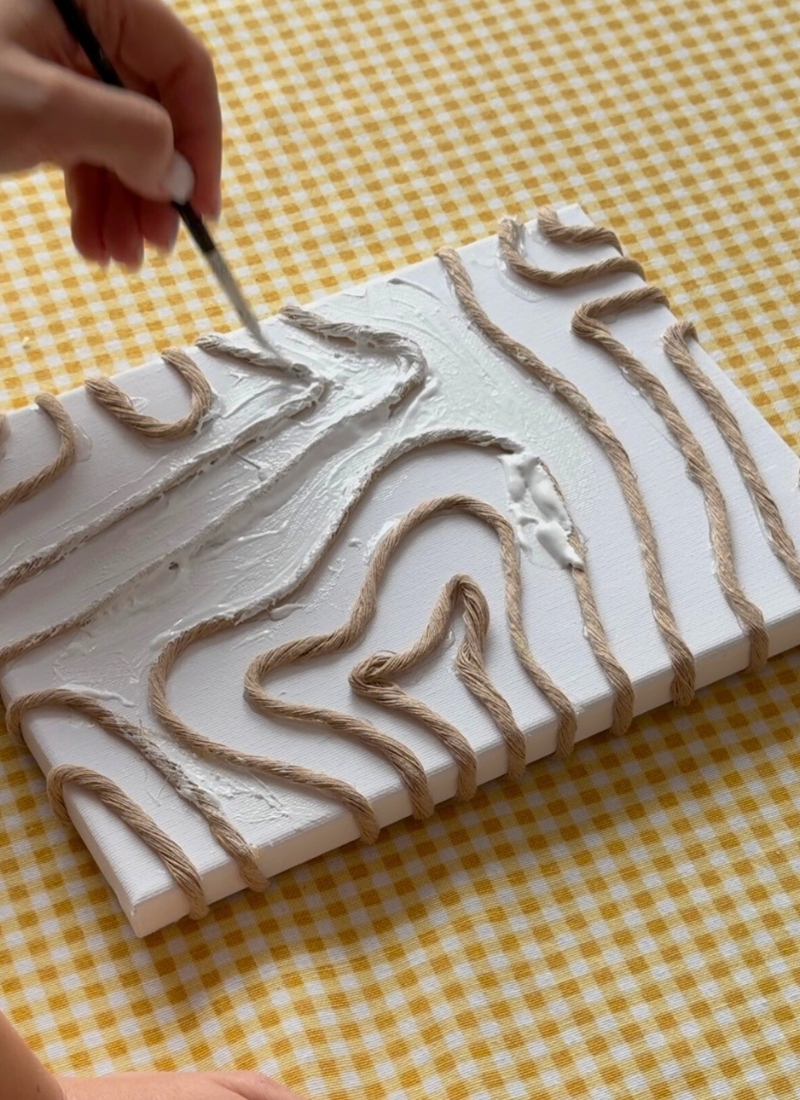
Checkout how to Create a Stunning Seaside Vase: Perfect for Summer Decor
Sailboat Craft Designs
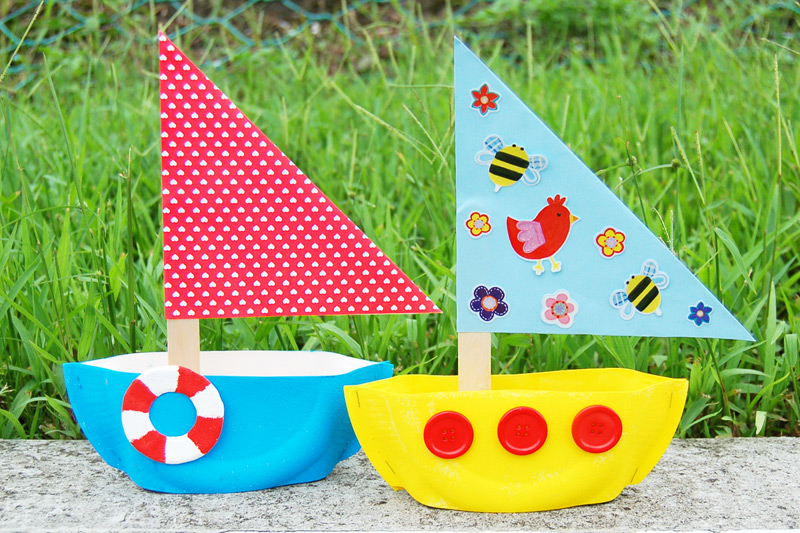
Creating your own miniature sailboats is both fun and educational. You can start with simple materials like cork, paper, and wooden skewers.
Cut triangular sails from colorful construction paper and attach them to the skewer “mast” with glue.
For the boat base, cork works wonderfully because it naturally floats. You can also use empty juice boxes covered in waterproof tape or half walnut shells for tiny vessels.
Kids love decorating their sailboats with markers, stickers, or small flags.
Try testing your creations in a kiddie pool or bathtub to see how well they sail!
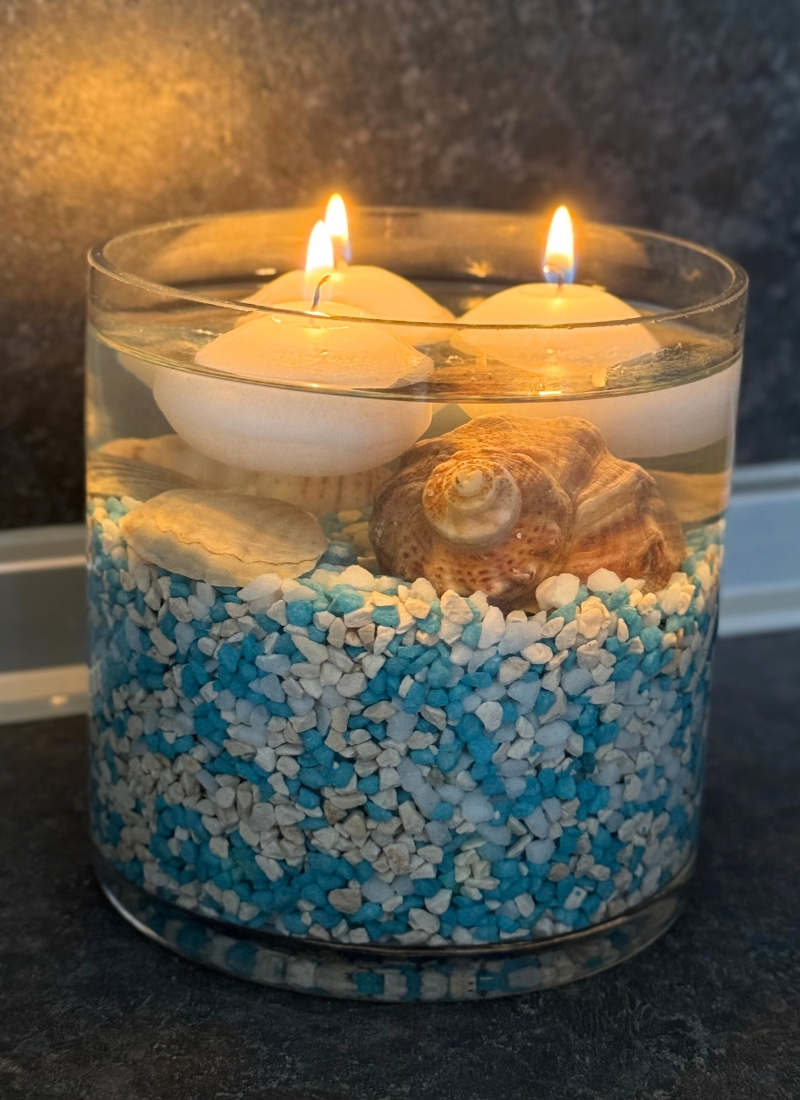
Ocean in a Bottle
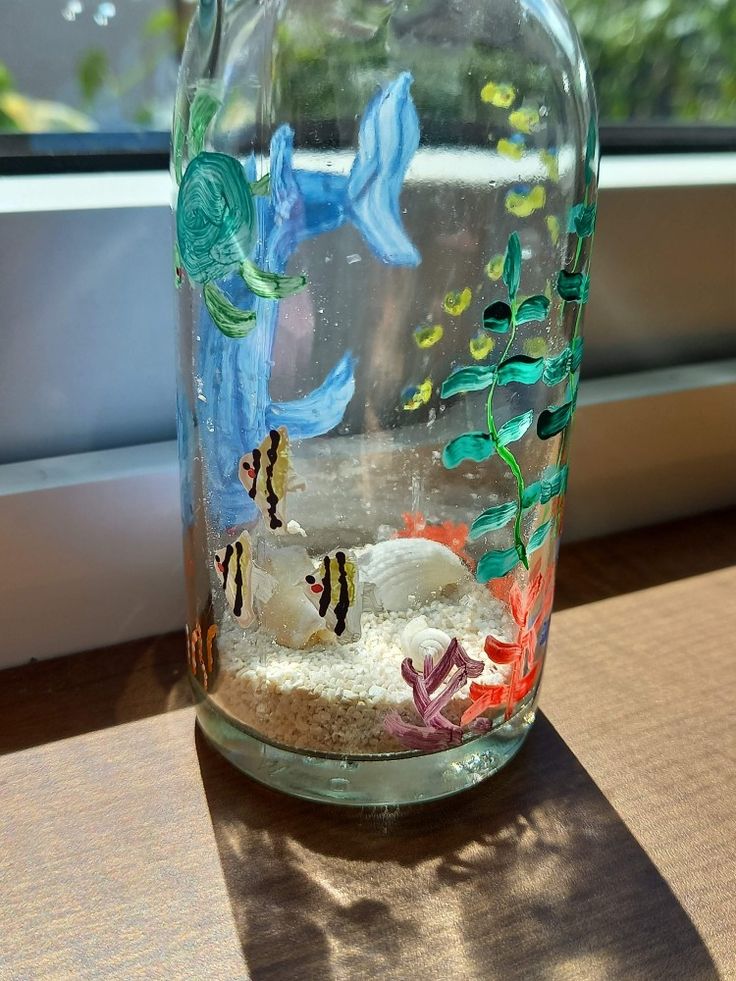
An ocean in a bottle captures the beauty of sea waves in a portable, mess-free way.
To make this craft, you’ll need a clear bottle, baby oil, blue food coloring, water, and optional items like glitter or small sea-themed trinkets.
Fill your bottle about halfway with water and add a few drops of blue food coloring.
Next, fill most of the remaining space with baby oil, leaving a small air gap at the top for movement.
For extra ocean magic, add glitter, tiny shells, or small plastic sea creatures before sealing the bottle tightly with hot glue around the cap.
When you tilt the bottle, the oil and water create beautiful wave-like movements.
Pine Cone Critters

Pine cones make fantastic craft materials because of their interesting texture and durability.
To create pine cone critters, take your kids on a nature walk to collect different sized pine cones.
Once home, clean them by laying them on newspaper in the sun for a day.
Use craft glue to attach googly eyes, felt pieces for ears, and pipe cleaners for legs and antennae.
You can create owls by gluing feathers to the sides, or hedgehogs by painting the tips of the scales.
For extra summer fun, try making pine cone butterflies by cutting colorful paper wings and attaching them to smaller cones.
These critters make adorable windowsill decorations or gifts for grandparents.
Garden Rock Markers
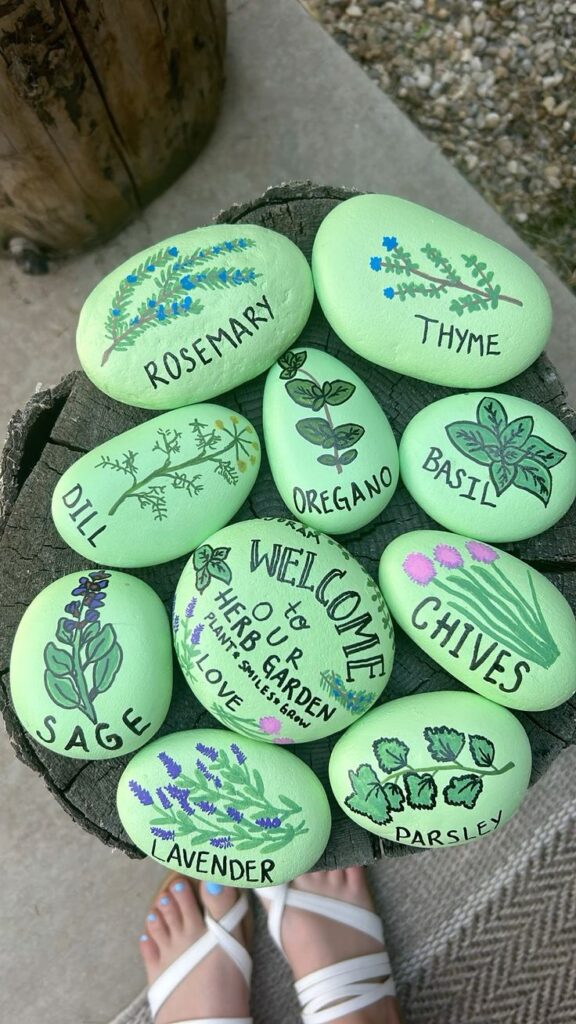
Turn ordinary rocks into useful and decorative garden markers this summer.
Begin by collecting smooth, flat rocks during a beach trip or backyard exploration. Wash them thoroughly and let them dry completely.
Use acrylic paints to decorate the rocks with pictures of vegetables, herbs, or flowers.
For younger kids, simple designs work best – a red tomato, green lettuce leaf, or purple eggplant.
After the paint dries, seal your rock markers with clear outdoor varnish to protect them from rain and watering.
This step is important for making your summer craft last through the seasons.
Place your finished markers in your garden beds or potted plants.
Family Handprint Art Ideas
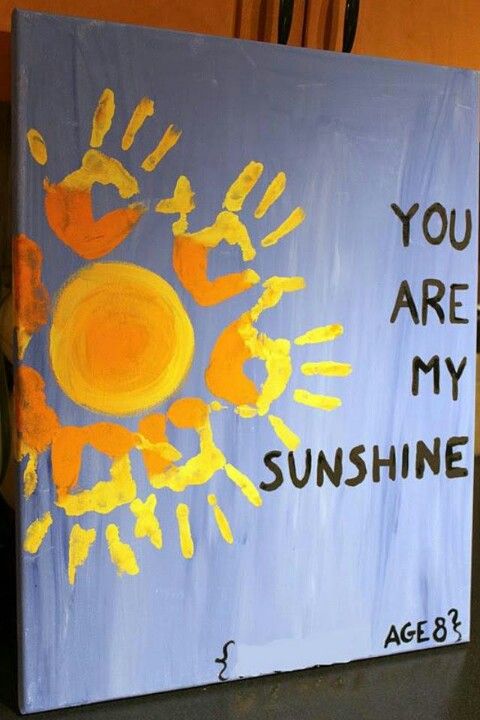
Want to capture the whole family’s creativity? Try making a handprint sun!
Have each family member press their yellow or orange painted hand onto paper, arranging the prints in a circle with fingertips pointing outward like sun rays.
Add a round center and you’ve got a bright summer keepsake!
Watermelon handprints are super easy and perfect for hot days. Just paint palms green and fingers red, then press onto paper. Add black fingerprint “seeds” when dry.
For beach memories, create handprint fish or crabs. Blue handprints make great fish – just add an eye and fins! Red handprints turned sideways become adorable crabs when you add googly eyes.
Pineapple and ice cream cone handprints are also popular summer designs that kids love making.
Handprint Campfire Creations
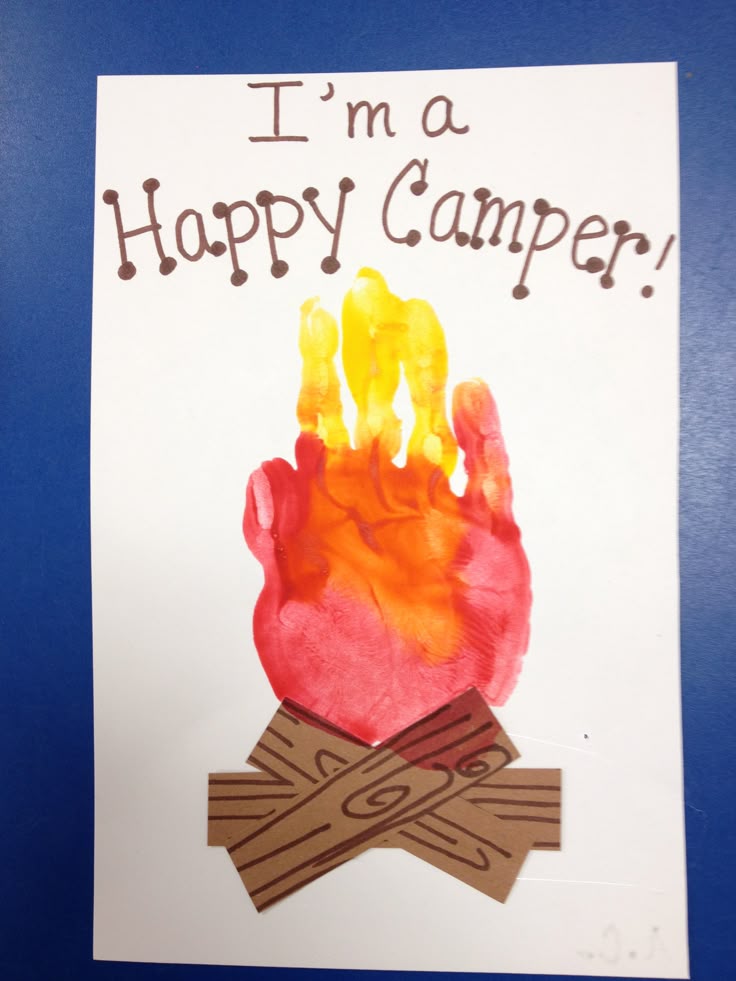
Handprint campfires bring summer camping memories home.
Start with overlapping brown handprints to create logs at the bottom. Then add red, orange, and yellow handprints pointing upward to form flickering flames.
For a complete camping scene, add blue handprints for the sky or a lake.
Green handprints can become trees around your campfire. Small fingerprints work great for stars in the night sky!
Want to make it even more special? Create a handprint family sitting around the campfire.
Use different colored paints for each family member’s print, then add simple faces and details.
Jar Lid Wind Chimes

Transform those extra jar lids into a melodic summer decoration!
Start by collecting lids of different sizes – the more variety, the better your wind chime will sound. Wash them thoroughly and let them dry.
Use a hammer and nail to punch holes near the edges of each lid. For a colorful touch, paint the lids with weather-resistant paint in bright summer colors like teal, yellow, and coral.
Thread fishing line or thin wire through the holes and attach the lids at different heights to a sturdy base like a small embroidery hoop or wooden ring.
Add beads between some lids for extra visual interest.
Hang your creation outside on a porch or in a tree where the breeze can catch it.
Tin Can Lanterns
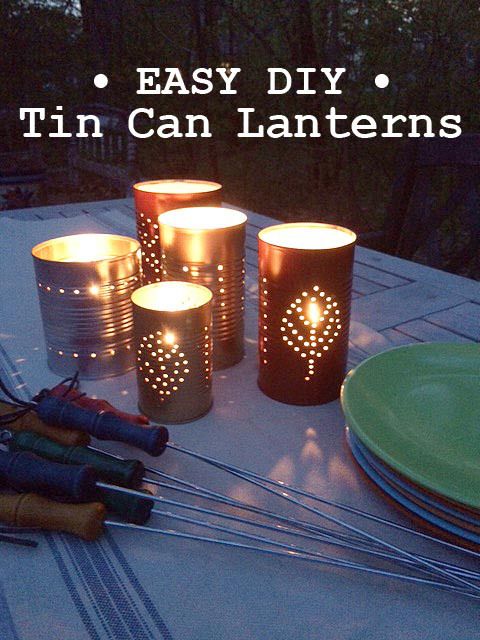
Empty food cans make magical summer night lights with just a little creativity.
Fill each can with water and freeze it solid. This prevents the can from denting when you create your design.
Using a nail and hammer, punch holes in patterns like stars, flowers, or waves. The ice inside will hold the can’s shape during this process.
Once your design is complete, let the ice melt. Dry the can and spray paint it in your favorite color – metallic finishes like copper or gold look especially stunning.
Place a tea light inside each lantern or string small LED lights through multiple cans for a glowing garden pathway.
They’re perfect for lighting up summer evening gatherings or adding a warm glow to your patio.
DIY Ring Toss
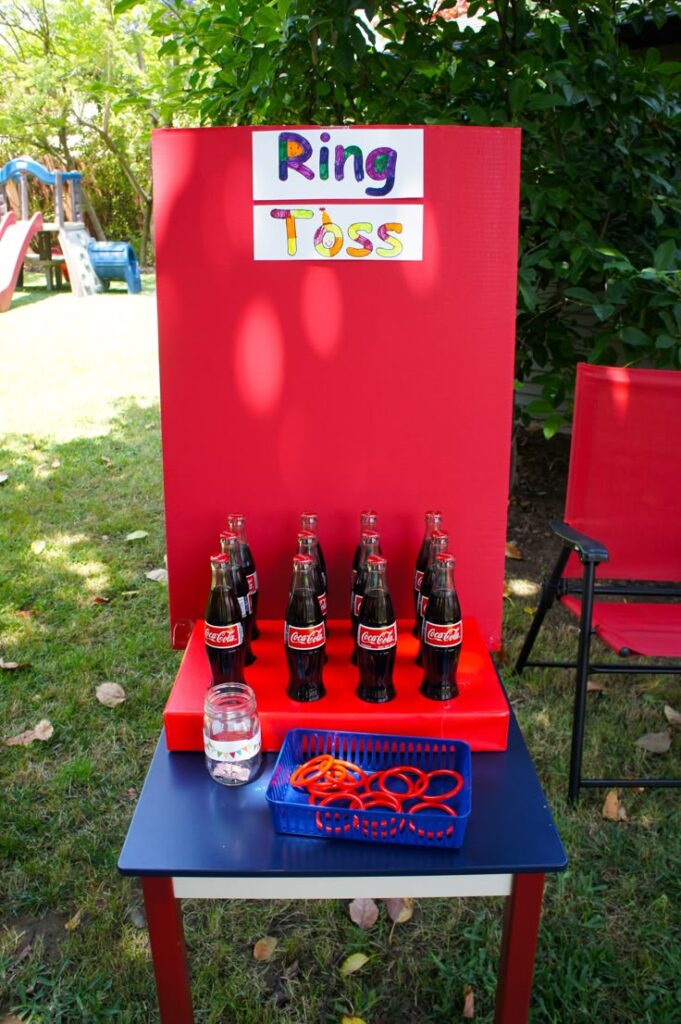
Creating your own ring toss game is both fun to make and play!
Start with a base – a piece of plywood works great. Paint it with bright summer colors like yellow, blue, or pink. You can use acrylic paints that hold up well outdoors.
For the posts, glue empty plastic bottles to the base and fill them partway with sand for stability. Or use wooden dowels secured firmly into drilled holes.
For rings, you have several options. Plastic bangles work perfectly!
You can also make rings from rope – form circles about 6 inches wide and wrap with colorful duct tape. Another option is to cut the centers from paper plates and wrap them in yarn.
Set different point values for each post and keep score with sidewalk chalk.
This game is perfect for backyard parties or lazy summer afternoons!
Homemade Cornhole
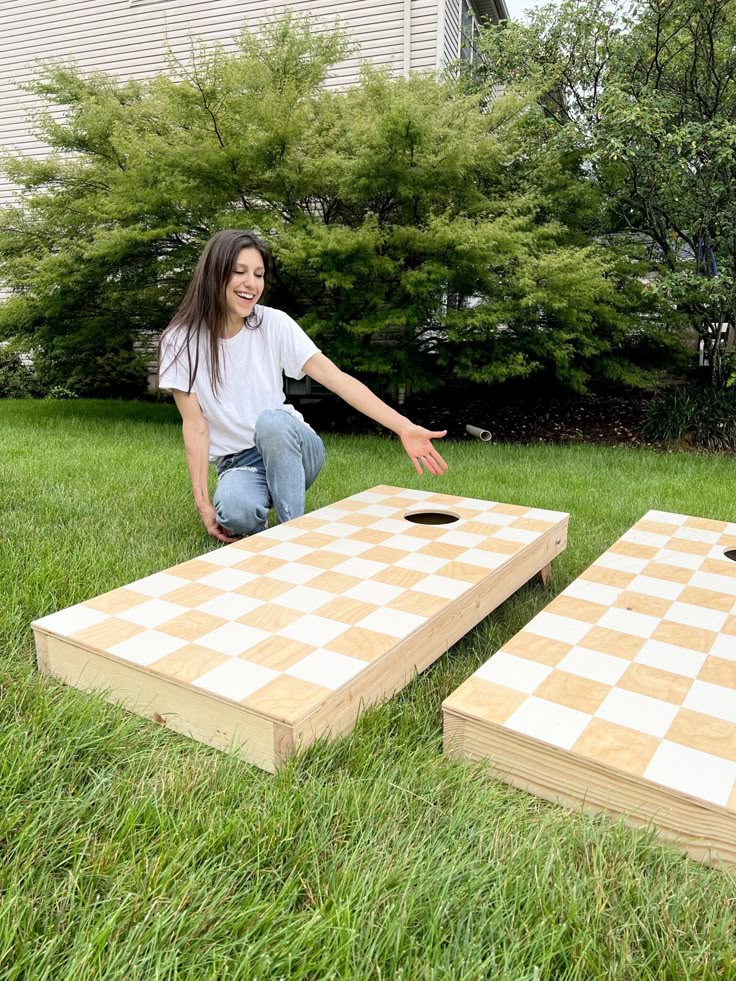
Building your own cornhole game creates a summer staple that kids and adults will enjoy. Start with two 2’×4′ pieces of plywood for the boards.
Cut a 6-inch hole near the top of each board using a jigsaw. Attach legs that are 4 inches tall at the front and 12 inches at the back.
This creates the perfect angle for tossing. Sand all edges smooth to prevent splinters.
Now comes the fun part – decorating! Let kids design bright summer themes with acrylic paints. Add protective clear coat when dry to preserve their artwork.
For bean bags, cut 6×6 inch squares of sturdy fabric like denim or canvas. Sew three sides, fill with dried beans or corn, then stitch closed.
Make 8 bags total – 4 in each of two colors. Set boards about 27 feet apart and take turns tossing.
A bag through the hole scores 3 points, while landing on the board earns 1 point.
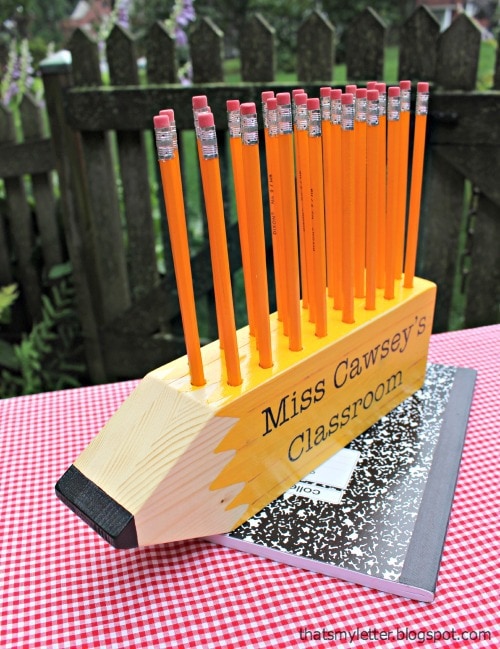
Back-to-School Crafts
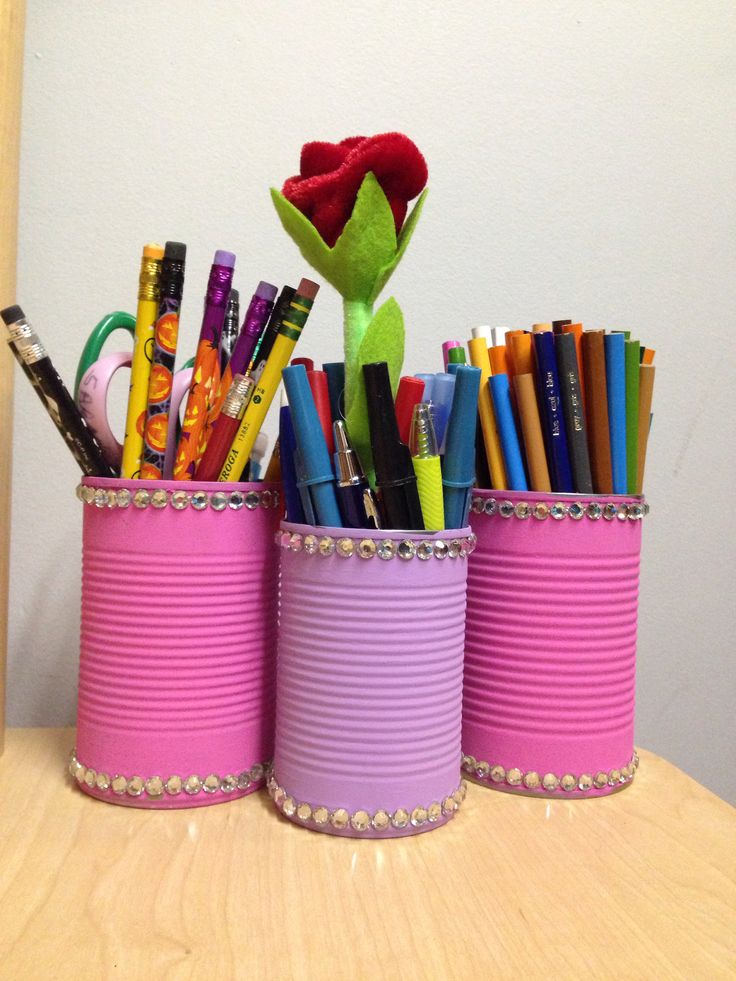
Getting ready for school can be fun with some creative DIY projects!
Personalized pencil holders are super easy to make – just use empty cans, wrap them in colorful paper, and decorate with stickers or your name.
You can also create custom bookmarks using pressed flowers from your summer garden. Decorated notebooks and folders help make the first day special.
Try using washi tape to create patterns, or paint book covers with bright designs that remind you of summer fun.
Homemade calendars are perfect for keeping track of homework and activities.
Use a large poster board and add colorful markers to create your schedule. You can even add small photos from your summer adventures in the corners!
Summer Scrapbooking
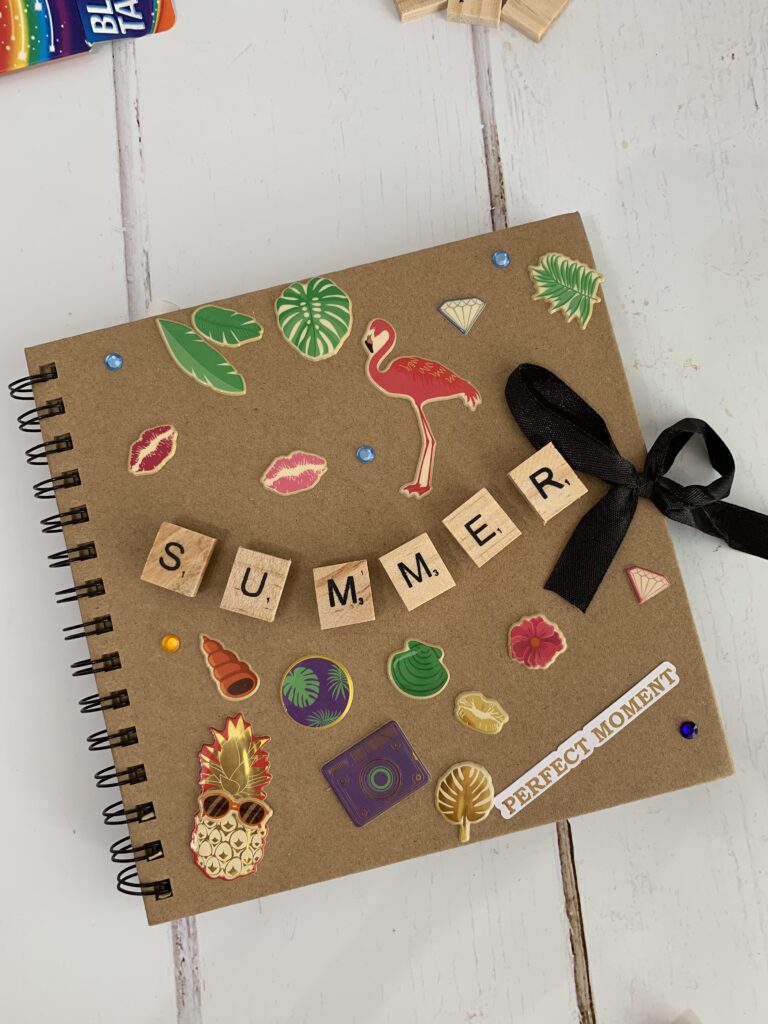
Summer memories are too precious to forget!
Start by gathering photos, ticket stubs, seashells, and other small souvenirs from your adventures. These will be the building blocks of your summer story.
Create themed pages for different activities. For example, use blue paper for water activities and sunny yellow for outdoor fun. Add pressed flowers or leaves as natural decorations.
You can use ice painting techniques to create colorful backgrounds. Just freeze paint and water in ice cube trays. Then, drag the melting cubes across paper for a cool effect!
Write short descriptions or funny quotes to help remember special moments. Don’t worry about making it perfect – the personal touches make it special.
Add dates and locations to help you remember exactly when and where your adventures happened.