Want to give your bathroom a fresh new look without the cost of a full renovation? Painting your bathroom tile floor is an easy and budget-friendly way to update the space—just follow these simple steps for a stylish, long-lasting finish.

If you’ve ever walked into your bathroom and thought, “Wow, I can’t look at this tile floor one more day,” you’re definitely not alone.
Painting bathroom tile floor is a real thing, and it’s honestly a game-changer for anyone on a budget or just tired of old tilee.
You don’t need to rip things out or blow your paycheck on new flooring to actually get a bathroom that feels fresh.
With some patience, good prep, and the right supplies, you can totally make those old tiles look like new—or, let’s be real, even better than before.
If you’re curious about how to paint bathroom tile floors or just want to see what bathroom floor tile painting tutorial tips actually work, you’re in the right spot.
Whether you love a pop of color, a fresh pattern, or a more chill vibe, there’s a way to DIY it so your space actually shows your style.
Types of Tile Paint
If you’re new to painting bathroom tile floor, you’ll find tons of options at the store—but not every paint is right for tiles.
The best paint for bathroom floor tile is usually labeled for “tile and tub” or “porcelain and ceramic.”
You’ll see two main styles: single-step paints (just open and roll) or two-process paints, which need a base coat and a top coat.
The two-process stuff is more work but way tougher.
For most folks, tile-specific epoxy paint gives that solid, glossy finish.
Latex floor paint with a strong bonding primer can also do the trick for less heavy-duty traffic.
If you want to get creative and do a bathroom tile floor pattern painting with stencils, stick with paint marked as stencil-safe.
Painting Tools and Supplies
Stocking up on the right supplies before you kick things off will make your bathroom floor tile painting tutorial a breeze.
Here’s a checklist of what you’ll need:
| Tool/Supply | Why You Need It |
|---|---|
| Bonding primer | Gets the paint to actually stick to tile |
| Paint (epoxy/latex) | Main star for coloring your floor |
| Paint brush | Edges and tight corners—key for grout lines |
| Foam roller | Smooth, streak-free finish over tiles |
| Paint tray | Makes loading roller easier (and less messy) |
| Painter’s tape | Crisp edges and keeps paint off your baseboards |
Epoxy Paint vs. Latex Paint
Here’s my honest take after trying both on my own painting floor tiles in bathroom journey:
Epoxy paint is super durable and water-resistant, which is gold for bathrooms.
It’s tough to beat if you want something that looks pro and stands up to lots of foot traffic.
It does take longer to cure, and you’ll probably need that two-process system (base coat, then a glossy top coat).
The smell is strong—so windows open!
Latex paint paired with a high-quality bonding primer is easier to use, dries faster, and comes in more colors.
It’s great if you want to try out bathroom floor tile paint ideas or do a quick bathroom tile floor makeover without committing to a full-on reno.
Just remember: It’s not as tough as epoxy, so you may need touch-ups sooner, especially in busy bathrooms.
Whichever route you go, both epoxy and latex offer solid DIY options for painting tile floor in bathroom—just don’t use wall paint, or you’ll definitely regret it.
Related posts: 24 Bathroom Countertop Decor Ideas for Any Style
Cleaning and Degreasing the Tiles
Let’s kick things off with a deep clean—no shortcuts here.
Sweep up any dust and loose gunk first.
Mix up a bucket of warm water with a good degreasing cleaner like TSP (trisodium phosphate) or even a bit of dish soap if you’re in a pinch.
You want every inch squeaky clean. Scrub each tile with a sponge or scrub brush, paying attention to corners and grout lines.
Don’t skip rinsing. Leftover cleaner can wreck your paint adhesion, so rinse your tiles with clean water and let them dry completely.
If things still look grimy, hit stubborn spots with a little more elbow grease.
Sanding and Creating a Rough Surface
This step is hands-on, but trust me—painting bathroom floor tiles goes smoother if you don’t ignore it.
Tiles are naturally glossy, so you have to roughen that shine for the paint to grab hold.
Grab some 220-grit sandpaper or a sanding block. Sand the entire surface using small circles or back-and-forth strokes.
Don’t forget along the edges! The goal is to lightly scratch the surface, not grind right through.
After sanding, vacuum up the dust or wipe it away with a damp microfiber cloth.
Tiles should now look just a bit dull—not shiny—to show you’re ready for primer and paint.
Protecting Surrounding Areas
Before the fun really starts, grab those drop cloths and painter’s tape.
You don’t want mystery paint splatters all over your vanity or tub. Lay down the drop cloths across the bathroom floor beyond your work area.
Use painter’s tape around the baseboards, walls, and any fixtures you absolutely don’t want painted.
If your bathroom has tiny nooks, stuff them with plastic or old towels for extra coverage.
Related posts: 20 Small Bathroom Ideas That Make a Big Impact
Priming the Tile Surface
First things first: clean everything. Tile floors in bathrooms get gross, so scrub them well.
You want zero soap scum or mystery gunk lurking on your soon-to-be masterpiece.
Once clean, take some sandpaper (120-180 grit) and lightly sand every tile.
Trust me, don’t skip the sanding—it helps the paint grip. After sanding, wipe away all dust with a damp cloth and let the floor dry.
Now you’re ready to tape off edges, baseboards, and anything else you don’t want painted.
When it comes to priming bathroom tile floors, go for a high-adhesion or bonding primer.
These help your paint stick, especially on glossy ceramic or porcelain.
Pro tip: Apply primer using a small foam roller for the tile centers and a brush for grout lines and corners.
Let the primer dry completely—usually a few hours.
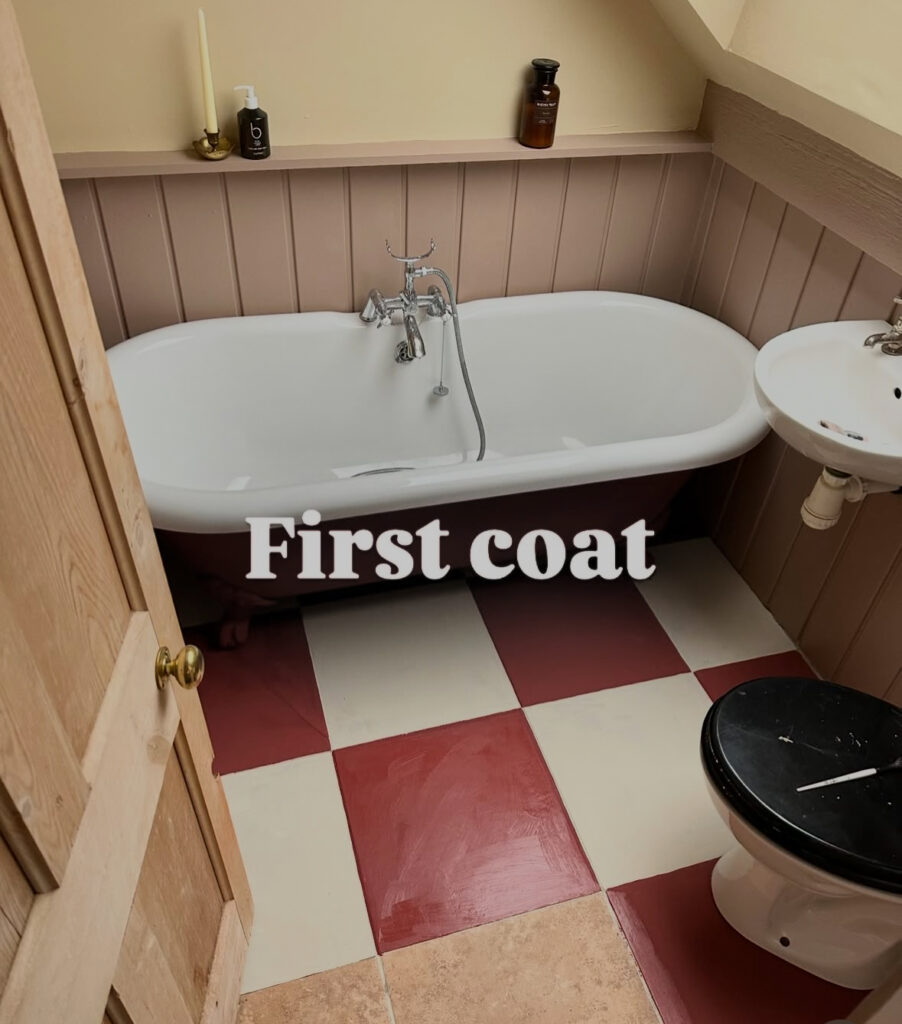
Applying the Base and Top Coats
Once your primer is dry, it’s time to add color.
For best results, choose a durable bathroom tile floor paint—this stuff is specially made for wet, high-traffic spots.
Oil-based paints or specialty tile paints are solid picks.
Start with your base coat. Pour a little paint into a paint tray, and use a clean roller for the main areas.
Again, use a brush to hit the grout and edges.
Make sure the first coat dries fully before adding the next one.
Painting bathroom floor tiles isn’t the place to rush—you need that base to set up before layer two.
After your second coat, you might want to finish things off with a clear sealer for extra toughness, especially if your bathroom gets a lot of use.
Techniques for Even Coverage
Getting a professional-looking finish with your bathroom tile floor painting mostly comes down to technique.
Start rolling paint from one side of the room and work toward the exit so you don’t trap yourself.
Use smooth, even strokes with your foam roller to prevent weird lines and clumps.
For grout lines, dab the paint in with a small paintbrush or a detail brush—you’ll get better coverage and fewer missed spots.
If you’re into bathroom tile floor pattern painting or want to try a bathroom floor tile stencil, wait until your base is dry.
Tape down your stencil, and use a dry, almost empty roller or stippling brush so the paint doesn’t bleed under the stencil.
Go slow and check your work as you go.
Remove any drips or extra paint along the way with a damp rag.
Managing Drying Time Between Coats
Most tile paints need at least 6–8 hours between coats—sometimes longer if it’s humid.
Check your paint’s instructions for the best timing.
If you jump the gun, you might end up with tacky spots that never fully dry or even peel later.
After the final coat (and any patterns), let your painted ceramic bathroom tile floor cure at least 24–48 hours before stepping on it.
Use a fan or open a window to help the drying process—and don’t drag anything heavy across that fresh paint while it’s still curing.
You want your DIY painted bathroom tile floor to last as long as possible!
Related posts: 27 Budget-Friendly Bathroom Decor Ideas You’ll Absolutely Love
Ceramic Tile Floors
If you’re considering painting ceramic bathroom tile floor, you’re in luck—ceramic’s a lot easier to work with.
The surface is smooth and non-porous, which makes prep pretty easy but also means proper cleaning is a must.
Don’t skip the degreasing step! Grime or leftover hair products will keep the paint from sticking.
After that, lightly sand to help the primer grip. Use a quality tile primer—don’t just go straight for the paint or it’ll peel right up.
Once your base is set, you can get creative with bathroom tile floor pattern painting or even try paint bathroom tile floor with stencil if you want some flair.
Just make sure to pick the best paint for bathroom floor tile.
Natural Stone Tiles
Painting natural stone tiles? That’s a whole different beast.
These tiles are way more porous than ceramic, so they soak up moisture—and paint—like crazy.
If you skip the primer, your color will probably seep in and look patchy or faded. Not exactly what you want, right?
Here’s a little bonus tip: always test your primer and paint on a hidden spot first.
Every stone—slate, travertine, marble—reacts differently, and some sealers can do weird things.
Find a bathroom floor tile painting tutorial that’s made for natural stone.
Make sure it covers waterproofing and sealing bathroom tiles, since bathrooms are all about moisture.
Oh, and don’t forget: painted natural stone can get really slippery.
Look for a non-slip paint for bathroom tile floor so you don’t end up wiping out.
Cleaning Strategies for Painted Tiles
When you finish a painting bathroom floor tiles project, avoid harsh chemicals.
Those will just mess up the finish and fade your paint job fast.
Grab a soft mop, warm water, and a few drops of gentle dish soap.
No bleach—seriously, don’t make that mistake.
Sweep or vacuum often, especially if you’ve got pets or track in sand.
Little scratches from dirt are real, especially with lighter colors.
For stains, blot gently instead of scrubbing. Scrubbing can pull the paint right off. Notice any chips? Just make a mental note for later.
Touch-Ups and Longevity Tips
You’ll see small nicks or chips eventually—totally normal for painting ceramic bathroom tile floor projects.
Want your painted tile to last? Keep a mat by the shower or vanity. Water and painted floors aren’t exactly best friends, even with a sealer.
Watch those grout lines too. If they get grimy, a gentle toothbrush and baking soda helps—just don’t scrub hard on the painted parts.
Sealant really changes the game. If you skipped it, you might want to go back and add one for extra durability.
Got scuffs? A melamine sponge works wonders—just pat gently, don’t go wild like you’re erasing the floor.
FAQ (Frequently Asked Questions)
What’s the best type of paint to use on a ceramic tile floor?
Pick a high-quality epoxy or latex floor paint made for heavy foot traffic and moisture.
I’ve seen friends try wall paint, and it flakes or scratches in no time—don’t do it.
Oil-based paints work too, but they can get smelly, so ventilate your bathroom well if you go that route.
If you want a pattern, paint bathroom tile floor with stencil using porch and floor enamel or tile-specific paint.
Seriously, don’t skip the primer! Check out “priming bathroom tile floor” before you even pick a color.
How do you waterproof painted bathroom floor tiles?
This is where a clear, water-resistant sealer comes in handy.
After your paint dries, roll or brush on two or three coats of polyurethane sealer for floors.
This keeps puddles and daily messes from wrecking your DIY painted bathroom tile floor.
Let every coat dry fully—don’t rush, even if you’re tired of tiptoeing around.
For extra safety, grab a non-slip floor sealer. No one wants to slip after a shower, right?
Does floor tile paint hold up well over time?
You’ll hear mixed reviews about this stuff.
With the right prep, good paint, and a waterproof sealer, most people get a couple of years out of it—sometimes even longer—before chips start to show up.
The spots you walk on the most, like right in front of the sink or shower, will wear down first.
If you love switching things up, painting ceramic bathroom tile is a pretty easy way to refresh your space without spending much.
It’s way cheaper than putting in new tile and a lot less hassle than ripping out old floors.
If you mess up, you can always sand it down and try again. So, honestly, don’t stress too much about it.