If you’re trying to figure out how to decorate a small balcony, I’m right here with you. A small apartment balcony can absolutely become your little outdoor “room,” even if you rent, even if you’re on a budget, and even if you’re currently storing a mop out there like it’s a museum exhibit.
My goal is simple: get you to a cozy setup that feels intentional, not cluttered. We’re going to start with measurements (because the door swing is always the plot twist), pick one clear purpose, then build the whole space around that. I’ll give you easy layout formulas, renter-friendly furniture picks, and a way to add plants without losing your walkway. I’ll also sprinkle in real-life stuff like wind, shade, and where the cushions go when the weather changes its mind.
This is not going to be precious. It’s going to be workable. And cute.
Start with measurements and purpose, then everything else gets easy.
Supplies quick checklist
- Tape measure
- Painter’s tape (for marking furniture footprints)
- Zip ties (clear or black)
- Rail hooks or renter-safe hooks
- Outdoor rug or runner
- Cushions or seat pads
- One rechargeable lantern
- A couple of planters plus saucers
- One storage piece (deck box, storage bench, or slim bin)
- Clips or bungees for wind days
- A throw blanket you can wash
Quick Win Box: The Small Balcony Rules (Read This First)
- Door swing first. Don’t block the door or your walkway.
- Choose 1 main job: dining, lounging, or garden-first.
- Go vertical. Plants and privacy belong up high, not on the floor.
- One hero piece beats lots of tiny clutter.
- Repeat, don’t scatter. One accent color repeated three times looks styled.
- Wind-proof everything. Secure light items and skip top-heavy planters.
- Three-layer cozy formula: floor + lighting + textiles = instant “room” vibe.
- Storage equals staying cute. If it has no home, it becomes balcony chaos.
Step 0: Before You Start: Measure + Pick Your Balcony Purpose (10 Minutes)
Measure first, then pick your purpose. That order is what keeps you from buying something adorable that turns out to be the size of a coffee table from a suburban patio set. This step is also how you keep your balcony from becoming a random pile of “outdoor-ish” items that never looks finished.
Start with the door. Open it fully. Watch where your feet naturally land. That’s your real entry path, and it needs to stay clear. Then measure width and depth, plus railing height. Railing height matters more than you think if you want a rail table or a screen. Finally, note your sun and wind. Wind is the silent bully of balcony styling.
Use painter’s tape to mark a few furniture footprints on the floor. It’s a quick reality check and it makes the next steps weirdly easy.
- Measure width and depth
- Measure the door swing and your natural step-out path
- Measure railing height
- Note sun direction and wind direction
- Quick rule check: drilling, screens, grills, drainage
Photo idea: take one overhead photo from inside the door with tape lines visible. It helps you “see” the layout.
Quick win: tape your door-swing no-go zone today.
What Kind of Balcony Are You Decorating?
Your balcony type tells you what’s realistic. If you name what you’ve got, you stop fighting the space and start working with it.
A Juliet balcony is basically a styling moment. A narrow walkway balcony is a layout puzzle. A square balcony is the easiest to furnish like a mini room. If you don’t know which you have, do this: place a chair outside the door and try to walk past it without turning sideways. If you can’t, you’re in walkway territory.
- Juliet balcony: super shallow, mostly railing. Best for plants and a rail perch.
- Narrow walkway balcony: long and slim. Best for a lounge strip or a perch setup.
- Square or box balcony: easiest for a bistro corner and layered styling.
You’re not “bad at decorating.” Your balcony just has a specific personality.
“Choose Your Purpose” Mini Menu (Pick One)
Pick one purpose. That’s how your space feels clear and calm instead of confused.
If you choose “dining,” everything supports eating outside. If you choose “lounging,” you prioritize comfort. If you choose “garden-first,” you build around plants and let seating be secondary. You can add a bonus function later, but your first one should be obvious at a glance.
- Coffee and laptop corner
- Reading nook
- Balcony garden
- Mini dining setup
- A pet zone
When you’re stuck, ask: what would make me actually step outside tomorrow? Choose that.
Step 1: How to Decorate a Small Balcony: Choose a Space-Saving Layout (3 Proven Layout Recipes)
A great layout does most of the decorating for you. Once the furniture sits in the right places, the space feels intentional even before you add plants, rugs, or lighting. The layout is also what protects your walkway and keeps the door from becoming a daily annoyance.
Here’s the trick I use: choose one “recipe” and stick to it. Do not freestyle-buy random items until your layout is locked. Small spaces do not forgive extra pieces. They just get cramped.
Below are three layouts that work on most balconies. Pick the one that matches your balcony shape and your purpose. Then you’ll shop for the hero piece that makes it possible.
Photo idea: draw a quick top-down sketch on your taped plan and label the hero piece. It’s very satisfying.
30-Second Layout Selector (Pick Your Best Fit)
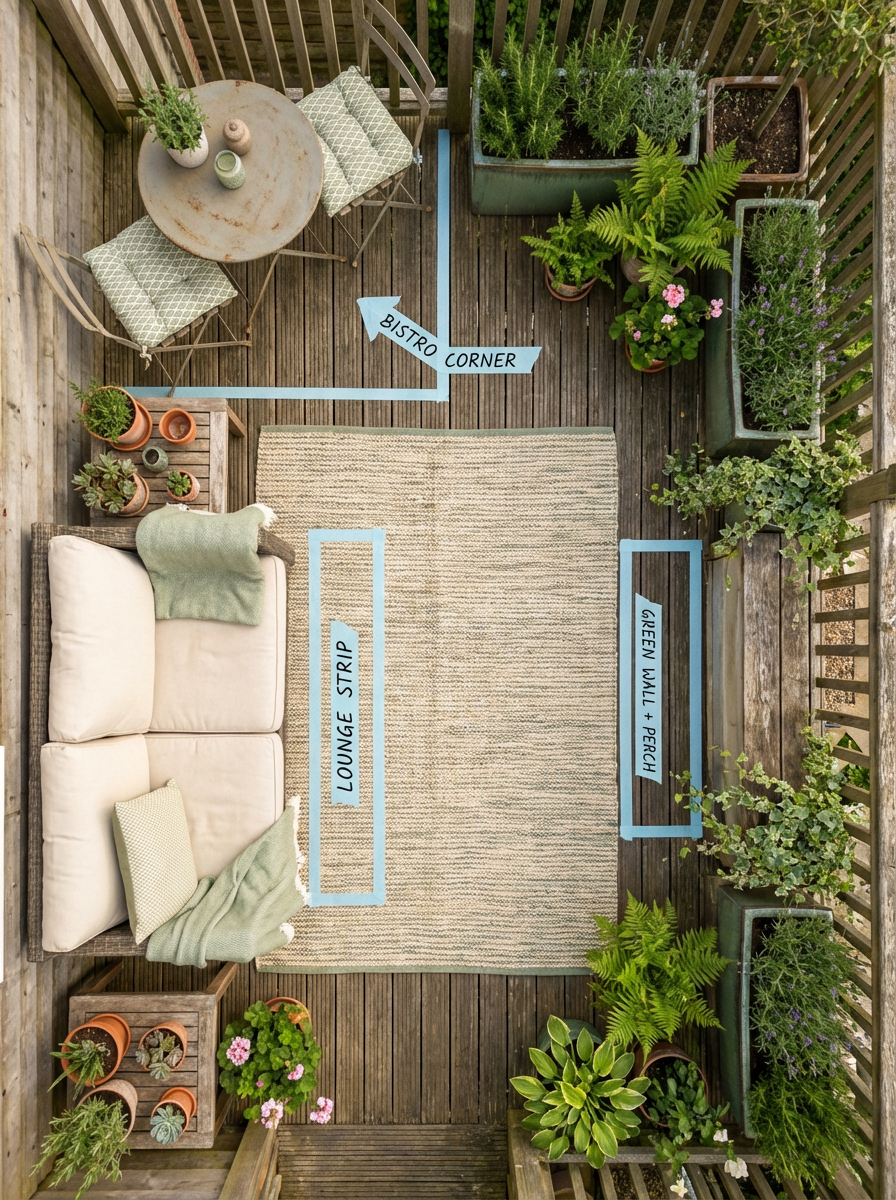
Choose fast. You can tweak later.
- Very narrow balcony: Green Wall + Perch
- Dining for two: Bistro Corner
- Lounging most days: Lounge Strip
- Plants plus privacy: Green Wall + Perch
- Tight door swing: rail table or a single chair first
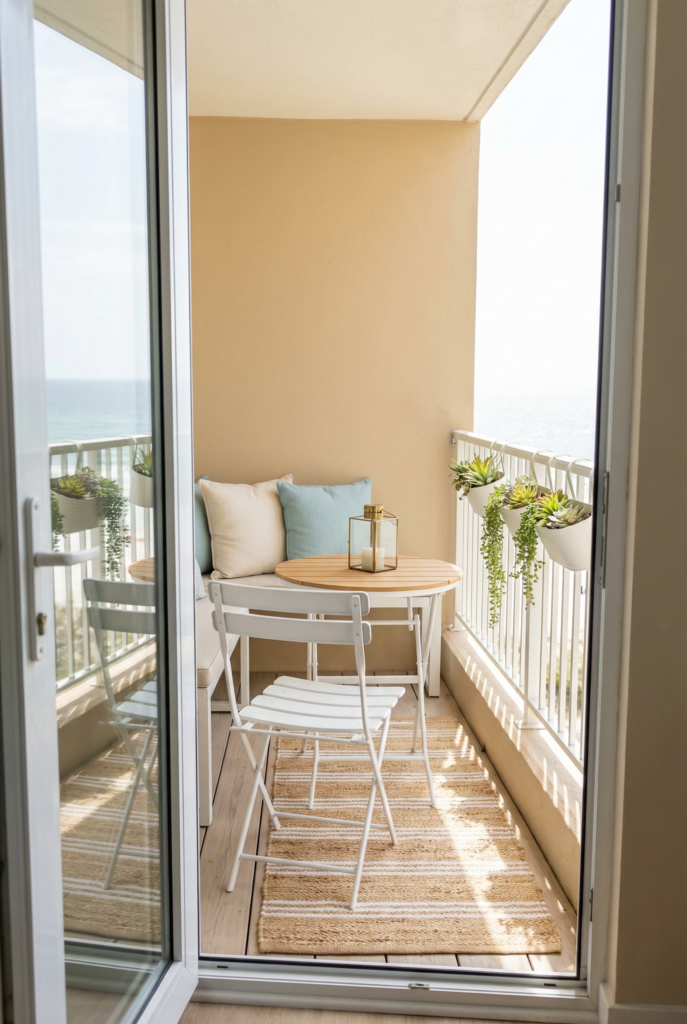
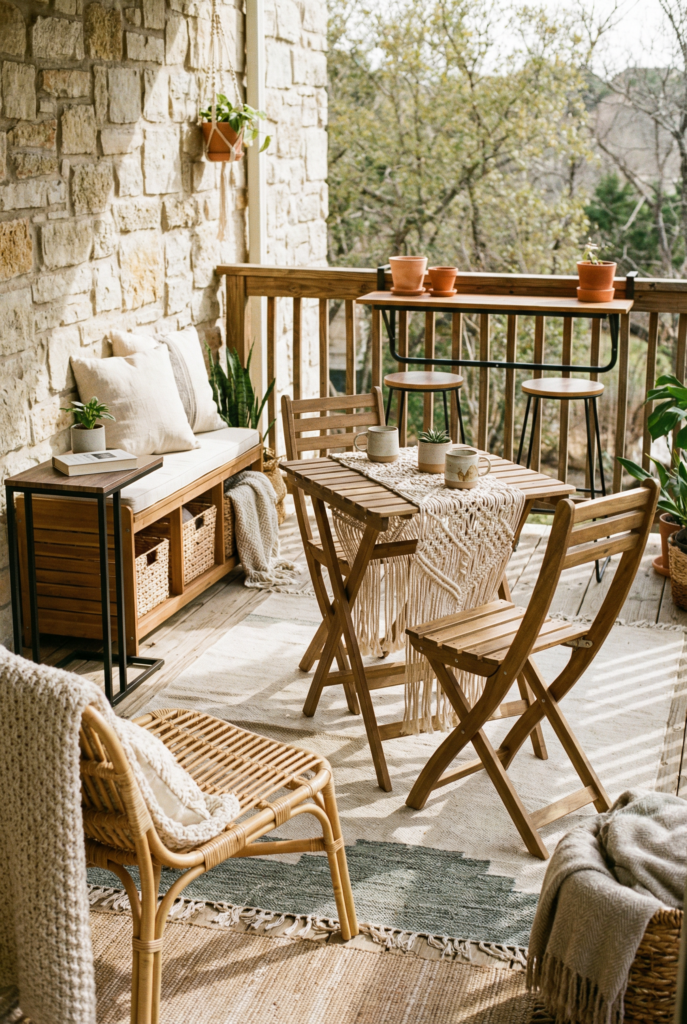
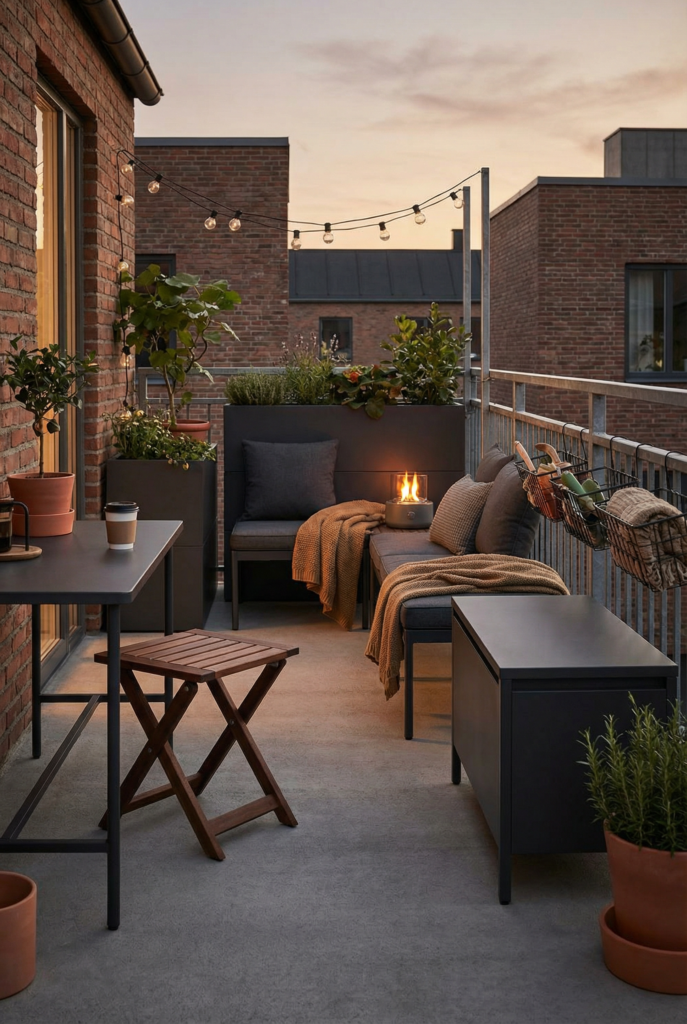
Layout A: Bistro Corner (Best for 2-Person Dining)
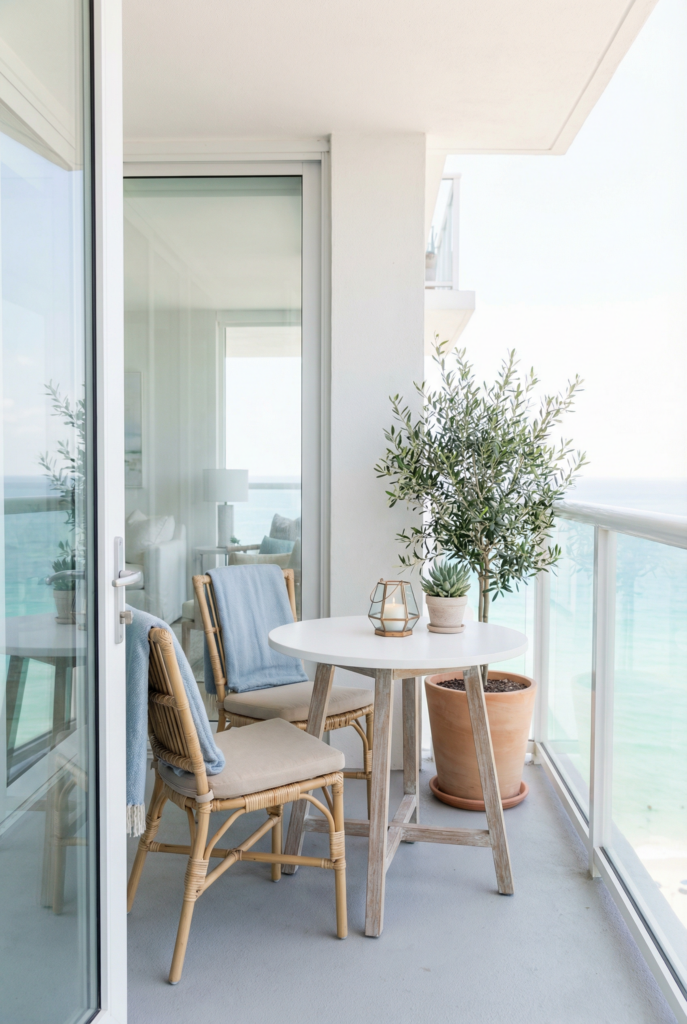
This layout is for meals, coffee, and the feeling that you live somewhere charming. Put a small table in the far corner, away from the door path, and tuck chairs toward the rail side so you can still step out comfortably.
A round table usually behaves best in tight spaces because corners love to snag hips. Go for slim chair frames and avoid deep seats. If you can only fit one chair without crowding, do one chair plus a rail perch. You’ll still use it more than you think.
- Table goes in the far corner
- Chairs tuck in toward the rail
- Keep the door path clear and obvious
- Add a lantern or small plant in the corner to “finish” the scene
Layout B: Lounge Strip (Best for Long, Narrow Balconies)
This is the “I want to sit here every day” layout. Run a slim bench or narrow lounge along the long wall, then add a tiny side table you can actually reach. The goal is comfort without blocking the walkway.
If you can, make one piece do double duty. A storage bench or deck box that also acts as a side table is a huge win. Keep the styling focused on one end, usually the far end, so the door area stays uncluttered.
- Slim seating along the wall
- Tiny side table near the seat
- One storage piece if it fits
- Keep the floor mostly open
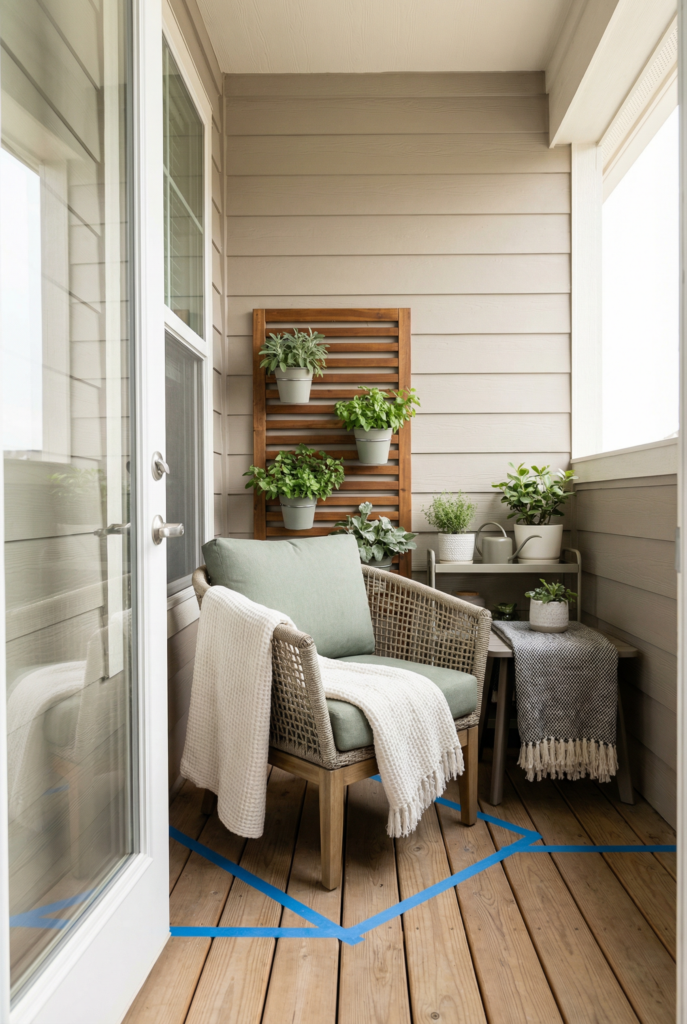
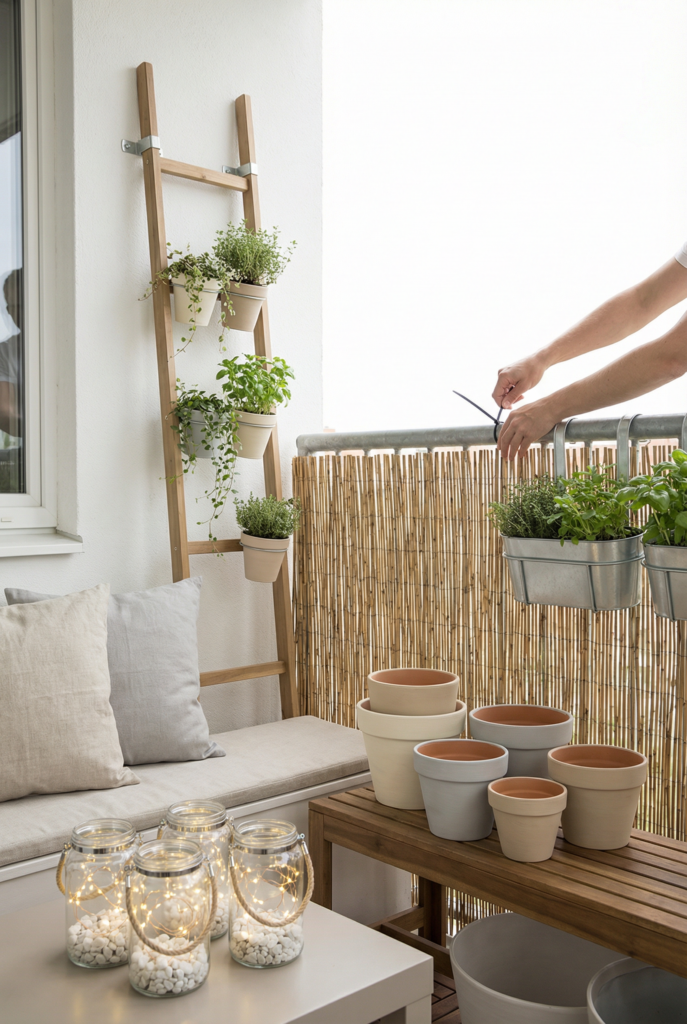
Layout C: Green Wall + Perch (Best for Plant Lovers)
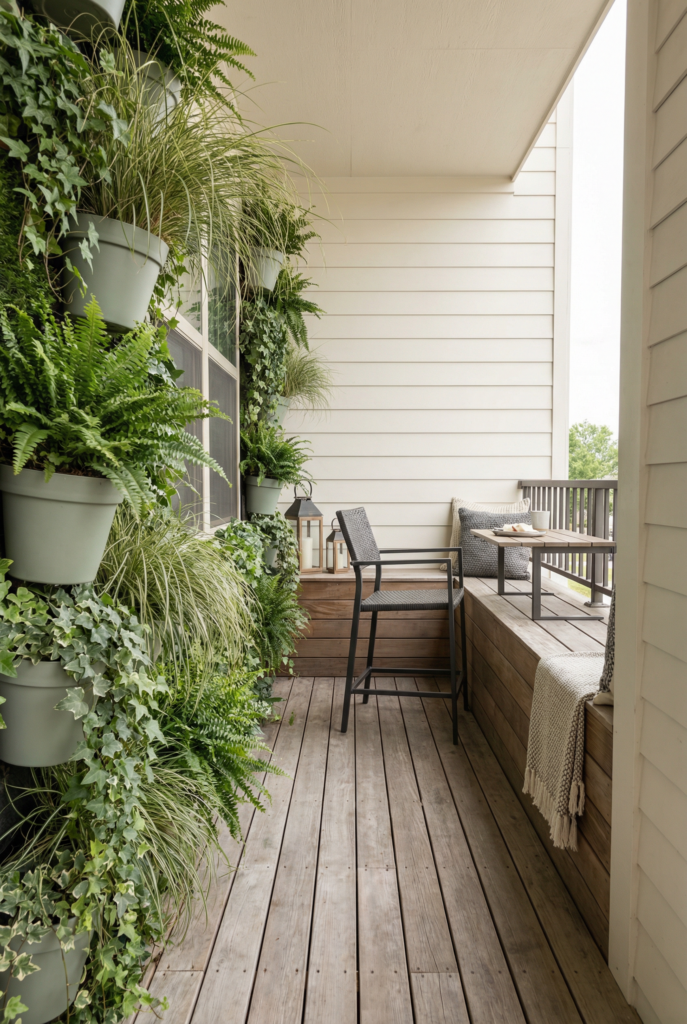
This layout is plants first, floor space second. You build a vertical plant zone along the rail or one wall, then add one perch: a single chair or a rail table. It’s the best way to get privacy and greenery without turning the floor into a pot obstacle course.
Think of this like creating one strong “green backdrop.” You want a tall element, a medium cluster, and something trailing. Then the perch becomes your little seat or coffee spot. It feels styled because the plants act like a wall.
- Vertical plant zone on one side
- One perch, not a full furniture set
- Keep the center path clear
- Let greenery do the decorating
Quick win: pick one layout recipe and commit to it before you shop.
Step 2: Buy the Right-Sized Furniture (Foldable > Bulky)
The fastest way to make a balcony feel cramped is buying furniture that’s too deep. The second fastest way is buying too many pieces. What you want is furniture that’s slim, flexible, and visually light. Open legs and narrow profiles make a space feel bigger because you can still see the floor.
This is where foldable balcony furniture shines. It lets you reclaim your balcony when you want to stretch out, water plants, or just not trip over things. If you only buy one “big” item, make it your hero piece. Everything else should support that hero and then get out of the way.
Also, test your chair situation early. If you sit down and your knees are basically in the railing, you will not use the space. Comfort matters, even when you’re being practical.
Best Small Balcony Furniture Pieces (Renter-Friendly)
These pieces are flexible and easy to live with.
- Folding bistro set
- Stackable chairs
- Slim bench, ideally with storage
- C-table that slides under seating
- Rail-mounted bar table for tight door zones
If you’re tempted by oversized lounge chairs, measure twice. Deep seats can eat your whole balcony.
Size Rules (So It Doesn’t Feel Crowded)
Door clearance first. Always.
Then keep one clear path. Even if it’s narrow, it needs to feel intentional. Choose armless chairs if you can. They take up less visual and physical space. Look for slim frames and open legs. Bulky bases look heavy and make a balcony feel smaller than it is.
Photo idea: tape the footprint of your dream chair before you buy it. It prevents regret.
Product Examples Grouped for Real Use
I’m going to keep this “shop similar” friendly.
Ultra-tight balcony heroes: rail tables, folding stools, slim side tables. Check price at Amazon, IKEA, or Wayfair.
Cozy lounging picks: a slim bench, a folding lounge chair, or floor cushions if your balcony stays fairly dry. Shop similar at Target or Walmart.
Storage savers: a small deck box, a storage bench, and a couple of rail baskets for small tools. Check price at Home Depot or IKEA.
Quick win: choose your hero furniture piece first, then stop shopping until it’s placed.
Step 3: Add Balcony Flooring + a Rug Layer (Instant Cozy)
Flooring is the instant “this is a room now” move. Once your feet land on something intentional, the whole balcony feels more finished. You do not need a full renovation. You just need a layer that defines the space and softens the hard surfaces.
For renters, removable options are the safest bet. Interlocking deck tiles are popular because they’re easy to install and easy to take with you. A rug is even easier, but you want to think about drainage and drying. Water trapped under a rug can get gross over time, especially in humid areas.
If you only do one thing in this step, do the rug. It’s the quickest cozy-maker and it helps your furniture feel grounded instead of floating.
Balcony Flooring Options (Renter-Safe)
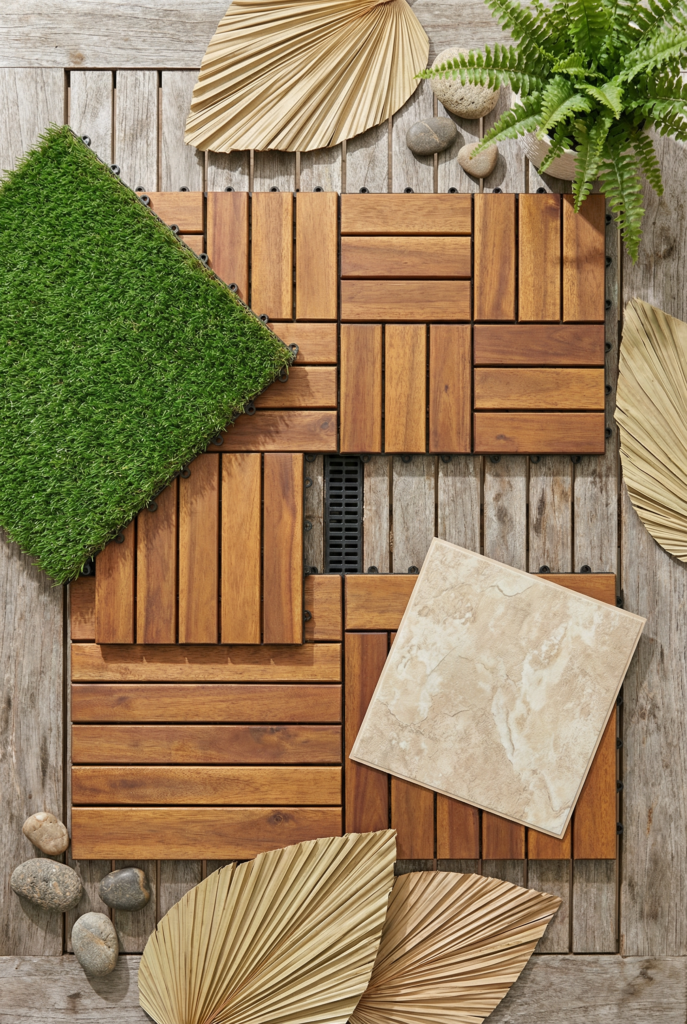
- Interlocking deck tiles (wood or composite)
- Outdoor turf tiles, if drainage is solid
- Peel-and-stick outdoor tiles only where allowed
Outdoor Rugs on a Balcony (Yes/No + How)
Yes, rugs can work beautifully. The key is airflow and drying. Choose a rug designed for outdoor use, and lift it occasionally so the area underneath can dry after rain. That’s the difference between cute and musty.
Use the phrase you’ll actually search: outdoor rugs balcony.
Photo idea: same angle before-and-after, because floors photograph like magic.
Quick win: add one floor layer this week, even if it’s just a runner.
Step 4: Go Vertical with Plants (No Floor Space Needed)
Plants make a balcony feel alive. They also steal floor space if you let them. The solution is building your greenery upward, not outward. This is where vertical plant styling turns into your secret weapon.
Start by choosing one “plant zone” instead of scattering pots everywhere. A plant zone might be along the rail, in one corner, or against one wall. Then you use height layers: something tall, something medium, something trailing. It reads as designed, not accidental.
If you rent, lean on hooks, clamps, and freestanding trellises. And if you have pets, keep a quick safety filter in mind. A pet-friendly balcony is about more than comfort. It’s about preventing nibbling, tipping, and climbing.
Hanging Options (Ceiling, Railing, Wall)
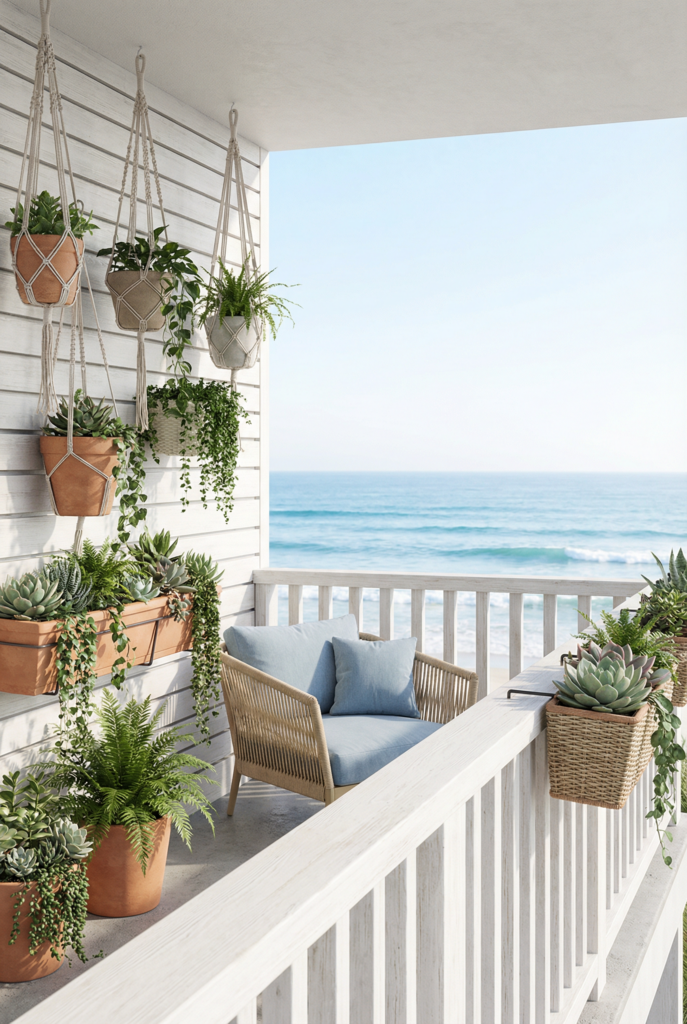
Hanging planters save floor space, but they need to be secure. Wind can turn a cute hanging basket into a swinging wrecking ball.
Look for railing planters, rail hooks, and lightweight trellis setups. If your building allows it, a tension rod can hold a light curtain or vine support. If it doesn’t, clamps and zip ties still get you surprisingly far.
Plant Picks by Sun Level
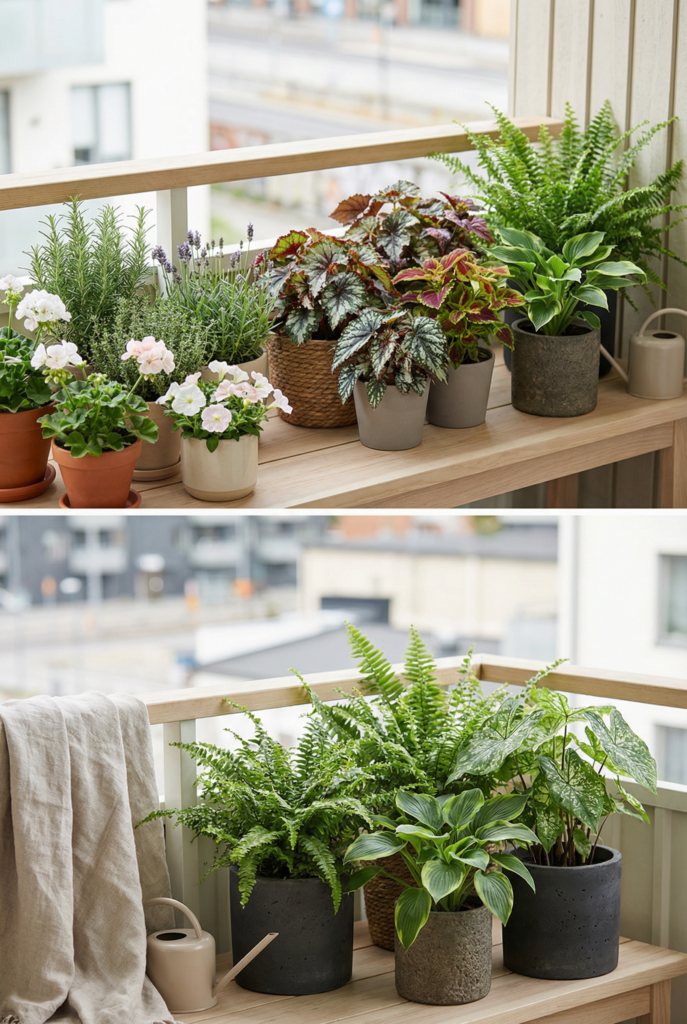
- Full sun: herbs, geraniums, hardy flowering options
- Part shade: begonias, coleus, many trailing plants
- Shade: ferns and other leafy, low-light lovers
If your balcony is mostly shade, don’t fight it. Choose plants that enjoy it and lean into the lush green look.
The Styling Formula (Rule of 3 + Height Layers)
Tall, medium, trailing. Repeat in small clusters. Odd numbers tend to look more natural. Keep the floor open and let plants create the “walls.”
Quick win: build one plant zone with three heights before you buy more pots.
Step 5: Add Privacy Without Drilling (Screens + Greenery)
Privacy is what turns a balcony from “exposed platform” into “I will actually sit here.” You don’t need to drill to get that tucked-in feeling. You need the right material and a secure attachment method that won’t sag after a week.
Start with one side, usually the side facing neighbors. Then add a second layer if needed. Your first layer can be a simple screen. Your second layer can be greenery. Together they feel intentional, not like you’re hiding.
Use the term you’ll search: balcony privacy screen.
Screen Options That Stay Put
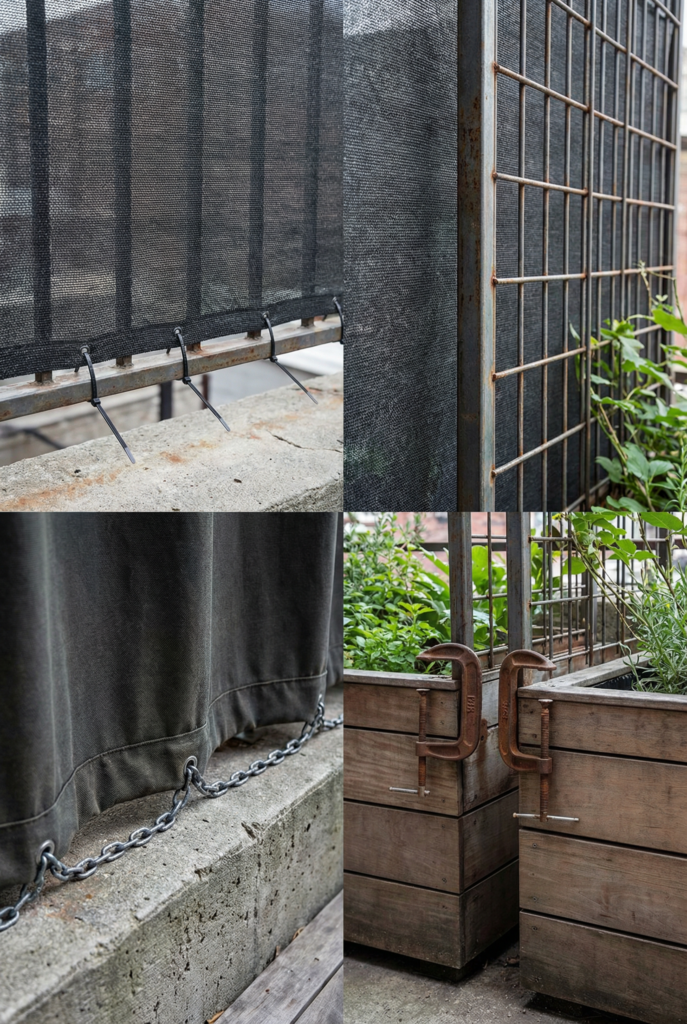
Bamboo or reed screens can work well when zip-tied tightly at multiple points. Outdoor curtains can work too, but they need weights at the bottom and a secure top line. Trellis panels paired with planters give you privacy plus softness.
IKEA even shows a narrow balcony setup using a half parasol for shade plus privacy vibes, which is a good reminder that comfort and screening can overlap.
Quick win: cover one exposed side first, then decide if you need more.
Shade and Weather Solutions
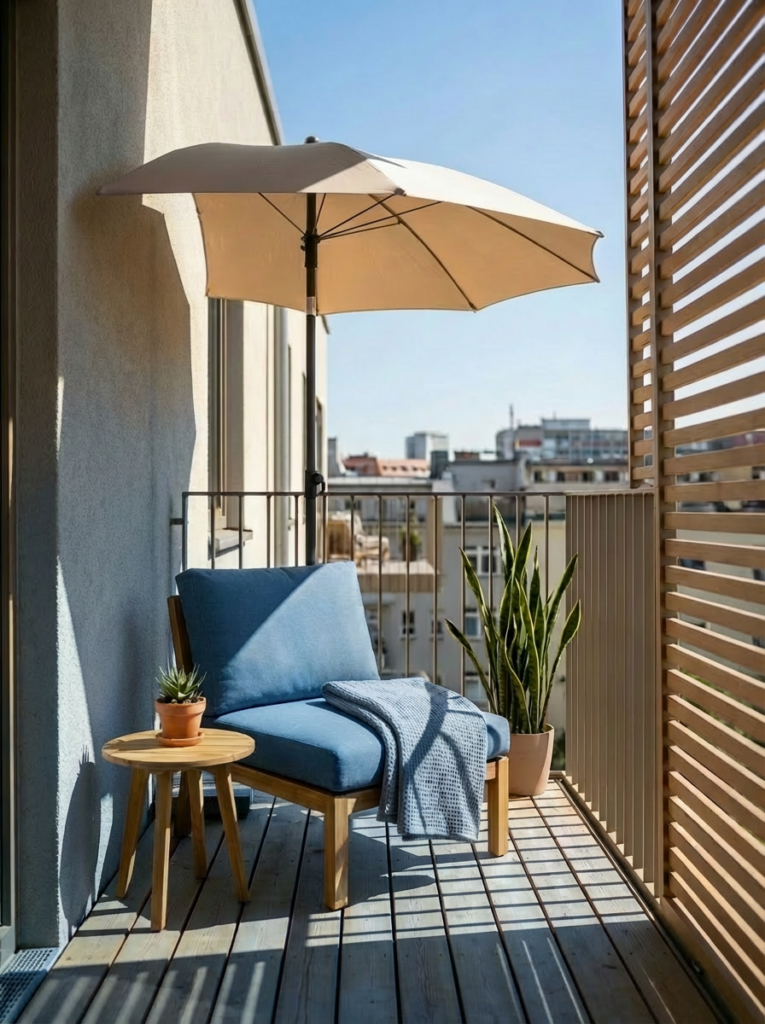
Shade matters. If your balcony gets full sun, you can have the cutest setup in the world and still avoid using it because it feels like sitting on a warm frying pan. Adding shade is not extra. It’s comfort insurance.
For small balconies, look for a space-saving parasol style. Half parasols are designed to sit closer to a wall, which makes them easier to fit on narrow footprints. IKEA’s narrow balcony example specifically uses a half parasol approach for compact shade.
If you have a bit more depth, a side parasol can shade seating without a center pole in your way, but you’ll need a stable base.
If umbrellas feel bulky, consider a small shade sail or an awning style that attaches renter-safely, depending on building rules. Always check what’s allowed, especially if you’re in a windy spot.
Shade options to shop similar for:
- Half parasol for wall-side shade
- Compact side parasol with a slim base
- Small shade sail for corners (rules first)
Weather backup plan
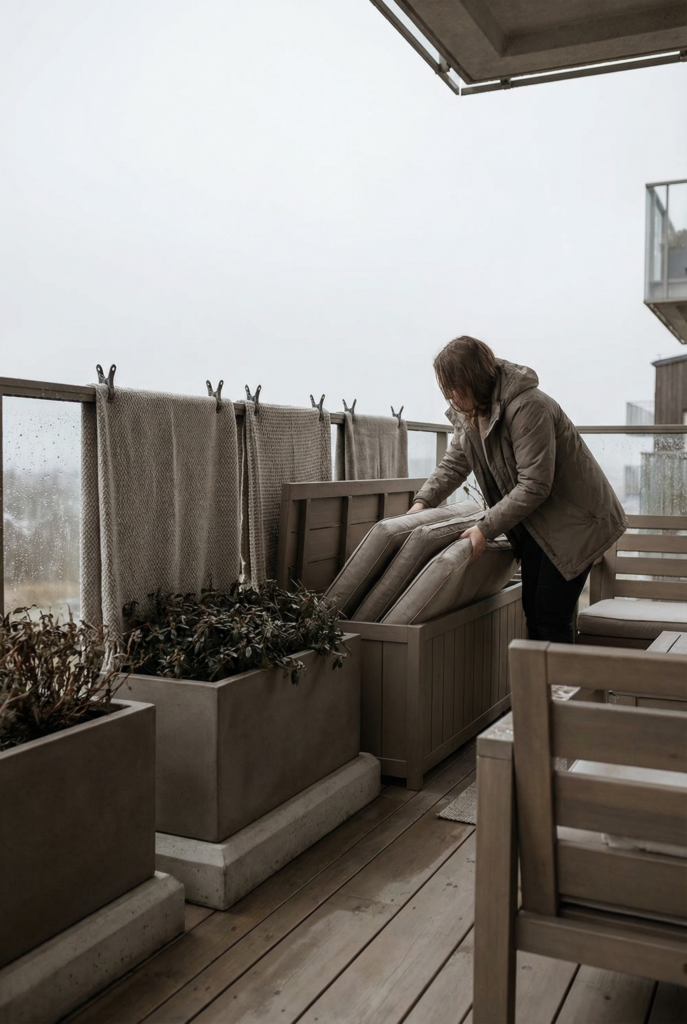
Wind and sudden rain are normal. Plan for it once, then you’re not stressed every time clouds show up.
Keep a storage bin or deck box where cushions can disappear fast. Clip down light textiles. Choose planters with weight or wide bases. And if you use rugs or tiles, leave paths for water to drain.
Quick win: set up one “pack away in 2 minutes” system for cushions and textiles.
Step 6: Lighting for a Glowy Night Balcony (3-Layer Lighting)
Lighting is what makes you use your balcony after sunset. It’s also what makes the space feel finished, even if the furniture is simple. You want glow, not glare.
Layering is the secret. One light source can look harsh. Three smaller light sources look cozy and intentional. I like a high glow, a table glow, and a little accent glow near plants or a corner. If you rent, battery and solar options keep things easy, and you avoid cord chaos.
If you do use plug-in lights, keep connections protected and cords tidy. Outdoor-rated gear matters. IKEA’s small balcony inspiration galleries lean heavily on flexible lighting like light chains for exactly this reason.
Use the search phrase once and move on: string lights balcony.
The Glow Rule for Small Spaces
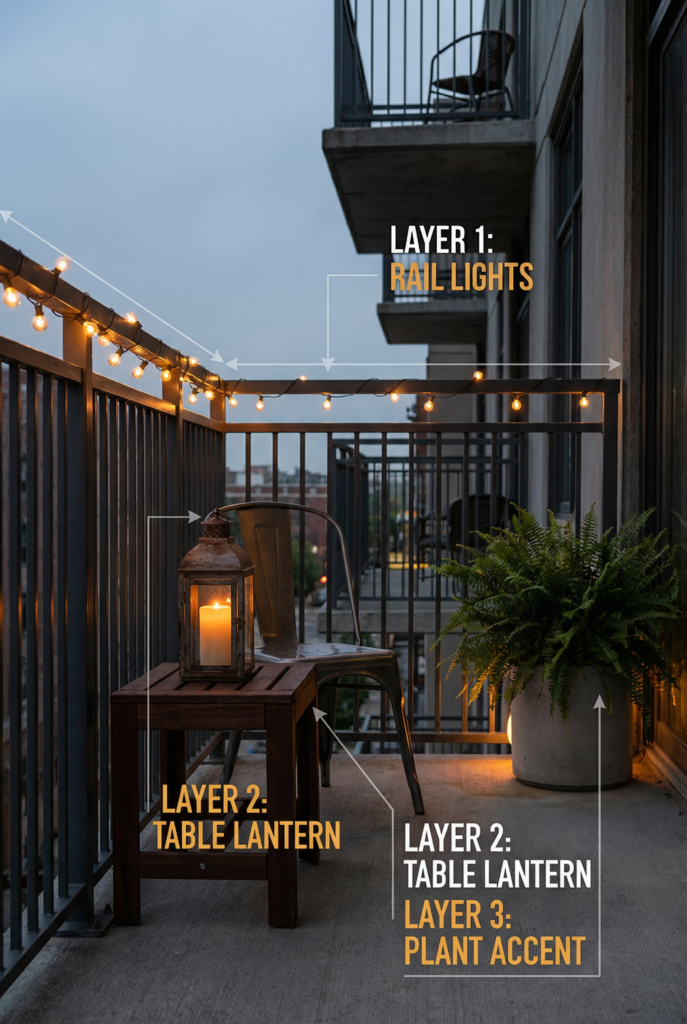
- Overhead or rail line glow
- Table-level lantern
- Accent light near plants or the far corner
Quick win: add one lantern plus one strand of lights this week.
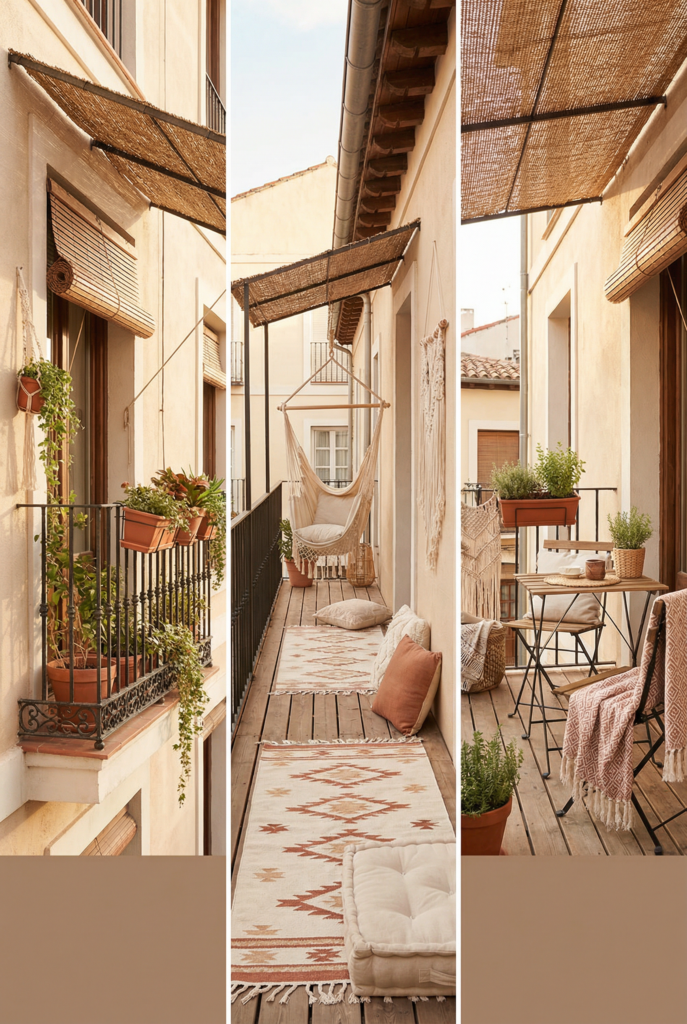
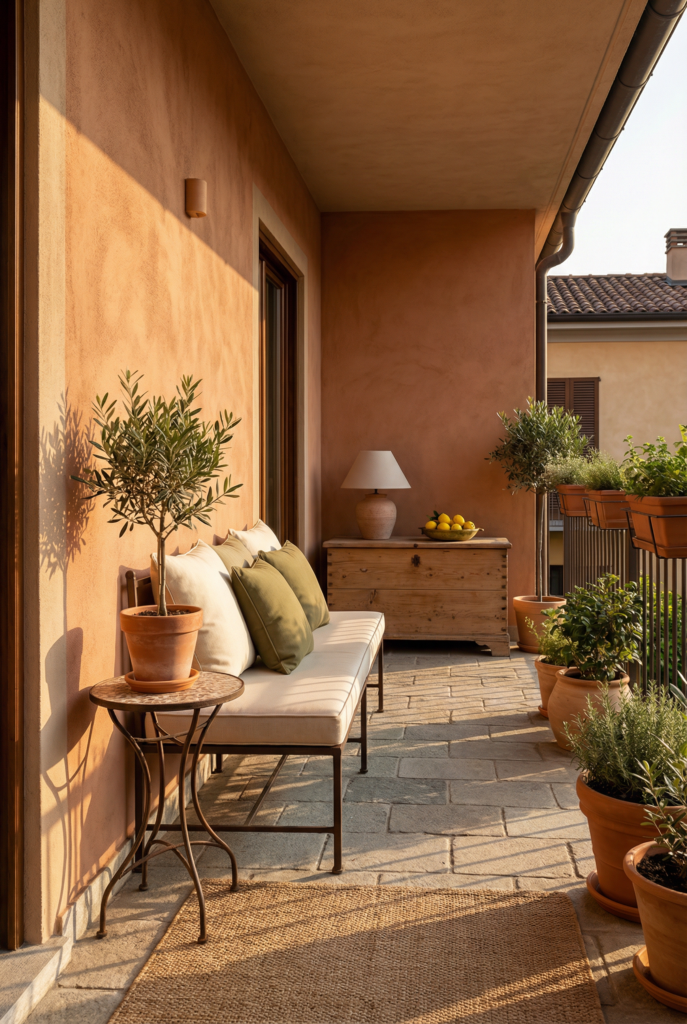
Step 7: Style It Like a Tiny Outdoor Room (Color + Texture)
Styling is where your balcony starts to feel like you. The key is keeping it simple: one palette, repeated a few times, and enough texture to feel cozy. When space is tight, styling is less about adding more and more stuff, and more about making the few things you have look intentional.
Choose a palette that matches your indoor vibe so it feels connected. Then repeat one accent color in three places. For example: one cushion, one planter, one lantern. That repetition is what reads as “designed.” Keep your surfaces minimal. One styled tabletop zone is plenty.
If you want one easy upgrade, do an outdoor-safe piece of balcony wall decor . A lightweight woven piece, a weather-safe mirror if allowed, or a simple hanging accent can pull the whole scene together without stealing floor space.
Three Easy Palettes
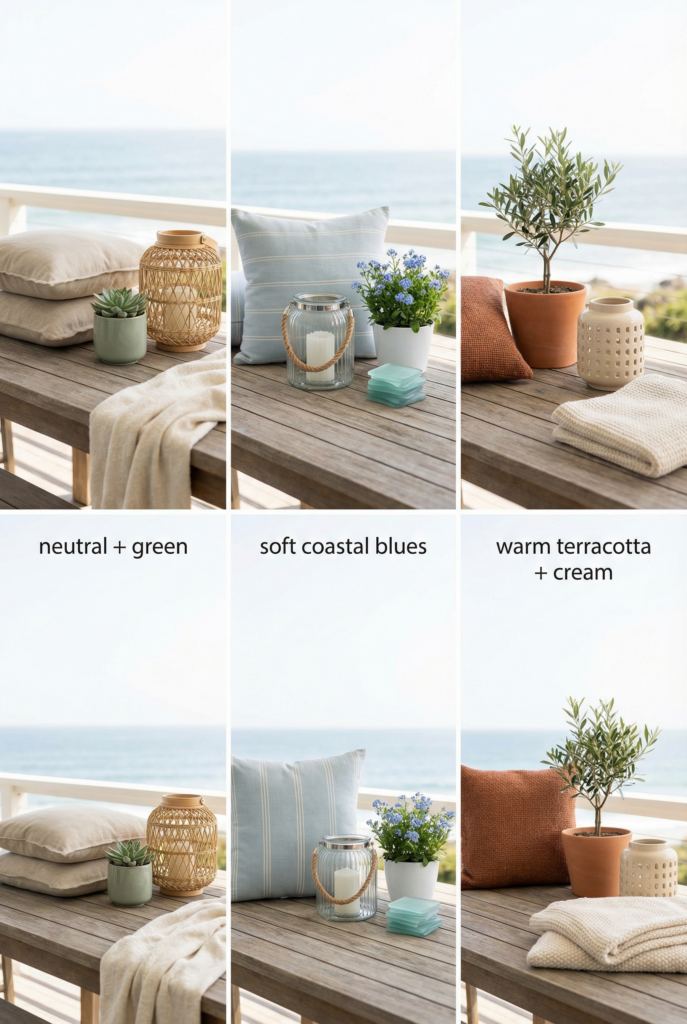
- Neutral plus green
- Soft coastal blues
- Warm terracotta plus cream
Accessories That Make the Biggest Impact
Cushions, a throw, one tray, one small side table. Then stop. That’s the move.
Quick win: repeat one accent color three times, then put the rest of your decor back inside.
Step 8: Storage Solutions (So It Stays Cute)
Storage is the difference between “I love my balcony” and “why is it always messy out here.” When everything has a home, the space stays calm. When nothing has a home, it becomes a holding zone for random items, and the whole vibe collapses.
Keep it simple. One bigger storage piece is usually better than several small ones. A deck box or storage bench can hide cushions, watering cans, and the stuff you don’t want to look at. If your balcony is very narrow, go vertical with a slim cabinet or use rail baskets for small items.
Use the phrase you’ll search: balcony storage solutions.
- Storage bench or deck box
- Vertical cabinet if depth allows
- Under-seat bins
- Rail hooks for small tools
Quick win: give every loose item a home, even if it’s one labeled bin.
Safety + Building Rules (Read Before You Hang Anything)
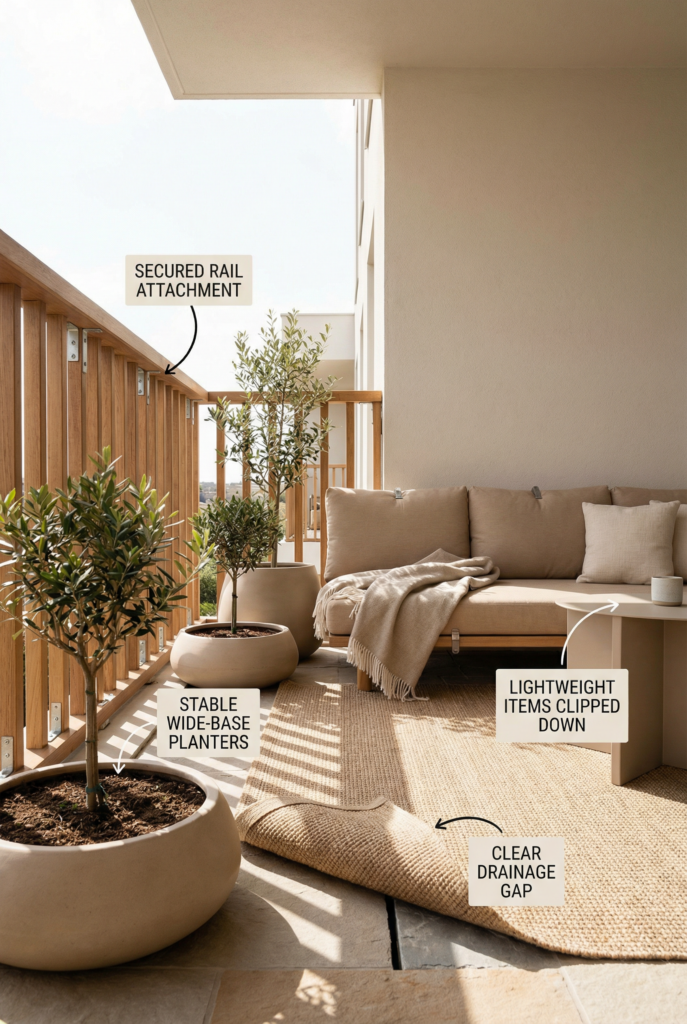
Wind hazards are real. Secure anything lightweight and avoid top-heavy planters. Be cautious with railing attachments and weight. Don’t overload rails. Watch drainage too. Don’t trap water under rugs or tiles. And for grills, heaters, or anything with flame, rules vary a lot by building and location, so check your specific rules before buying.
Budget Tiers (Copy-Paste Shopping Lists)
These are meant to be simple. Pick one tier, then shop similar.
Under $100 setup
- Battery or solar lights: $15 to $35
- Outdoor runner: $20 to $35
- Two seat pads: $15 to $30
- One planter plus a small plant: $10 to $25
- Clips, zip ties, hooks: $5 to $10
$250 setup
- Folding bistro table: $50 to $100
- Two folding chairs: $60 to $140
- Outdoor rug: $30 to $70
- Two cushions plus a throw: $30 to $70
- Two planters plus greenery: $30 to $70
- One rechargeable lantern: $20 to $50
$500 setup
This is where it starts feeling like an urban balcony oasis.
- Slim bench or lounge chair: $120 to $280
- Storage bench or deck box: $80 to $170
- Deck tiles or floor upgrade: $80 to $200
- Layered lighting: $40 to $140
- Privacy screen setup: $40 to $140
- Plant wall pieces and pots: $60 to $180
- Textile upgrade: $40 to $120
The Weekend Plan (So You Don’t Get Overwhelmed)
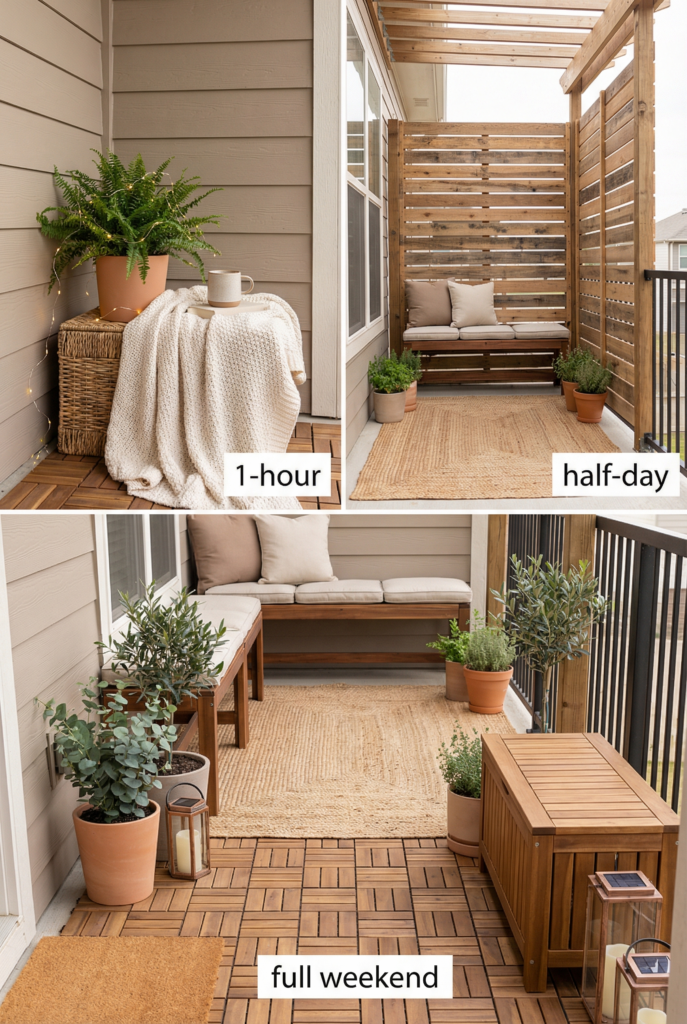
You do not need to do everything at once. You just need momentum and one finished corner.
1-hour quick win
Add lighting, one plant moment, and one textile. That’s it. It will feel dramatically better.
Half-day upgrade
Add seating, then add a rug or tile zone, then add privacy on one side. This is the sweet spot.
Full weekend makeover
Flooring first, then plants, then lighting, then storage. Ending with storage is how it stays done.
DIY Balcony Projects (Fast Weekend Upgrades)
These are the kind of diy balcony projects that actually get finished, even when you’re tired.
DIY privacy screen: zip-tie a reed screen tightly to the railing at multiple points, then add weights at the bottom so it doesn’t flap.
Painted pots: paint three pots in one palette, seal them, and repeat that color once in a cushion.
Leaning plant shelf: seal a small wood shelf, lean it against a wall, and secure it with a strap so it can’t tip.
Jar lantern cluster: add pebbles to jars for weight, then drop in battery tea lights and group them in one corner.
Simple cushion covers: sew envelope covers from outdoor fabric or drop cloth, then add ties so they stay put.
Rail herb bar: hang small planters from the rail for a mini kitchen garden look.
These also double as balcony decor ideas because they add charm without eating space. If you want small balcony ideas that feel realistic, start here.
Small Balcony Mistakes to Avoid (So It Doesn’t Feel Cramped)
Too many tiny items equals visual clutter. Furniture that’s too deep blocks your path. Putting everything on the floor wastes vertical space. Skipping lighting makes the space feel unfinished at night. And no storage plan means the balcony is always one windy day away from chaos. If you stick to one layout, one hero piece, and clear zones, you’ll avoid most of the pain.
FAQs
How to make a small balcony pretty?
Start with one purpose and one hero piece, then add the three cozy layers: floor, lighting, textiles. A rug, one lantern, and two cushions can shift the whole mood fast. Keep decor grouped, not scattered. Repeat one accent color a few times and the space will look styled even with simple furniture.
What furniture works best on small balconies?
Slim, flexible furniture wins. Folding bistro sets, stackable chairs, a narrow bench, and a small side table are usually the easiest to live with. Rail tables are great if your door swing is tight. Always measure first and make sure you can still step outside comfortably.
How to decorate your balcony on a budget?
Spend money where it changes comfort: a rug, lighting, and a seat you actually like. Then add inexpensive texture with cushion covers and a washable throw. Plants can be budget-friendly too, especially herbs or small starters. Thrifted chairs often look great once you add one cushion and a cohesive color.
How to arrange plants in a small balcony?
Create one plant zone and use height layers. Add one tall element, cluster medium pots, and include one trailing plant to soften edges. Group plants in little scenes instead of scattering singles everywhere. If floor space is tight, go vertical with rail planters and a trellis setup.
What plants are good for small balcony?
Match plants to your sun. Full sun loves herbs, geraniums, and hardy flowers. Part shade works well with begonias and many trailing plants. Shade can be great for ferns and leafy greens. If you have pets, check safety for anything you bring home, especially if your pet chews leaves.
Is it okay to put a rug on a balcony?
Yes. Choose an outdoor rug and let it dry. Lift it occasionally after rain so the area underneath can breathe. Avoid trapping water against the floor. A rug is one of the quickest ways to make a balcony feel like a room, so it’s worth the small maintenance.
How do I add privacy to a small balcony?
Start with the most exposed side. A reed or bamboo screen attached with zip ties is renter-friendly and quick. Outdoor curtains can work too, but they need secure attachment and weights. If you want privacy that feels lush, combine a screen with greenery on a trellis.
How do I decorate a balcony with no drilling?
Use clamps, tension rods, rail hooks, and zip ties. Choose rail planters, a rail table, and freestanding trellises for plants. Add lighting with battery or solar options and keep styling simple with a rug and textiles. You can get a finished look without making a single hole.
Conclusion
Here’s the order that makes everything easier: layout, furniture, floor, plants, privacy, shade, lighting, styling, storage. If you do it in that sequence, your balcony won’t feel like a puzzle. It’ll feel like a tiny outdoor room you actually use.
And if you’re still stuck, go back to your purpose. Once you pick that, how to decorate a small balcony stops being a big vague project and becomes a handful of clear moves. Pick your layout and do Step 1 today. If you want, tell me your balcony dimensions and sun direction, and I’ll tell you which layout I’d choose.