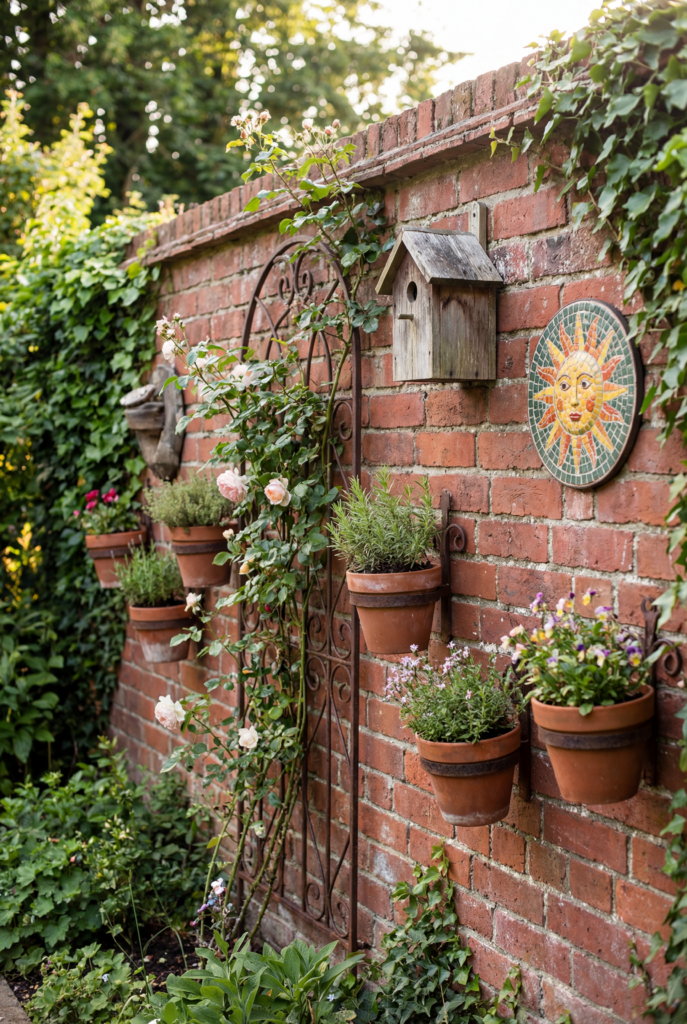
That brick wall in your garden does not have to sit there looking stern and unfinished. I’m turning it into a cozy backdrop with greenery, lighting, and a few smart add-ons that won’t fall off the second the wind picks up.
If you have a garden brick wall that looks fine in theory but feels boring, harsh, or weirdly unfinished in real life…hi. Same.
Brick can turn into this big flat slab of “builder leftover” once the plants die back, the patio furniture gets shoved to one side, and the sun hits it like it has a personal vendetta.
Garden brick walls often feel boring or harsh because they’re a huge, unbroken plane of the same color and texture. Your eye skims and moves on.
The fix is usually decoration, not an expensive renovation. You’re layering greenery, lighting, and one strong focal moment so the wall stops feeling like a boundary and starts feeling like a backdrop.
Here’s my promise: you can make that wall look intentional with a few smart moves that fit your sun, your budget, and your tolerance for drilling.
We’ll cover vertical garden options, nighttime lighting and projection, brick wall decor that’s actually safe outdoors, and paint treatments that can be low-commitment if you’re nervous.
Quick Start Box (pick your situation and copy it)
- If your wall gets full sun: trellis + climbing rose or jasmine + 2 uplights
- If your wall is shaded: wall planters + ferns or heuchera + warm string lights
- If you rent or can’t drill: freestanding grid + hanging pots + solar lights
- If you want the biggest impact fast: 2 uplights + one large wall art piece
Decision Table (so you don’t overthink this for 3 weeks)
| Goal | Best idea | Cost | Difficulty | Time |
|---|---|---|---|---|
| Soften a harsh wall | Trellis + vine | $40 to $150 | Easy to medium | A weekend |
| Night glow | Uplights | $30 to $150 | Easy | 1 to 2 hours |
| No drill solution | Brick clips or freestanding panel | $20 to $120 | Easy | About 1 hour |
| Major makeover | Limewash or paint | $60 to $200 | Medium | Weekend plus |
If you’re wondering how to decorate a brick wall in the garden without turning it into a cluttered craft fair, this is the starting line. Pick one direction, do it well, then add one supporting layer.
Before You Decorate (so your stuff actually sticks)
- Brush the wall down first. Dry brick holds dust like it’s its job.
- If it’s grimy, wash with plain water and a stiff brush, then let it fully dry.
- Scrape off anything loose or flaky. Don’t build on crumbs.
- If you see white powdery spots, brush them off and let the wall dry out.
- Pick mounting zones now. Mortar joints are usually your friend.
- If you want adhesive, test one small spot for a full day first.
- Plan drainage for planters up front, not after you get mystery stains.
Why Brick Walls Feel Harsh, and How to Soften Them Fast
Brick feels harsh because it’s one big texture, one big color, one big plane. It’s also extremely honest.
Every stain, every joint, every “why is that darker?” moment is on display.
In full sun it can look intense. In shade it can look blank.
The fastest fix is layering. You want at least two of these: greenery in front of it, something that changes at night (lighting), and one focal element that feels like it belongs there on purpose. This is outdoor decor, not construction, which is great news for everyone’s sanity.
Do one practical thing before you buy: stand where you actually sit.
Coffee spot, grill spot, “I’m hiding from my family for three minutes” spot. If the wall feels like it’s staring at you, that’s where your main move goes. Everything else supports it.
Also, take a before photo. Not for Instagram. For you.
Vertical Garden Options that Make Brick Feel Alive (and not fussy)
Vertical greenery works because it breaks up the wall’s flatness and adds movement. Even when nothing is blooming, the wall reads softer and more layered.
It’s also the best use of space when your patio is small and you’re tired of stepping around pots like an obstacle course.
Plants by Sun vs Shade (so you don’t guess and then get mad later)
- Full sun: climbing rose (romance, big payoff)
- Full sun: jasmine or star jasmine (smells unfairly good)
- Full sun: trailing lantana (tough, cheerful)
- Full sun: ivy geraniums (classic spill-over)
- Full sun: succulents in pockets (only with great drainage)
- Shade: ferns (instant softness)
- Shade: heuchera (pretty leaves, easy color)
- Shade: hostas (if you’re not in a slug war)
- Shade: coleus (fast, bright, dramatic)
- Shade: creeping jenny or lamium (trailing, forgiving)
Wall-Mounted Planters
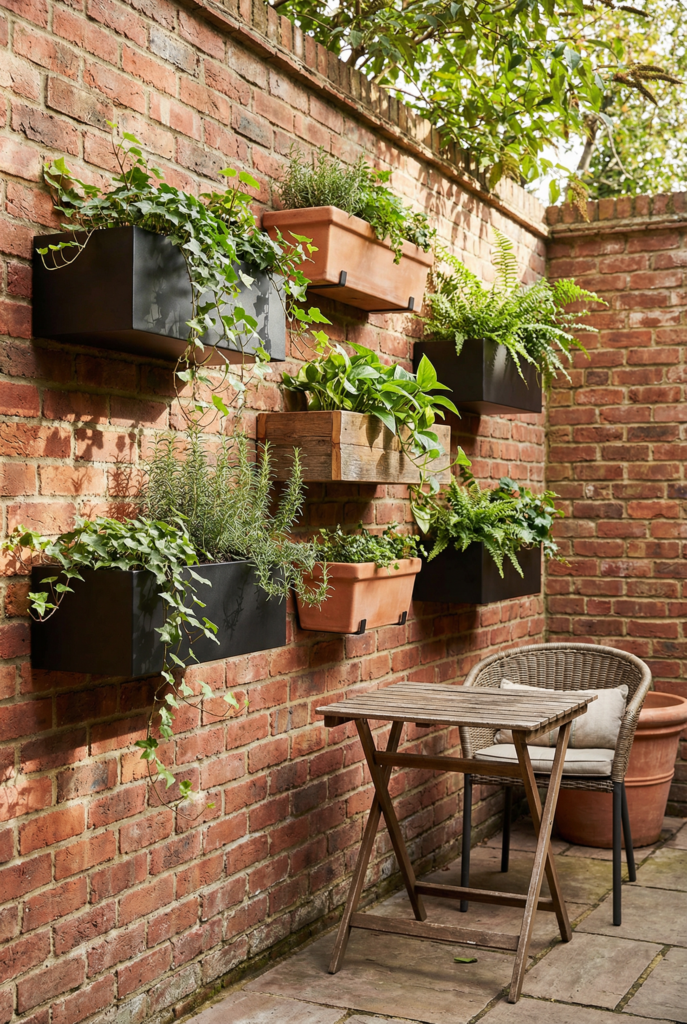
Wall-mounted planters are pockets or boxes on the wall with herbs, trailing plants, or pops of color. They can look modern or cottagey depending on the shape.
They’re also a sneaky way to add depth without stealing floor space.
- What it looks like: staggered rows of planters with greenery spilling down
- Best use case: small patios, narrow yards, sun or shade (plant dependent), rentals if mounted to a freestanding panel
- Maintenance level: medium (small soil dries fast)
- Typical US price range: $15 to $60 each, sets $60 to $180
- Practical tip: drainage matters. No drainage equals swamp roots and brick stains.
Store note: Home Depot and Lowe’s are great for basics fast. Wayfair is where you go when you suddenly care about “matte black but make it cute.”
Trellis Plus Climbing Plants
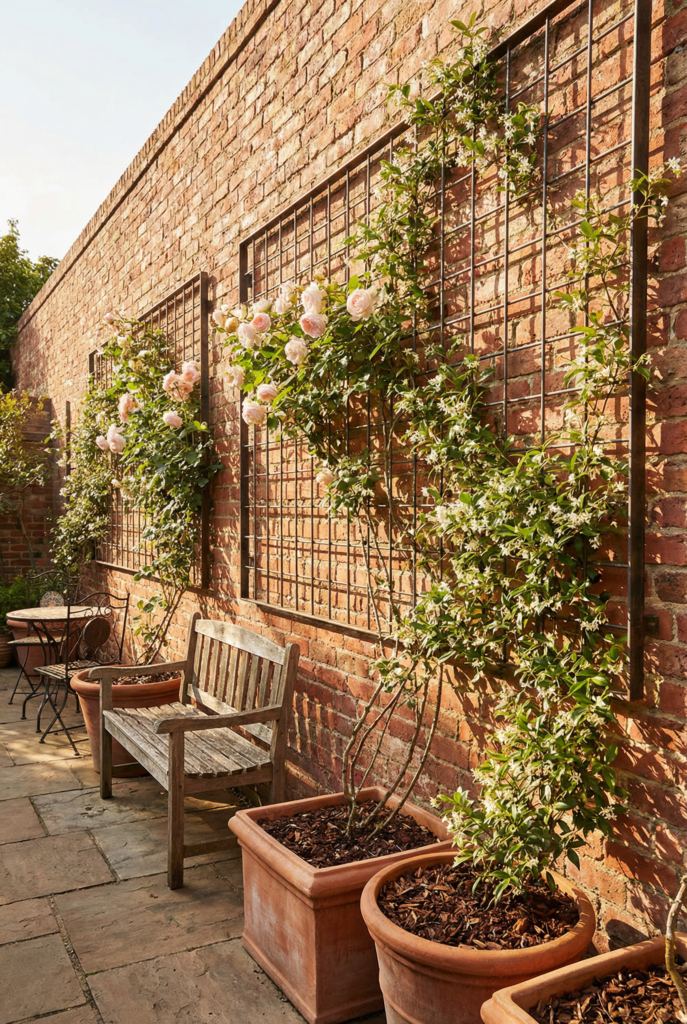
A trellis plus vines is the classic “soften the wall” move because it turns brick into a garden backdrop.
You get vertical lines, leaf shapes, and shadows that change all day. It’s very garden wall ideas in the best way.
- What it looks like: a grid or lattice with vines weaving through, slowly covering the brick
- Best use case: full sun, bigger walls, anyone who wants that romantic garden vibe
- Maintenance level: low to high (depends on vine and pruning)
- Typical price range: trellis $25 to $120 typical, premium large metal $200+
- Plant cost typical: $20 to $50 for a climbing rose or jasmine starter
- Practical tip: don’t mount it flat. Leave an air gap so the wall can dry and the vine can tuck behind.
Mini guide: How to install a trellis with an air gap (DIY)
- Choose a trellis size that fills at least a third of the area you want to soften
- Hold it up and mark points with painter’s tape (no “measure by vibes”)
- Plan a 1/2 inch to 1 inch gap behind it
- Use spacers like washers or small wood blocks
- Drill into mortar joints when possible, not the brick face
- Use masonry screws or the right anchors for your trellis weight
- Mount, then do a gentle tug test
- Tie the vine loosely, then train it weekly the first season
- Water at the base, not on the wall
I did my first trellis marks at 8:15 am with coffee in one hand and still managed to be crooked. Step back and eyeball it before you drill.
Modular Living Wall Systems
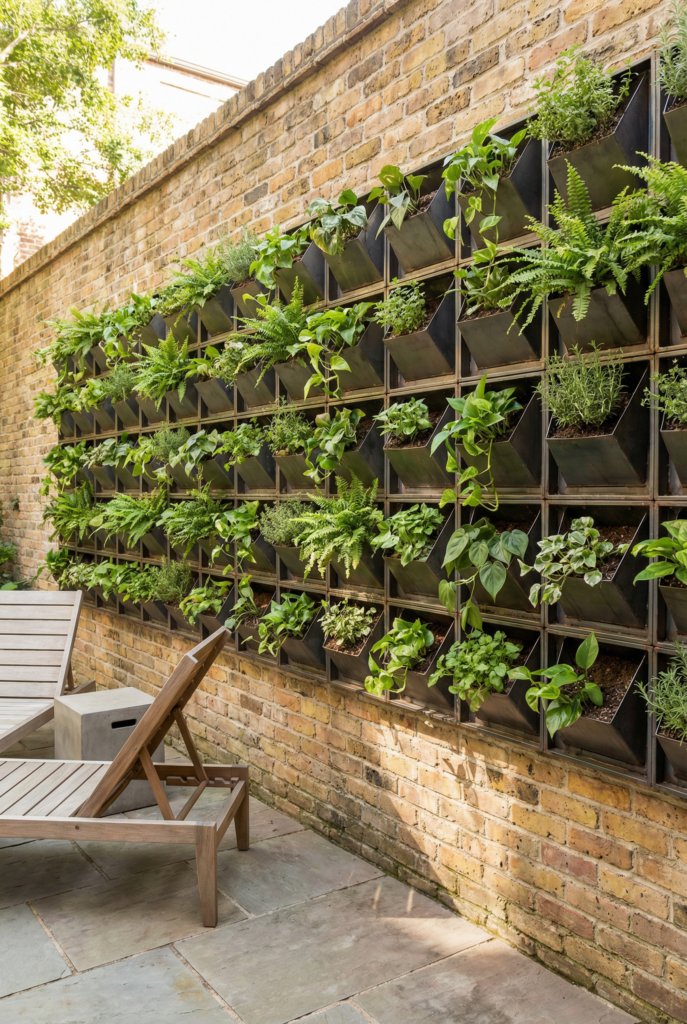
Best for: a clean, modern “green feature wall” look, especially if you like swapping plants.
Tip: start with easy plants for the first season because tiny pockets dry out fast.
Cost: $80 to $250 to start, premium larger systems $300+.
Shopping note: Wayfair makes it easy to get started. Etsy is where you go when you want it to look handmade and cooler.
Faux Greenery (yes, it’s okay sometimes)
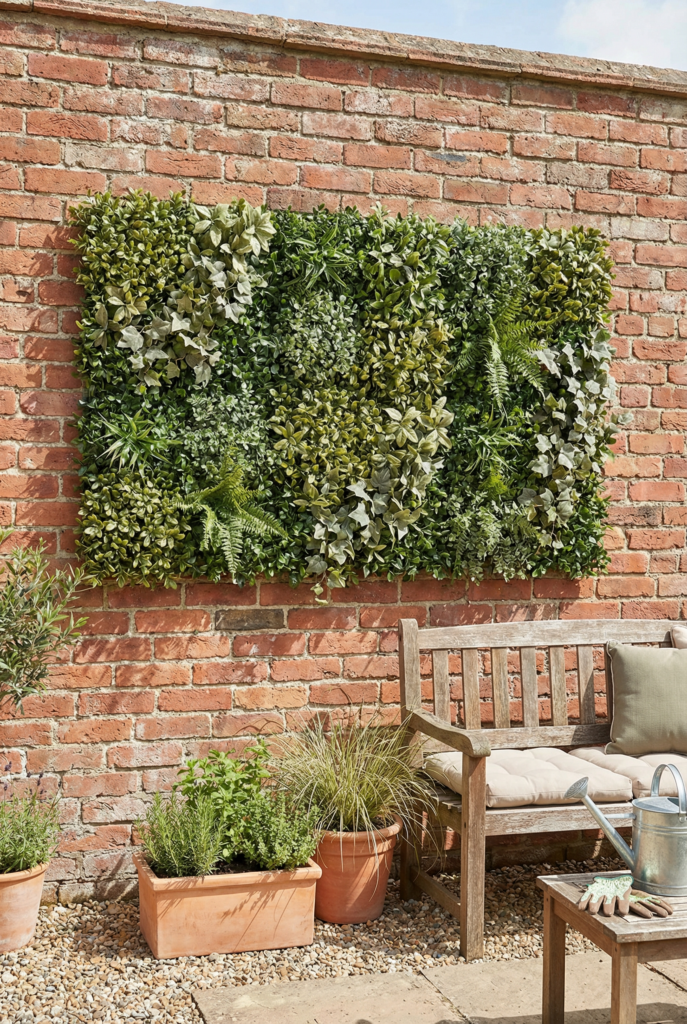
Best for: rentals, travel-heavy life, brutal sun, or “I forget to water” honesty.
Tip: buy one panel and leave it outside a couple weeks before committing to a whole wall.
Cost: $40 to $120 per panel, premium UV-rated $150+.
Lighting and Projection that Makes Brick Look Expensive at Night
Lighting changes brick more than almost anything because brick is all texture.
In daylight, you see color and pattern. At night, you see depth.
The right light grazes the surface and makes it look intentional. The wrong light flattens it and gives “parking garage.”
Placement matters more than fixture type. You’re either washing the wall softly or skimming it for drama. This is how you build outdoor ambiance without rebuilding anything.
String or Café Lights
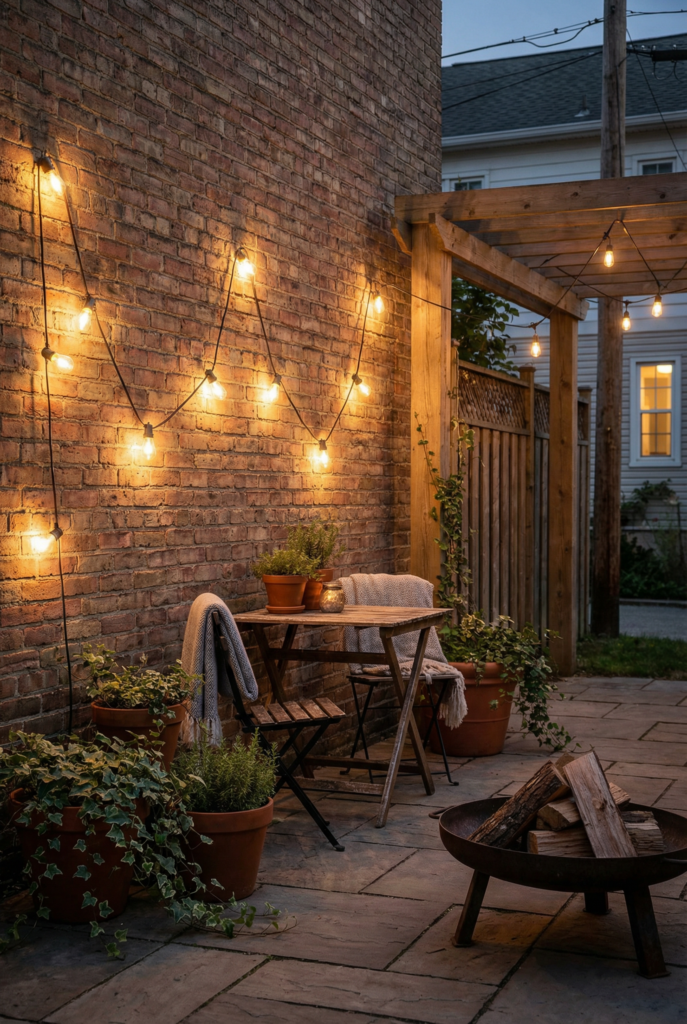
- Where to install: house to wall, wall to pole, or zigzag over seating
- Mood it creates: cozy, casual, lingering-outside energy
- Brick texture effect: softens, less shadow drama
- Power source: plug-in or solar
- Typical US price range: $25 to $120, premium sets $150+
Shady wall tip: warm string lights plus greenery is an easy win. Home Depot and Lowe’s have sturdy options that don’t feel flimsy.
Wall Sconces
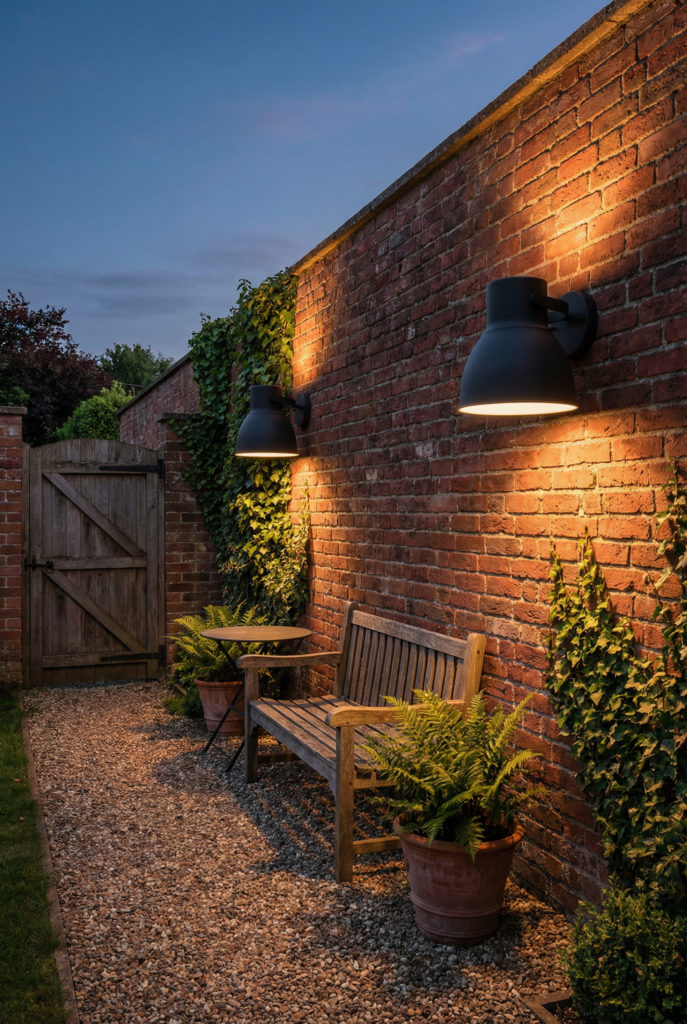
Best for: a more “architectural” look, especially near doors, gates, or seating zones.
Tip: mount them where they light people and surfaces, not just the top of the wall.
Cost: $40 to $180, premium $250+.
Ground Uplights (featured)
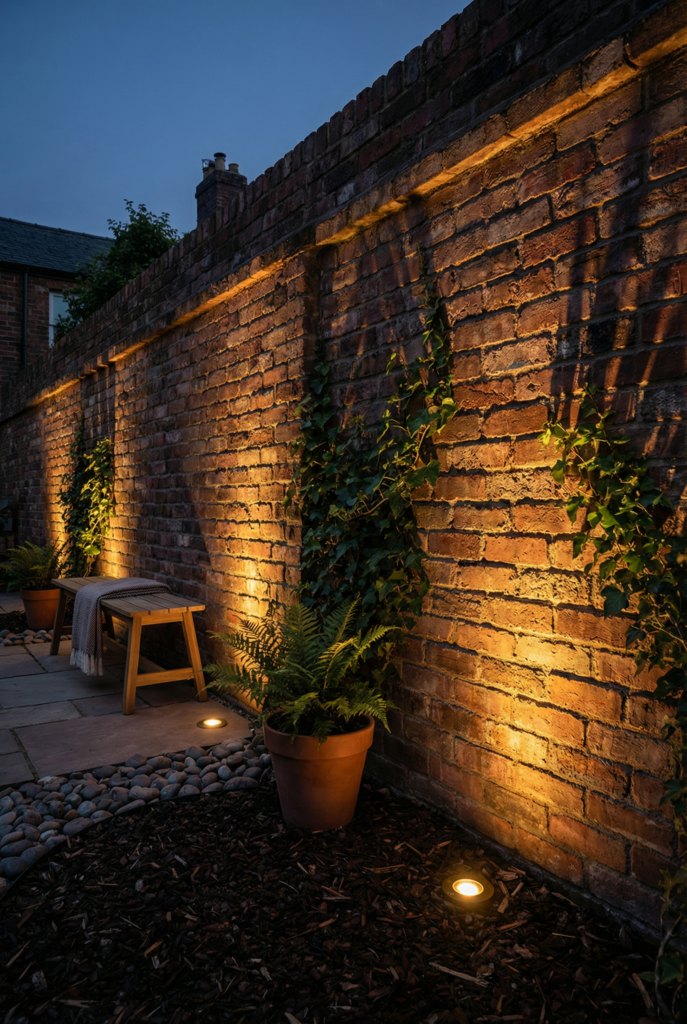
If you do one lighting move, do uplights. They’re the fastest “this looks designed” button.
- Where to install: at the base of the wall, about 12 to 24 inches out
- Mood it creates: moody, designed, kind of magical
- Brick texture effect: strong definition, texture looks expensive
- Power source: low voltage, plug-in transformer, or solar
- Typical US price range: $15 to $60 each, kits $60 to $200
Mini guide: How to uplight a brick wall for texture
- Start with two lights
- Place them 12 to 24 inches from the wall
- Angle 30 to 45 degrees upward
- Add more if the wall is long
- Warm white for cozy, neutral for modern
- Aim to avoid glare from seating
- Hide wires under mulch or along edges, or use solar
- For solar, place panels where they actually get sun
- Tweak angles at night, slowly, like you’re aiming stage lights
- Stop before it becomes “stadium lighting”
I tested mine at 7:10 pm, got bitten by a mosquito, the dog stepped on the wire…still worth it.
Solar Lights
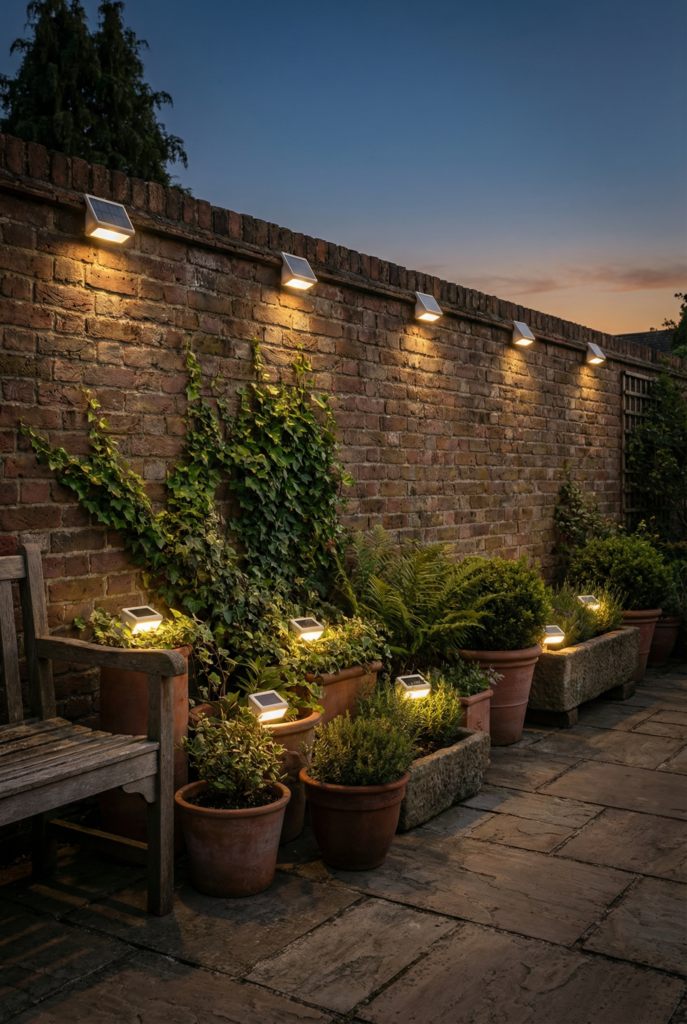
Best for: quick accent glow without wiring, especially around planters or along the top edge.
Tip: make sure the solar panel actually gets sun, even if the wall is shaded.
Cost: $15 to $60, premium brighter options $80+.
Subtle Projection Patterns
Best for: adding movement to a flat wall when you want something a little whimsical.
Tip: keep it subtle, like “tree shadow” energy, not “laser show.”
Cost: $25 to $100, premium $150+.
Wall-Mounted Decor Pieces
Brick is not drywall. Brick wants a plan.
If you want the pretty stuff to stay on the wall through wind and weather, you match the decor to the mounting method and the weight. This is where you can nail focal point design without clutter.
Outdoor metal art

- Weather resistance: good if outdoor-rated or powder-coated
- Weight considerations: usually light to medium
- Mounting method: screws into mortar, or brick clips if compatible
- When NOT to use it: super windy spots without secure fastening, or if you hate patina
- Typical US price range: $40 to $200 typical, premium large $250+
Wayfair is great for simple big shapes. Etsy is where you find the handmade look.
Ceramic or mosaic tile inlays

- Weather resistance: great with outdoor-rated tile and grout
- Weight considerations: medium to heavy
- Mounting method: mortar-based install or exterior-rated masonry adhesive
- When NOT to use it: freeze-thaw zones without proper prep, or walls that stay wet
- Typical US price range: $30 to $150 for a small DIY accent, premium custom $300+
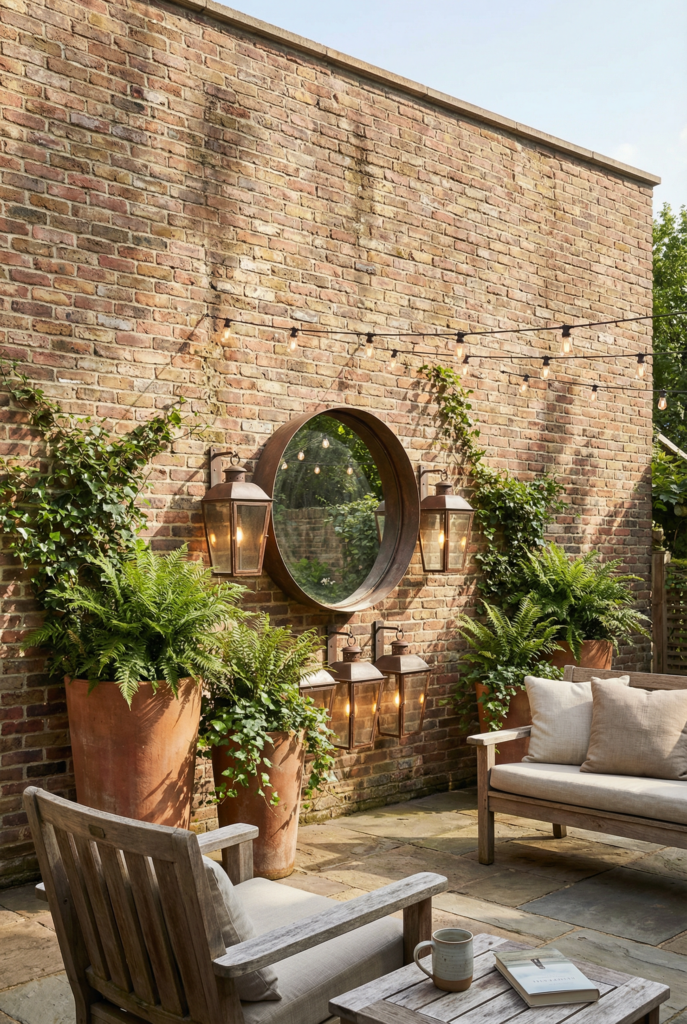
Mirrors and reflective elements
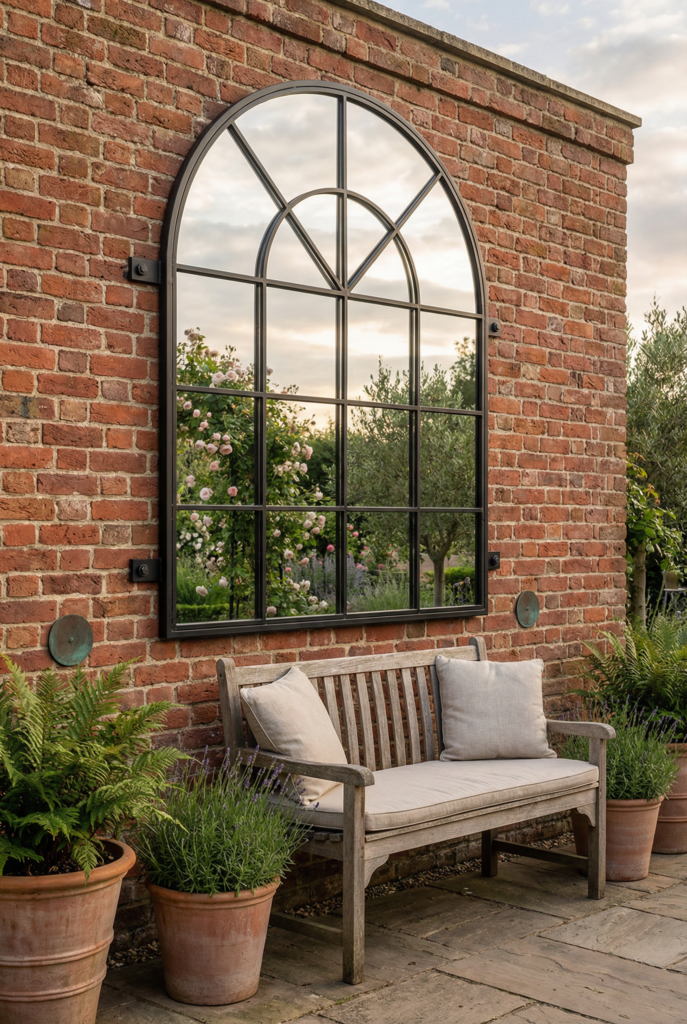
- Weather resistance: good if sealed and truly outdoor-rated
- Weight considerations: medium to heavy
- Mounting method: mechanical fastening into mortar, not just adhesive
- When NOT to use it: harsh direct sun angles or spots reflecting clutter
- Typical US price range: $50 to $180, premium oversized $250+
Shelves and recessed niches
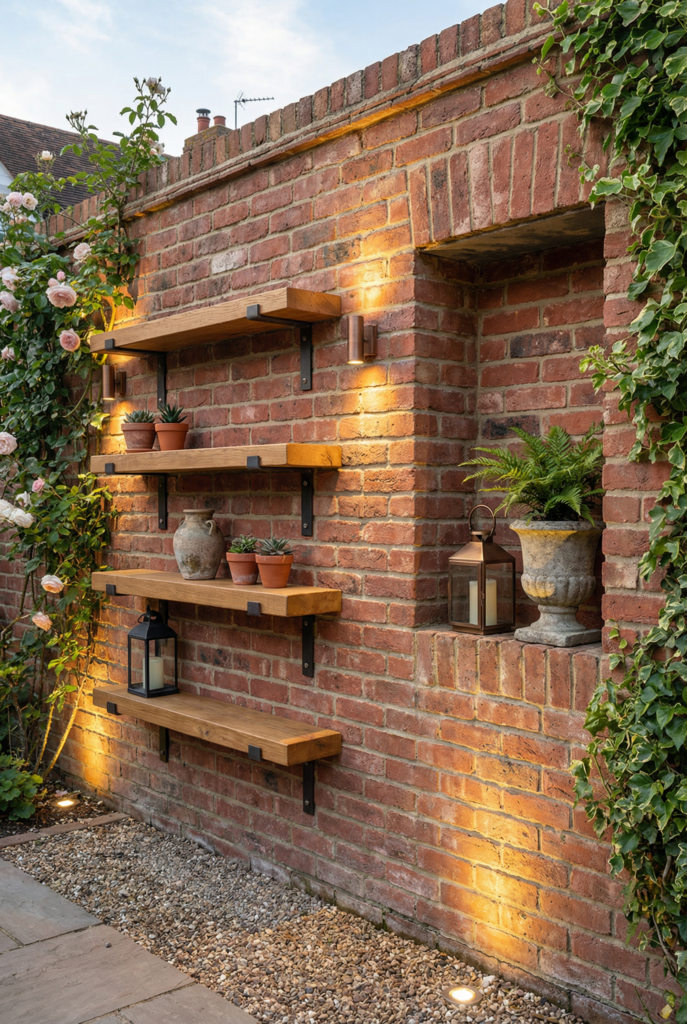
- Weather resistance: good with exterior wood or metal, sealed properly
- Weight considerations: medium to heavy depending on what you place
- Mounting method: screws into mortar, anchors for heavier loads
- When NOT to use it: if you won’t anchor properly or the wall gets soaked
- Typical US price range: $30 to $150, premium systems $200+
Built-in seating nooks
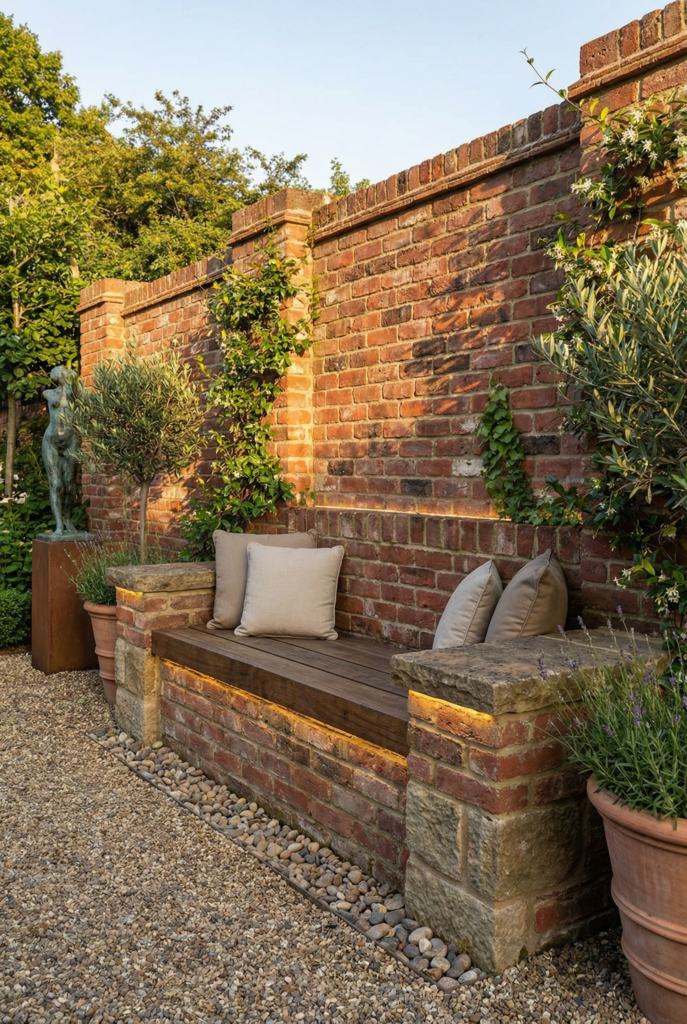
- Weather resistance: excellent with the right build materials
- Weight considerations: heavy, real build
- Mounting method: integrated construction
- When NOT to use it: bad drainage zones or moisture-prone walls
- Typical US price range: project-based, typically higher than decor
Wall water features
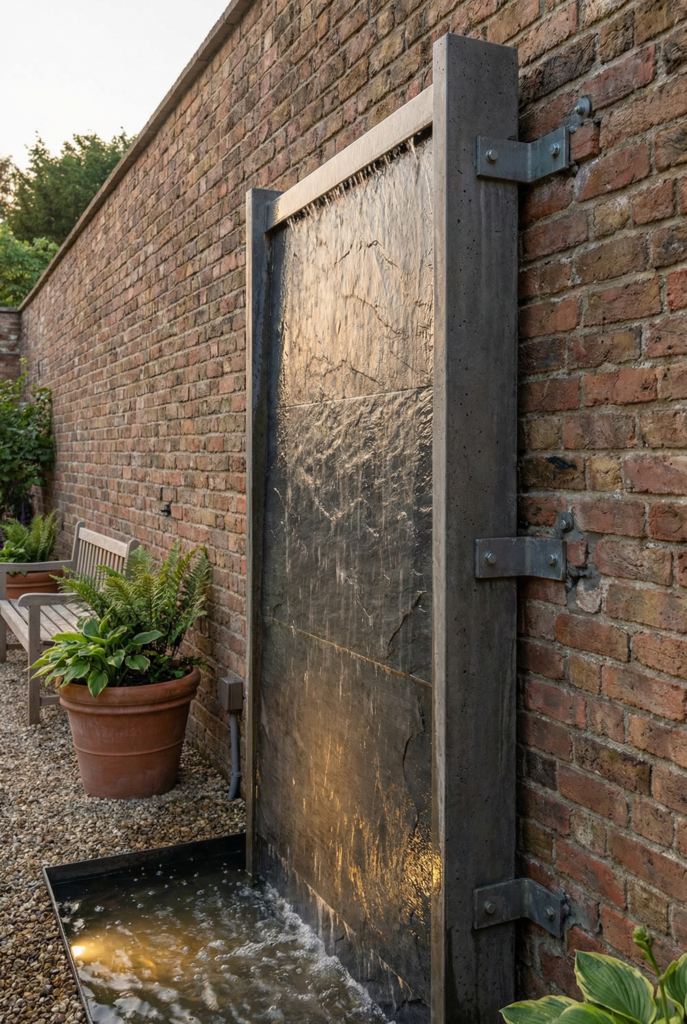
- Weather resistance: good if designed for outdoors
- Weight considerations: heavy, plus water weight
- Mounting method: secure brackets and anchors into mortar
- When NOT to use it: no power access, no winterizing plan, moisture concerns
- Typical US price range: $150 to $600 typical, premium statement $800+
Brick plus wood
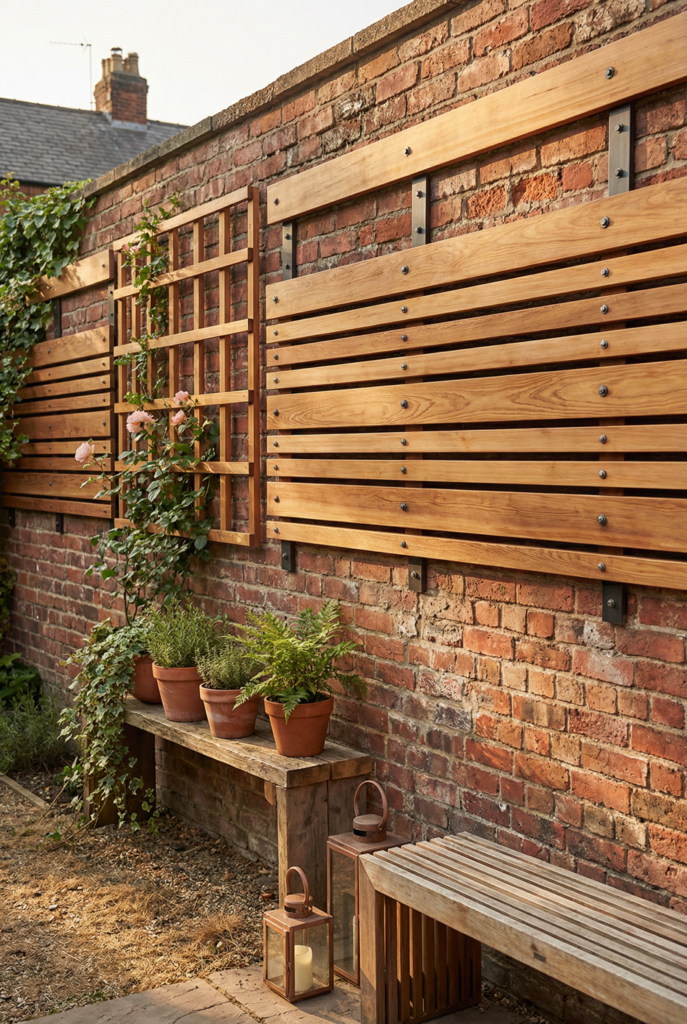
- Weather resistance: good if sealed and maintained
- Weight considerations: medium
- Mounting method: screws into mortar
- When NOT to use it: constant wet zones if you won’t reseal
- Typical US price range: $40 to $200
Brick plus stone

- Weather resistance: excellent
- Weight considerations: heavy
- Mounting method: mortar-based install, sometimes pro help
- When NOT to use it: moisture issues or structural concerns
- Typical US price range: project-based
Brick plus metal

- Weather resistance: good if outdoor-rated
- Weight considerations: medium
- Mounting method: screws or anchors into mortar
- When NOT to use it: salty coastal air without the right finish
- Typical US price range: $40 to $200 typical, premium $250+
Mounting Reality Check (read this before you buy the cute thing)
- Light: under 2 lb, outdoor-rated adhesive sometimes works only on smoother brick
- Medium: 2 to 10 lb, brick clips if compatible, or screw into mortar joints
- Heavy: 10+ lb, masonry anchors or masonry screws into mortar, and consider pro help
- If the mortar crumbles when you scrape it, repair first—anchors won’t hold reliably.
Mini guide: How to mount items safely on brick (simple decision tree)
- Weigh the item, or look it up online
- Decide temporary vs permanent
- Under 2 lb: try outdoor adhesive only on smoother, clean, dry brick
- Clean the surface and let it dry fully before applying anything sticky
- 2 to 10 lb: brick clips if compatible, or screw into mortar joints
- 10+ lb: masonry anchors or masonry screws into mortar joints
- Avoid drilling the brick face unless you have a reason and the right hardware
- Do a gentle tug test before trusting it
- If it’s above seating, treat it like it matters more. Because it does.
Yes, drilling is scary. I have tile-drilling trauma. I still flinch at hammer drill sounds. But I also like my decor not falling during wind gusts.
Texture-Enhancing Paint Treatments (for when you want change without regret)
If you’re hesitant to paint brick, I get it. Brick feels permanent. Painting feels like a commitment.
And your brain will absolutely whisper, “What if it peels and I cry?” Valid.
Pick the method that matches your risk tolerance. Some treatments feel softer. Some are more durable. Some are basically forever.
Limewash
- Visual result: soft, chalky, old-world look with texture showing
- Durability outdoors: good when applied correctly
- Difficulty level: medium
- Reversibility: semi-reversible, not wipe-off simple
- Price per gallon: $40 to $70 typical
Whitewash
- Visual result: lighter brick with variation showing through
- Durability outdoors: medium
- Difficulty level: low to medium
- Reversibility: low
- Price per gallon: $30 to $60 typical
Big mistake to avoid: going too opaque. Test first.
Exterior masonry paint
- Visual result: solid color, smoother overall read
- Durability outdoors: high when done right
- Difficulty level: medium
- Reversibility: low
- Price per gallon: $30 to $60 typical
Chaotic true-life moment: I once started a “quick sample” at 7:10 pm because the evening light made me feel brave.
Then a mosquito bit my ankle, the dog brushed the wet spot, and I spent 15 minutes calling it “intentional texture.” Start in the morning. Please.
Stenciled patterns
- Visual result: patterned brick, tone-on-tone or bold
- Durability outdoors: medium to high with the right paint and seal
- Difficulty level: medium
- Reversibility: low to medium (you can paint over it)
- Price per gallon: $30 to $60 typical, plus stencil cost
Textured coatings (advanced)
- Visual result: more uniform texture, hides imperfections
- Durability outdoors: high
- Difficulty level: high
- Reversibility: low
- Price per gallon: $70 to $120 typical
Unresolved annoyance: textured coatings can grab pollen and dust.
You might rinse more than you’d like. Not tragic. Just…annoying.
Common Mistakes that Make Brick Wall Decor Fail
- Using indoor adhesives outside
- Drilling into the brick face instead of mortar when you don’t need to
- Ignoring drainage behind planters
- Hanging heavy items without anchors
- Overdecorating with mixed styles
My “do this today” game plan
If you’re staring at your wall thinking, “Cool, but where do I start?”, here’s my low-stress plan. This is how garden wall ideas become real.
- Pick one main move: vertical greenery, a water feature, or one big art piece
- Add lighting that makes the wall look good after sunset
- Then layer smaller accents only after the big move feels right
If you’re stuck, choose the wall’s job. Soft backdrop? Dramatic night wall? Functional zone? Once the wall has a job, choices get easier.
And yes, sometimes you do one uncomfortable drilling thing so you stop being annoyed forever. It’s the same energy as finally replacing a boob light.
FAQs (homeowner edition, not contractor edition)
How do I make a garden brick wall look nice?
Break up the flatness. Add greenery to soften it, then add lighting to bring out texture at night. One strong focal moment beats a bunch of tiny stuff.
What decor looks good on a brick wall?
Curves and contrast win. Metal art, mirrors, trellises, and layered planters look great because they interrupt the brick grid.
How can I make a brick wall look better on a budget?
Start with lighting and one big statement. Two uplights plus one large wall art piece goes a long way. Then add a simple trellis and a young vine if you want the slow glow-up.
How do I hang something on an outdoor brick wall?
For medium or heavy items, plan on mounting into mortar joints with masonry screws or anchors. Brick is textured and tough, so “easy hooks” rarely behave how you want.
How do I hang things on brick outside without drilling?
Try brick clips if your brick shape allows it, or use a freestanding grid panel leaned against the wall with hanging pots. Solar lights also help you style without commitment.
Do command strips work outside on brick?
Usually not well. Brick is porous and uneven, so adhesion is unreliable. If you test anything sticky, keep it very light and treat it as temporary.
What sticks to brick outside?
Exterior-rated masonry adhesives can work for very light items on smoother brick, but they’re not a magic solution. For anything you truly care about, mechanical fastening is safer.
Do brick clips really work?
Sometimes, yes. But they depend on your brick profile. If your brick doesn’t have the right lip, the clip won’t grip. Check compatibility before buying.
What is the best anchor for a brick wall?
For many homeowner projects, masonry screws into mortar joints work well for medium loads. For heavier items, use proper masonry anchors or consider pro help, especially over seating.
Sources and product notes (kept simple and non-weird)
- Brick clips only work on certain brick shapes and edges. Always check compatibility notes first.
- Most removable adhesive strips are not made for porous, textured brick outdoors, especially with temperature swings and moisture. Test first and keep it light.
- For medium to heavy items, mounting into mortar joints with masonry-rated screws or anchors is generally safer than relying on adhesives.
Grab one move from the Quick Start Box and do it this weekend, even if it’s tiny. Once the wall has one job and one light source, everything else gets weirdly easy and kind of fun. And if you’re stuck, start with two uplights…brick is embarrassingly good at looking fancy when it’s lit right.