Hey all! My name is Julia, former college student and a home decor enthusiast who loves DIY home improvement projects and finding creative ways to decorate any living spaces on a budget. Recently moved from my dorm to my new apartment which I renovated from scratch and I am here to help you with tips & tricks about home decor/college and more 🙂
First floor framing takes center stage as we walk through how we raised the main level of our timber home in under 48 hours—from sill plates and moisture barriers to factory panels and 3-meter ceilings. You’ll see the 120–130 m² layout come together (5 m × 9.5 m living + kitchen, bedroom suite, laundry, storage), why we added a basement mid-build, and how two huge window openings frame the forest and lake.

Not totally finished yet, but I just couldn’t wait to show you!
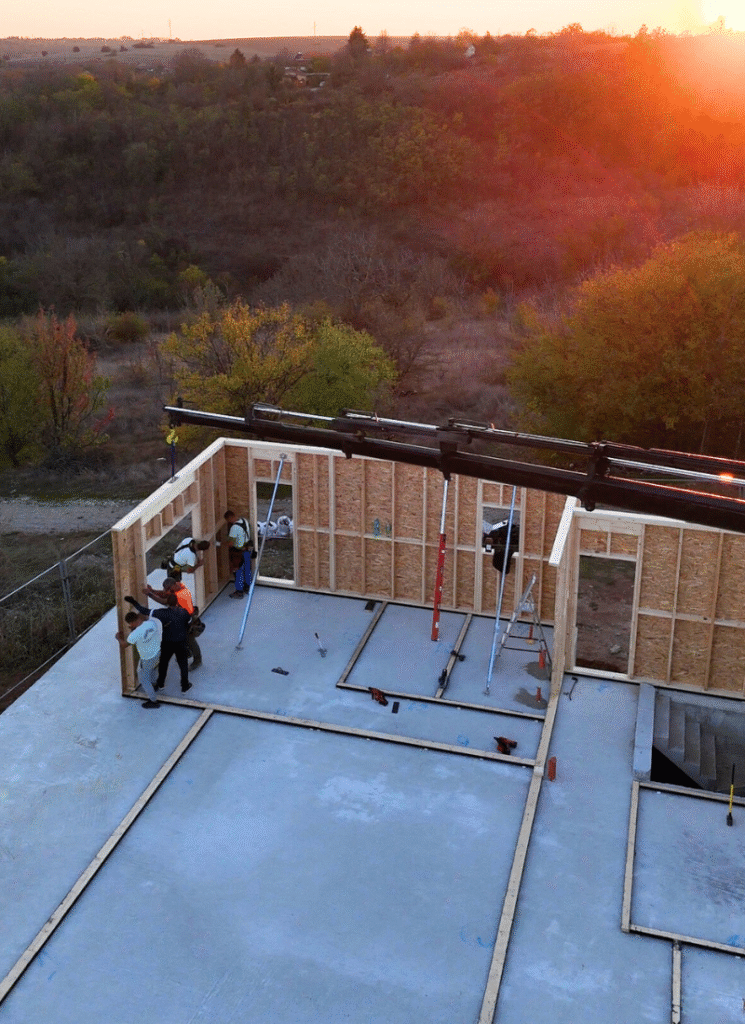
I teased it, hyped it, counted the days. “A ground floor in two days”—and today you get to see it (and judge for yourself). After the foundation was done, we had over a month of waiting—a true stress test for the nerves. Honestly? I’m grateful. We used that time to revisit a ton of details, make the final tweaks and… boom, the waiting ended.
The Crew Arrives
I can’t describe how FAST the house “grew” in front of my eyes. As you know, I’m the “chief foreman” and I’m on site for two reasons:
- because I’m wildly excited, and
- because I want to film everything for you (and make it useful!).
The Sill Plate
Sill Plate | Moisture Barrier | Kiln-Dried Timber

First went in the sill plate—the continuous timber ring the walls sit on. Ours is a timber house, so separating wood from concrete and moisture is HUGE. The members are kiln-dried and coated with liquid rubber, creating a barrier that stops moisture at the source. Instant peace of mind. Beneath the finished floor we’ll also have additional insulation plus underfloor heating—hello even temperatures, less dust circulation, and that soft, cozy feel underfoot all winter.
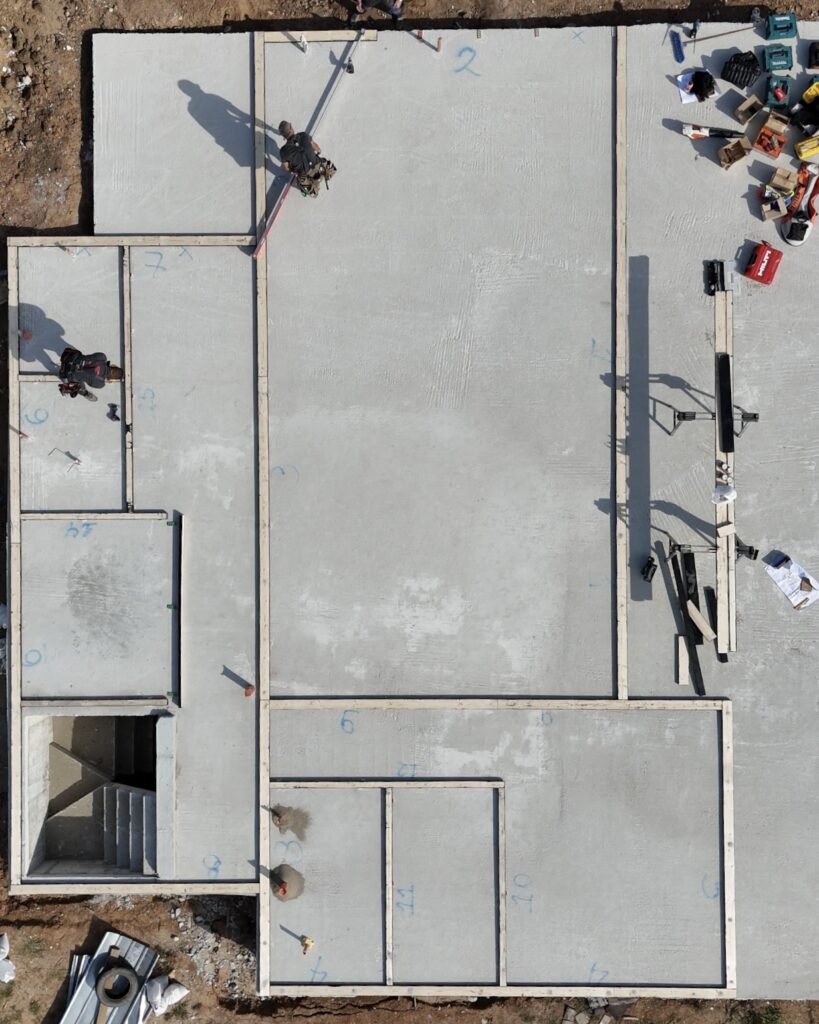
This is how the first floor framing plan looks from above.
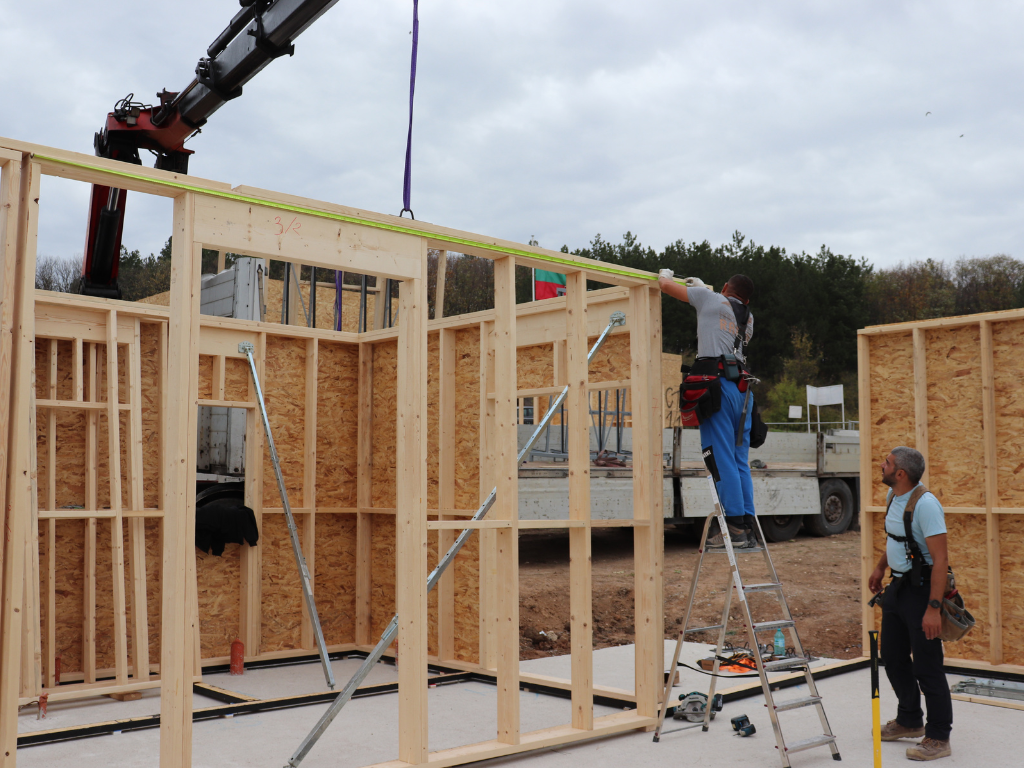
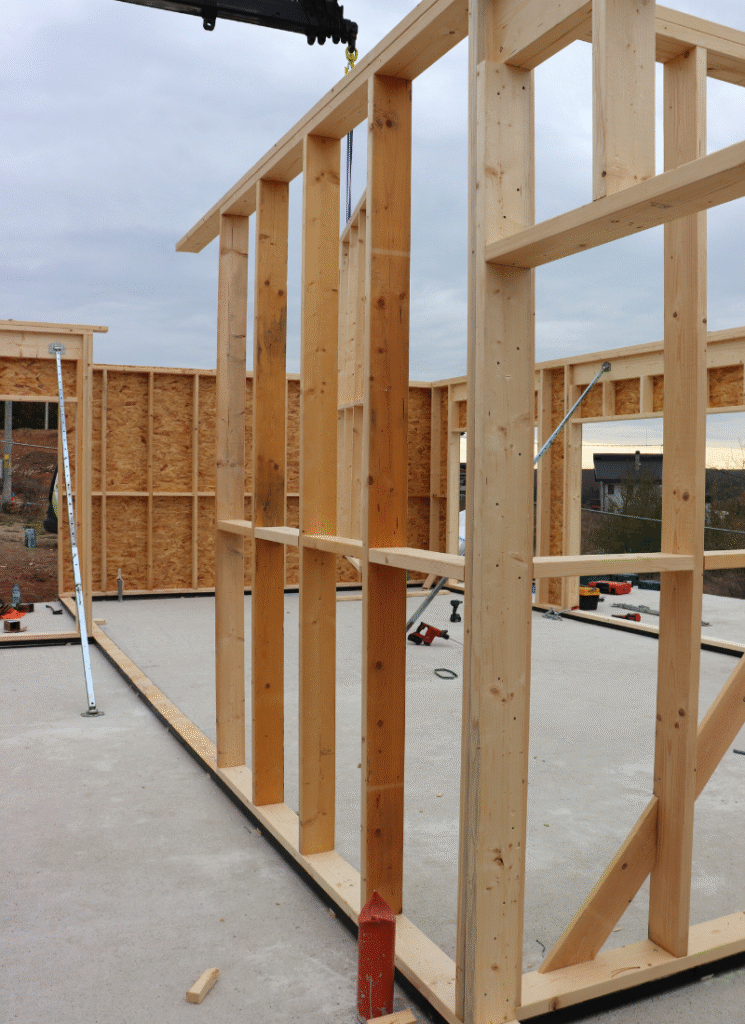
Panels (aka Ready-Made Walls)
Factory Panels | On-Site Assembly | Wow Moment
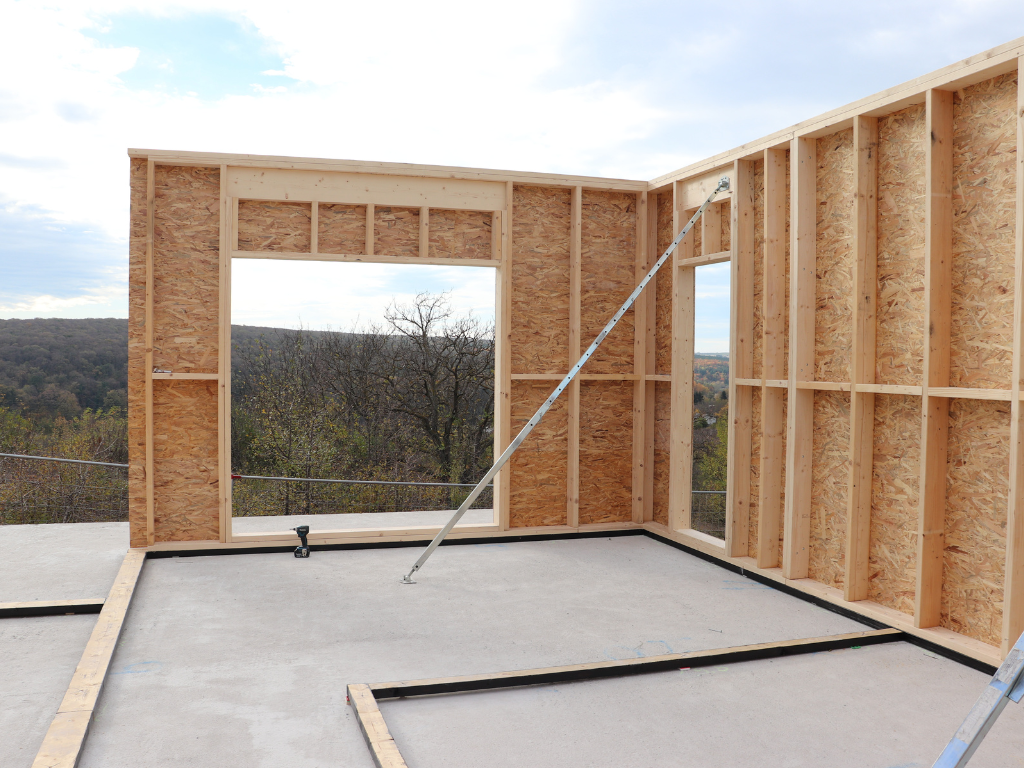
Then the factory-made wall panels rolled in (yep, actual walls), and installation started. This might be my favorite stage: after mere HOURS I could already walk through the first real room—the ground-floor bedroom.
What one panel looks like (exterior → interior):
- Outside insulation: EPS or rock wool that wraps the panel and cuts thermal bridges
- OSB sheathing: the structural “skin” that stiffens the panel and handles racking loads.
- 15 cm vertical timber studs, with the cavity filled with 15 cm mineral wool for serious thermal + acoustic comfort.
- Vapor barrier on the warm side to keep indoor moisture from sneaking into the insulation.
- Drywall inside—ready for tape, texture, and paint.
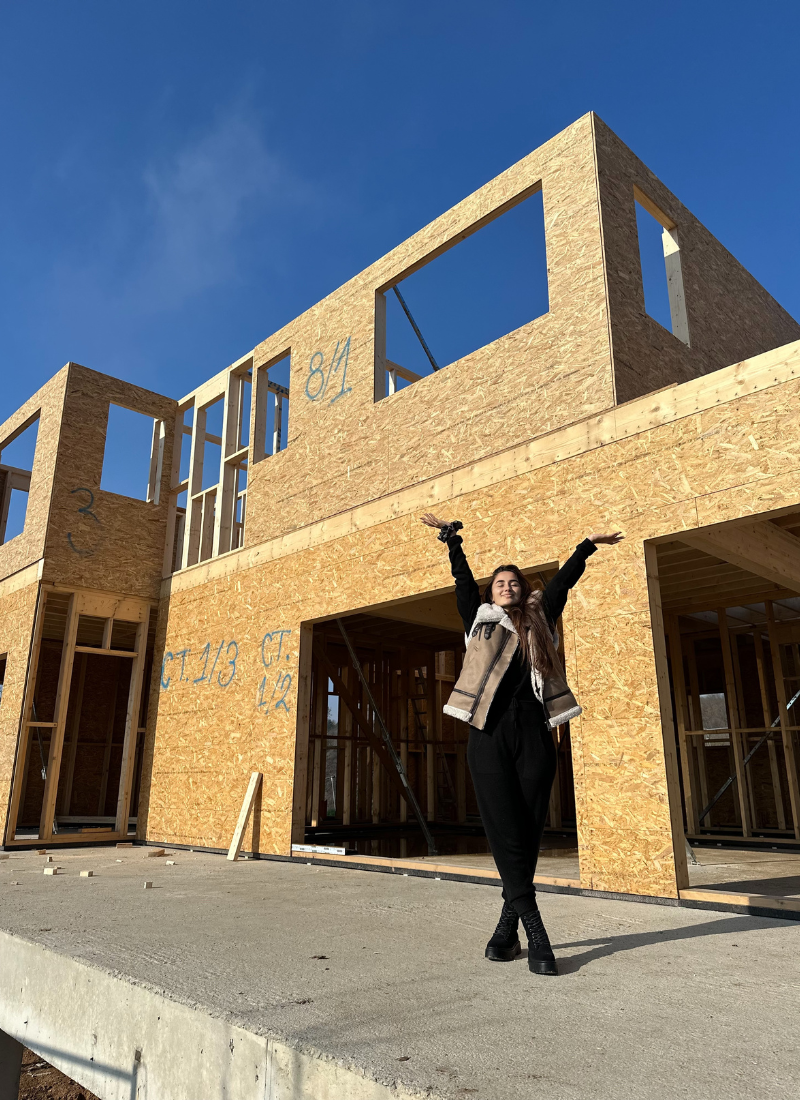
In under 48 hours the ground floor was mostly framed. In person, I love it EVEN more. I fell head over heels and immediately started daydreaming where everything goes, what my partner and I will “negotiate” about (you know it’s coming, haha), and how much love we’re about to pour into this place.
Ground-Floor Plan (120–130 m² / ~1,290–1,400 sq ft)
The entire ground floor is about 120–130 square meters—generous but still human-scaled. And most importantly: every single room has a window. Light and airflow everywhere (yes, even the laundry and the store room).
- Guest WC (half bath) – close to the entry and living area for easy access. Compact but impactful—the plan is to play with textures and a statement mirror for extra light. The window is a game-changer: natural ventilation, zero “help me, fan!” moments.
- Laundry Room – tucked away from the main spaces to keep the noise and visual clutter out. Washer, dryer, sink, shelves—everything within reach. The window here is gold: vents moisture and odors and brings in daylight so it doesn’t feel like a cave mission.
- Store Room – the guardian of order. Boxes, seasonal gear, all those “we’ll need it someday” things live here. Btw we wanted a door here so that, in the future, when we park behind the house, we can access the storeroom directly wow.
- Bedroom with Walk-In and En-Suite – a little ground-floor refuge. The walk-in hides the chaos; the private bath keeps mornings smooth.
- Living Room + Kitchen – the beating heart of the floor: cooking, chats, homework, movies, guests. In the living area we have two large openings/windows framing the forest and the lake—they’re not just windows; they’re living paintings that change throughout the day. Living + Kitchen: 5 m × 9.5 m—big enough for clear zones without shouting at each other. Ceiling height: 3 m—air, light, breathing room. It hits that sweet spot of “spacious yet intimate,” with no corridor vibes.
Vertical Flow = Freedom
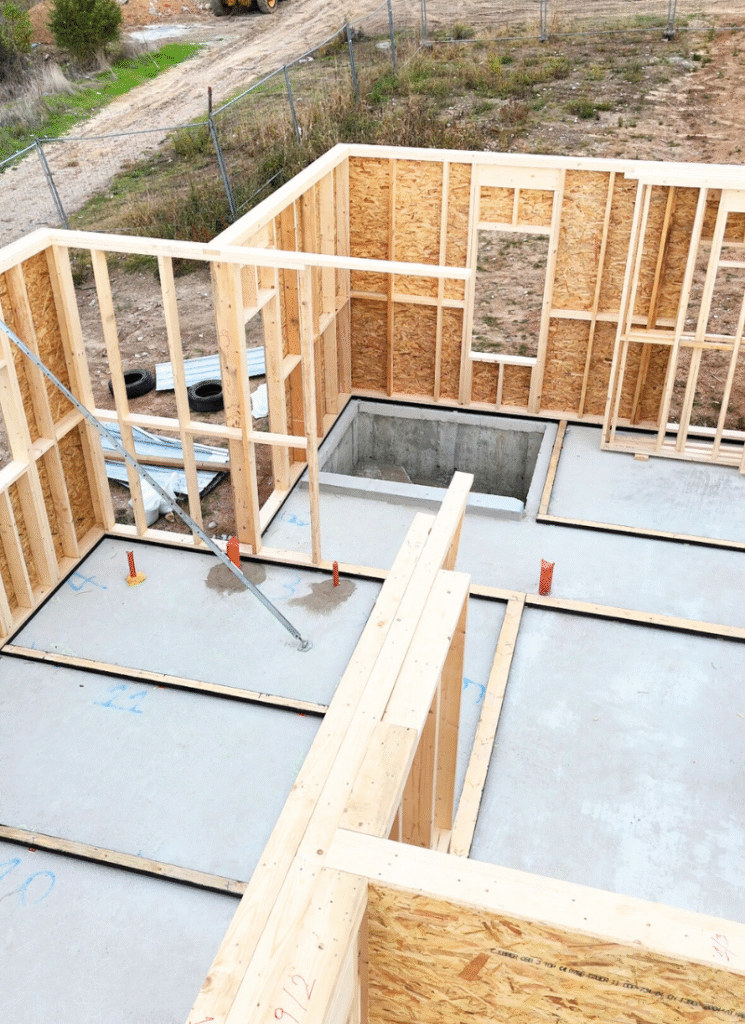
An internal staircase will link the ground floor to the basement and the second floor. Plot twist: in the original plans we didn’t have a basement, but we changed our minds mid-build—and thank goodness we did. Everything we’d planned to cram into the store room is going downstairs instead: water heaters, heat pumps, freezers, and more. The ground floor can breathe, and the store room stays for easy, everyday stuff.
Paper vs. Reality
Tape Measure FTW | Real-World Scale | Cozy Wins
Big takeaway from “plans to real size”: don’t leave it all on paper. Pull out the tape measure and check every centimeter, every room. Plans often distort how space feels. Our ground floor turned out beautifully, but one bedroom ended up a touch smaller than we pictured.
Honestly? I’m glad.
It’s super cozy—and the view is stunning. Everything else exceeded expectations. My hands-down favorite is the open living + kitchen: the proportions are perfect for us. And yes, that’s personal—“big” means different things to different people. My goal: a home that’s both spacious and warm.
Ceiling, Structure & a Surprise Wall
Ceiling | Load-Bearing Columns | One New Wall
Once the ground-floor structure is up, it’s time for the ceiling (which is also the second-floor deck). The structural system includes three main load-bearing columns. Because of one of them, we needed to add a wall between the living room and the corridor—wasn’t part of the wish list, but our builder made a solid safety case, so we approved it at the last minute. At first I resisted; then I realized it’s one more lovely surface for styling. Honestly? A win for the interior.
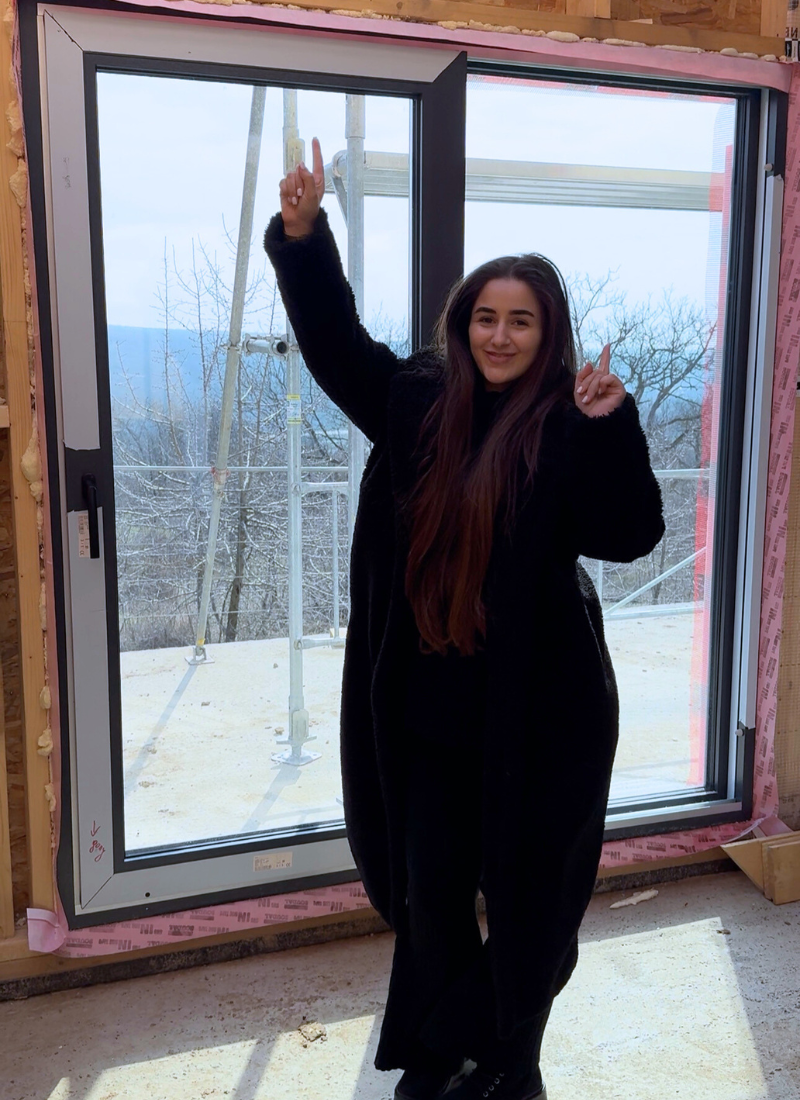
What’s Next: Windows & Those Big Openings
Windows throughout the ground floor—the detail that locks in the warmth and unlocks the views. In the living room we have two big openings toward the forest and the lake. We’re obsessing over level lines, thresholds, and finishing so that the inside-out transition is squeaky clean. More daylight, deeper sightlines, and that soft calm of nature being an arm’s length away.
In the meantime, we’re continuing with the ceiling and the second floor.
Wrapping This Chapter
We’re itching to see the floor fully “closed in.” Curtains can wait (I know, I know), but walking into each room with a finished ceiling and windows will be… chef’s kiss. On we go—dreaming and building. In the meantime, follow along on my Instagram—that’s where the action is, almost in real time.


The windows look huge! I love following along with this build 🥰
Thank you Stacey, we really wanted them bigger, so more natural light comes in and see those views xx
Wow! That came together fast, so fun to see 😍
Yess, the builders are working very fast, it is very possible by the end of the year to finish with construction 😍
It’s been so amazing to see the process and it’s exciting to see the walls are coming up!
Thank you Val, we can’t wait either! I hope the weather doesn’t surprise us haha