Hey all! My name is Julia, former college student and a home decor enthusiast who loves DIY home improvement projects and finding creative ways to decorate any living spaces on a budget. Recently moved from my dorm to my new apartment which I renovated from scratch and I am here to help you with tips & tricks about home decor/college and more 🙂
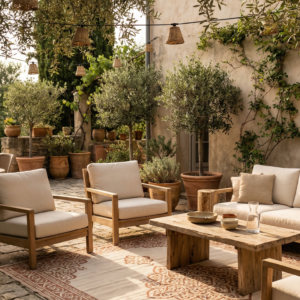
I’m going to say something brave: you can absolutely have a Pinterest-worthy patio without the price tag, even if you rent. Even if your “yard” is technically a balcony the size of a yoga mat. Even if you work from home and stare at your outdoor space like, why do you look so sad, the secret is not buying 47 random things and hoping they become a vibe.
What you want is a cozy little outdoor retreat that feels like an extension of your home. That indoor-outdoor decor feeling where the outside is basically your living room’s fun cousin. And yes, we’re doing garden furniture and decor on a budget without it looking like a college porch.
I’ll walk you through a simple formula, a one-weekend plan, and a bunch of budget-friendly upgrades that feel high-end. You’ll get furniture ideas, thrift wins, quick DIYs, patio refresh essentials, and shopping timing tricks. By the end, you’ll know exactly what to buy, what to skip, and how to build those cozy retreats with outdoor living essentials that actually get used.
Supplies quick checklist
- Broom + hose or bucket
- Mild soap + scrub brush
- Microfiber cloths
- Tape measure
- Zip ties + outdoor command hooks
- Sandpaper or sanding sponge
- Primer + paint (spray or brush-on)
- Exterior sealer (spray or brush-on)
- Scissors + staple gun (optional)
- Battery candles or LED string lights
- Work gloves
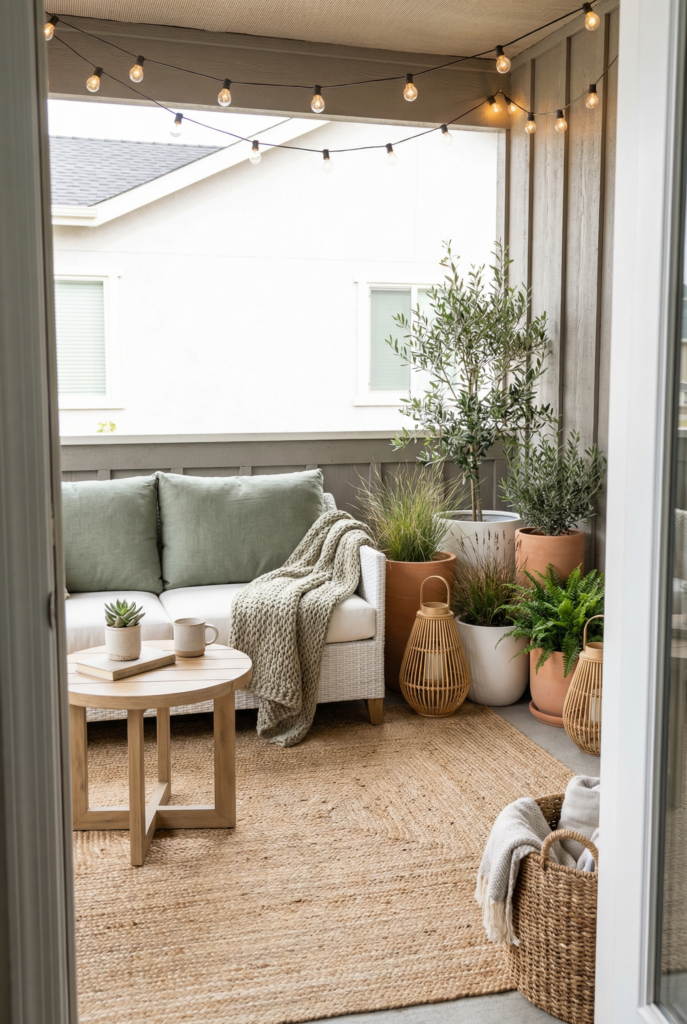
The Anchor + Layers Budget Formula (How to Make Cheap Look Expensive)
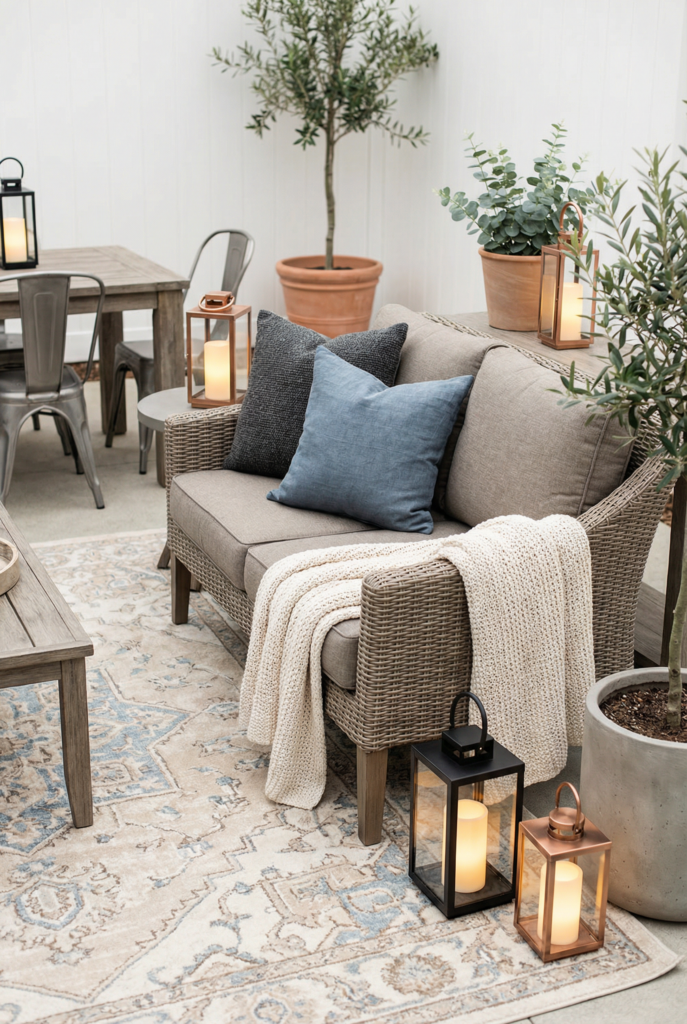
The fastest way to make cheap look expensive is to pick one anchor and then style the layers like you mean it. Your anchor is the “this is where humans sit or eat” moment. Your layers are the cozy, glowy, planty stuff that makes it feel finished.
Here’s how I think about it: choose 1–2 anchor pieces that do the heavy lifting (seating, table, shade), then spend your energy on layers you can swap, thrift, or DIY. Comfort and durability get the money. Accessories get the creativity. That’s it. That’s the whole trick. I used to do the opposite, buy cute little decor first, and then wonder why I still didn’t want to sit outside. Learn from my chaos.
- Anchor: seating, dining table, umbrella, or a small loveseat
- Layers: textiles, lighting, greenery, and small decor
- Rule: spend most on comfort + durability, save on accessories
Mini budget snapshots:
- $50 refresh: clean + rearrange + lights + a couple pillow covers
- $150 refresh: add a rug + paint refresh + a planter moment
- $300 refresh: upgrade one anchor + add shade/privacy + storage
One-Weekend Patio Refresh Plan (Free → $ → $$)
You can change the whole mood of your patio in a weekend if you work in layers, not in spirals. Spiral work is when you start painting a chair, then get distracted by planters, then suddenly you’re in a lighting aisle holding seven kinds of bulbs. Ask me how I know.
This plan goes Free first because cleaning and layout do most of the visual work. Then you add low-cost upgrades that make it cozy fast. Then, if you have budget left, you upgrade one anchor piece so the space feels like it belongs to you.
Step 1 — Free (30–90 minutes)
This step is about making your space feel bigger and calmer without spending anything. You’re basically editing, then staging the patio like it’s a tiny room.
Clean and clear first. Then rearrange for the function. Create a little zone for sitting, a spot for drinks, and a path that doesn’t require hopping over a planter like an obstacle course. Borrow from indoors if you need to. A tray, a throw, a small side table. Just bring it back in when the weather is moody.
Checklist:
- Sweep, wipe, hose off surfaces
- Declutter and remove broken extras
- Rearrange seating into a conversation nook
- Create zones (sit, sip, plant, storage)
- Pull one or two items from indoors to test the vibe
Before photo suggestion: stand in your doorway and take a wide shot that shows the whole space.
Quick win: clear one surface completely and style it like it’s intentional.
Step 2 — $ (2–4 hours)
This step is where “fine” becomes “cute.” You’re doing quick cosmetic upgrades that punch above their price. Paint, textiles, and lighting are the big three here.
If your furniture is faded or mismatched, unify it with a simple paint refresh. Then add soft goods for comfort. Then add lighting because lighting is basically emotional support. I’m not even joking. The same plastic chairs look nicer under a warm glow.
Checklist:
- Paint refresh on one key item (chair, table, planter)
- DIY planters using thrifted pots or buckets
- Add budget textiles (pillow covers, throws, seat pads)
- Add quick lighting (string lights, lanterns, battery candles)
After photo suggestion: take the same doorway photo, then a close-up of your seating corner.
Quick win: hang one strand of lights and turn them on tonight, even if nothing else is done.
Step 3 — $$ (2–6 hours)
This step is about upgrading exactly one thing, so the whole setup feels more grown-up. Not everything. One thing. Your future self will thank you.
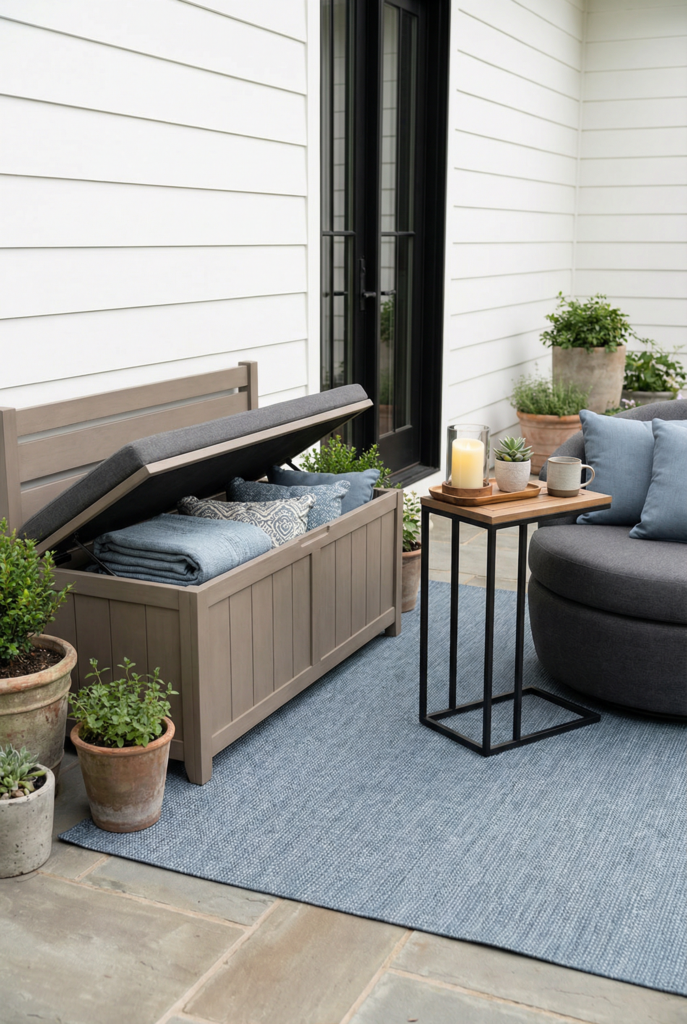
Pick one anchor upgrade, then add grounding and privacy. A rug makes everything feel like a room. Shade makes it usable. Storage keeps it from sliding back into chaos. If you do nothing else, do a rug plus one comfort upgrade and call it a day.
Checklist:
- Upgrade ONE anchor item (chairs, small sofa, dining set, umbrella)
- Add an outdoor rug to ground the space
- Add shade or privacy (curtains, screen, trellis, sail)
- Add storage (deck box, bench storage, slim cabinet)
Final reveal photo suggestion: take a dusk photo with lights on and one styled drink moment.
Quick win: upgrade the seat you use most, even if everything else stays basic.
Weather backup plan
If your weekend turns soggy, you can still make progress without ruining anything. Focus on indoor prep, then do fast outdoor installs between rain breaks.
Do this inside: wash cushion covers, assemble lights, prep planters, and pre-sand furniture. Paint in a garage or covered area if you can. If you can’t, pivot to a no-paint weekend: deep clean, rearrange, add lighting, and style with textiles you bring in at night.
Outside in short windows: hang lights, place rugs only when surfaces are dry, and set out decor just for the evening. If wind is part of the chaos, skip anything lightweight that becomes a kite. Shade cloth and outdoor curtains can wait for calmer weather.
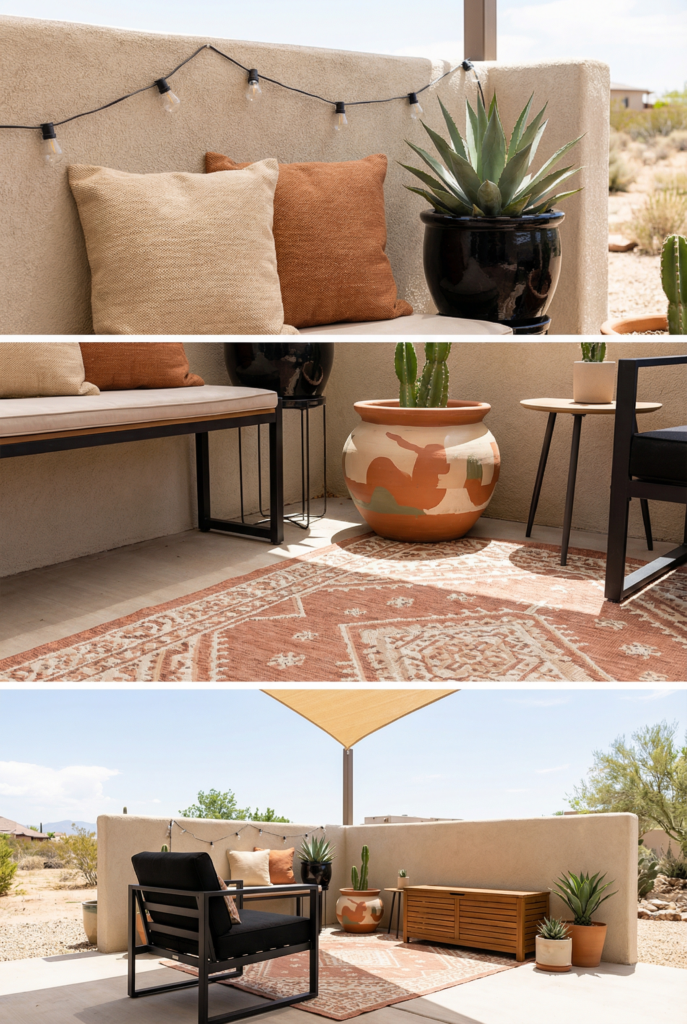
Budget Furniture Picks That Look High-End (By Material + Small Spaces)
Budget garden furniture and decor looks expensive when it has a clear shape, a calm color story, and cushions that don’t look like sad pancakes. You’re not buying “cheap.” You’re buying smart. The best outdoor furniture choices are the ones that survive your climate and match how you actually live.
I’m breaking this down by material because it makes shopping less overwhelming. Also, it helps you understand patio furniture styles without needing a design degree. You’ll see what to buy, why it works, a style move, a price range, and where to look. Think of this as your shortcut to finding outdoor patio furniture that doesn’t scream “temporary.”
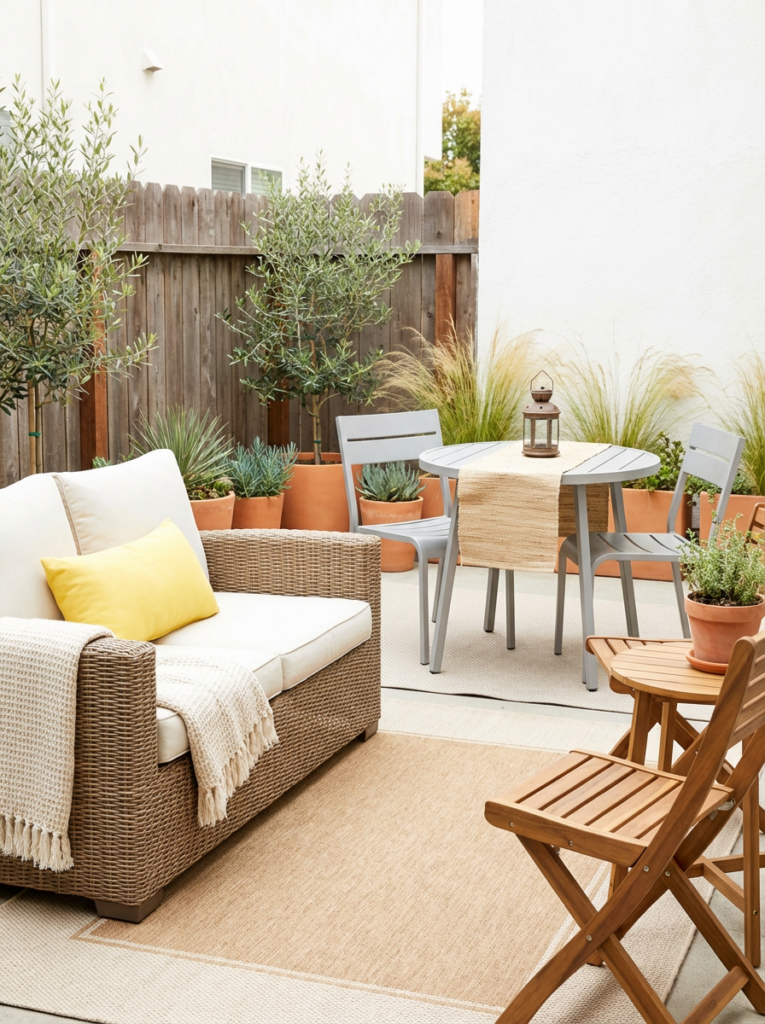
Wicker Patio Furniture (Budget-Friendly & Cozy)
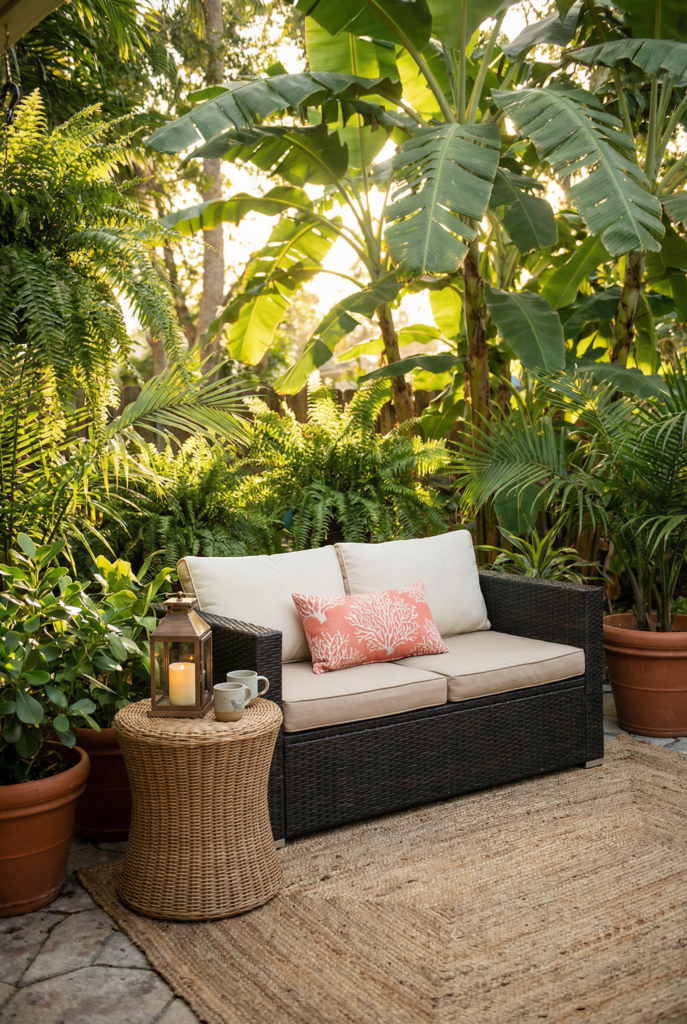
Wicker is cozy and forgiving. It looks styled even when it’s slightly imperfect, which is basically my brand. Budget versions in resin hold up well, and cushions do a lot of the heavy lifting.
A compact resin wicker loveseat set
- What it is: small loveseat + two chairs or loveseat + table
- Why it works: visually warm, easy to soften with cushions
- Style tip: keep cushions neutral, add one patterned lumbar
- Price range: $180–$450
- Where to check price: Walmart, Target, Wayfair, Home Depot
Wicker bistro chairs with a tiny round table
- What it is: two chairs that feel “cafe,” even on a balcony
- Why it works: looks intentional in small spaces
- Style tip: add a striped seat pad and a small lantern
- Price range: $120–$300
- Where to check price: IKEA, Amazon, At Home, World Market
Aluminum Patio Furniture (Lightweight + Rust-Resistant)
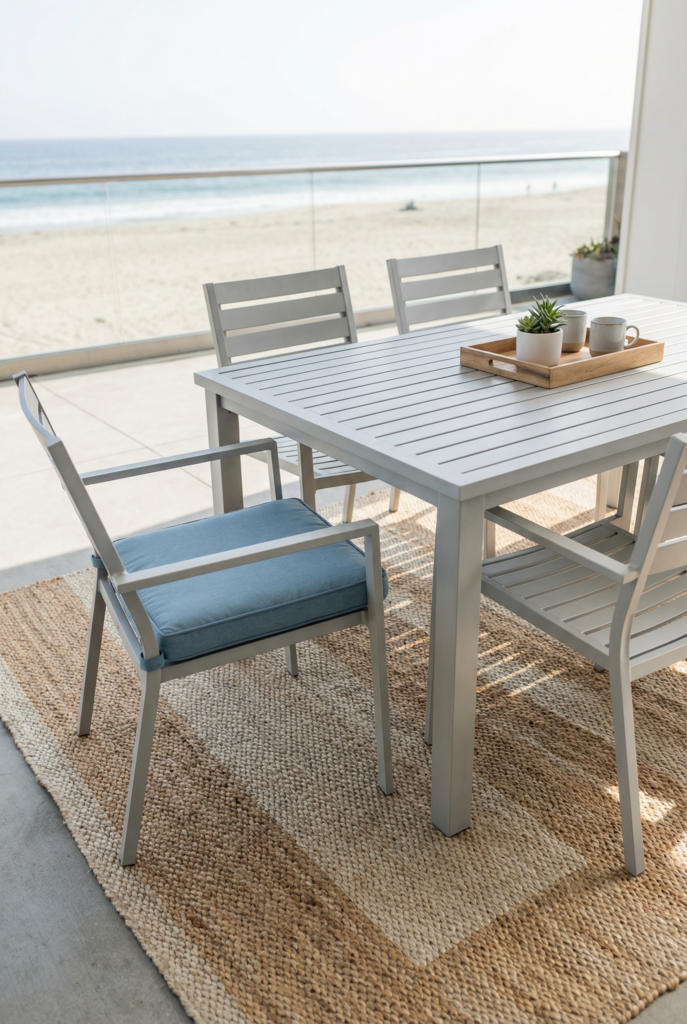
Aluminum is the practical bestie of the patio world. It’s light, it moves easily, and it doesn’t rust the way steel can. If you rearrange your setup a lot, this is your material.
Aluminum slat dining set
- What it is: a simple table with clean-lined chairs
- Why it works: modern look, easy to wipe down
- Style tip: soften it with a rug and mixed cushions on seats
- Price range: $220–$650
- Where to check price: IKEA, Home Depot, Lowe’s, Wayfair
Stackable aluminum lounge chairs
- What it is: two loungers you can stack and store
- Why it works: great for small patios, low maintenance
- Style tip: add matching towels for a hotel vibe
- Price range: $160–$400
- Where to check price: Target, Costco, Amazon, Walmart
Wood Patio Furniture (Warm Look for Less)
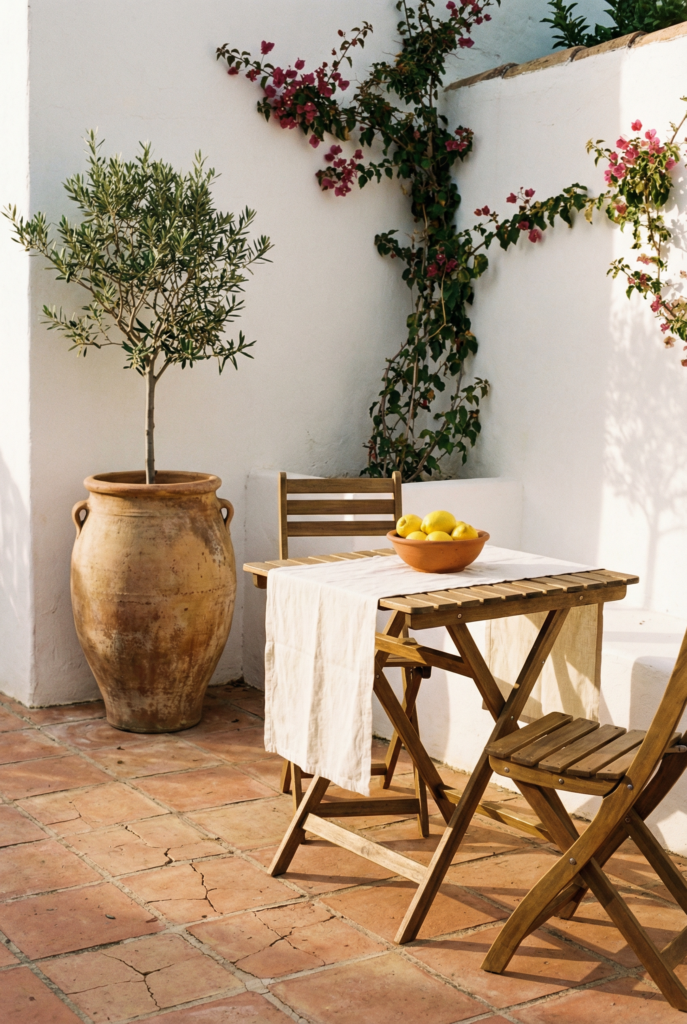
Wood feels elevated instantly. The trick is choosing affordable wood species and accepting that you’ll do a little maintenance. A once-a-year oiling is not dramatic. You can do it with coffee in hand.
Acacia wood folding set
- What it is: foldable chairs and a small table
- Why it works: warm tone, stores easily
- Style tip: Use a simple outdoor runner and one big planter
- Price range: $140–$350
- Where to check price: IKEA, World Market, Amazon
Wood bench as flexible seating
- What it is: a bench that can be a seating or a coffee table base
- Why it works: multifunction, looks custom with cushions
- Style tip: add a long seat cushion and two back pillows
- Price range: $90–$260
- Where to check price: Home Depot, Target, Facebook Marketplace
Compact + Multi-Use Pieces (Small Space Winners)
Small spaces love pieces that do two jobs. If you’re renting, you also want things that move with you. These are the quiet heroes of a patio refresh.
Storage bench
- What it is: seating plus cushion storage
- Why it works: hides clutter, adds a finished look
- Style tip: top it with two pillows so it looks like a built-in
- Price range: $80–$220
- Where to check price: IKEA, Walmart, Wayfair
C-table or slim side table
- What it is: a small table that slides next to seating
- Why it works: makes cheap seating feel usable
- Style tip: style it with a tray and a battery candle
- Price range: $25–$90
- Where to check price: Target, Amazon, HomeGoods
Mini “Shop This Look”:
- Outdoor rug (5×7 or 6×9), $40–$120, check price at Wayfair or Target
- String lights, $15–$40, check price at Amazon or Home Depot
- Pillow cover set, $18–$45, check price at IKEA or Amazon
- Battery lantern or LED candles, $12–$35, check price at Target or Walmart
- Large planter, $18–$60, check price at HomeGoods or Lowe’s
- Shade sail or umbrella, $35–$180, check price at Home Depot or Costco
Don’t waste money on: the cheapest no-name cushions. They flatten fast and look tired immediately.
Second-Hand + Upcycle Wins (Thrift Finds + Refinishing Recipes)
Second-hand patio pieces are where the real savings live. You get better materials, more interesting shapes, and sometimes a weird little vintage gem that makes the whole patio feel curated. Also, you can build a whole look with used garden furniture and still have budget left for plants and lighting, which is honestly where the magic is.
I like thrifting patio pieces because they’re usually built to survive. Then I just refresh the finish, swap textiles, and suddenly it looks like I planned it. This is also where you can sneak in those “wait, you made that?” moments that feel like high-end home decor ideas, but on a very normal-person budget.
Where to Find Cheap Patio Furniture (Fast)
This is the scavenger hunt. Go in with measurements and a plan, and you’ll win.
- Facebook Marketplace
- Thrift stores and ReStores
- Estate sales and garage sales
- Curb alerts (check your neighborhood groups)
- Buy Nothing groups
Quick thrift rules: sit on it, shake it, check for rot, and don’t be scared of ugly cushions.
Refinishing Recipe #1 — Metal Set (Rust → Fresh Finish) (Step-by-Step)

A rusty metal set can look brand new with paint and patience. You’re basically giving it a clean, sealed coat so it stops shedding rust like glitter.
Tools and materials:
- Wire brush or sanding sponge
- Mild soap + water
- Rust-inhibiting primer
- Spray paint (exterior)
- Clear outdoor sealer
- Gloves + mask
Steps:
- Step 1: Brush off loose rust and flaking paint
- Step 2: Wash and fully dry
- Step 3: Prime the whole piece, light coats
- Step 4: Paint in several light coats
- Step 5: Seal once the paint is dry
- Step 6: Let it cure 24–48 hours before heavy use
Cost estimate: $20–$60, depending on how many cans you need.
Refinishing Recipe #2 — Wood Set (Faded → Like-New) (Step-by-Step)
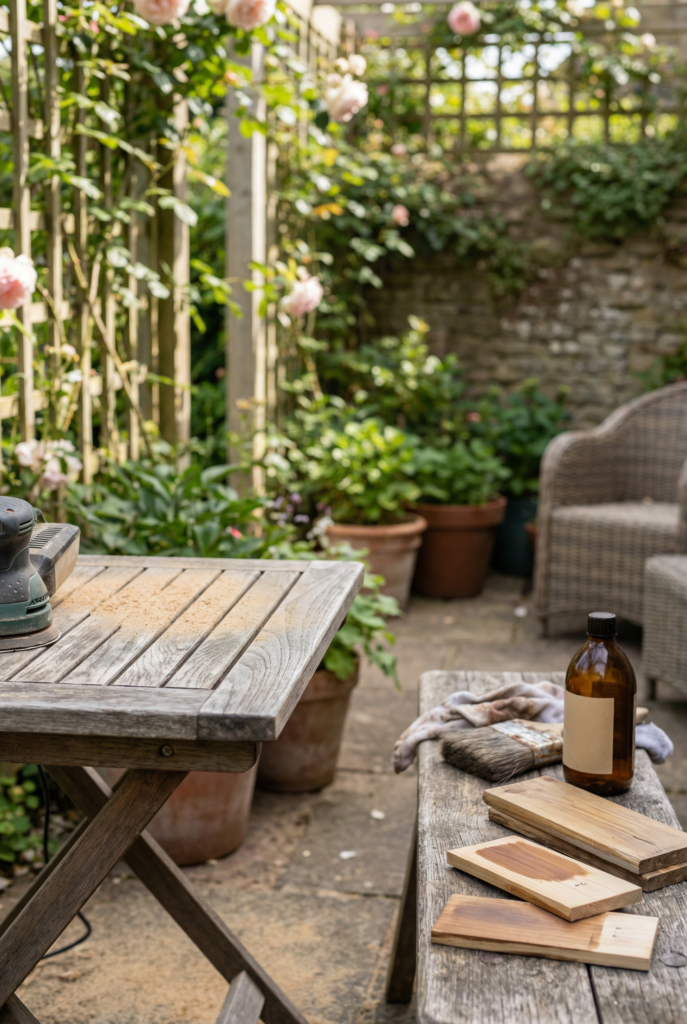
Wood furniture looks expensive when it’s clean and evenly finished. The secret is prep. If you skip sanding, you’ll hate it. Sorry. True.
Tools and materials:
- Cleaner (wood-safe)
- Sandpaper (medium and fine)
- Exterior stain or paint
- Exterior sealer
- Brush or rag, gloves
Steps:
- Step 1: Clean thoroughly and dry
- Step 2: Sand to remove rough spots and old finish
- Step 3: Wipe dust off completely
- Step 4: Apply stain or paint evenly
- Step 5: Let dry fully between coats
- Step 6: Seal for weather protection
- Step 7: Cure for 48 hours before the cushions go on
Cost estimate: $25–$90, depending on product and size.
5 Quick Upcycles That Add Seating or Surfaces
These are the “I need one more place to set a drink” fixes, and they work.
- Pallet coffee table (sand, paint, add wheels)
- Crate side table (stack, screw together, stain)
- Cinder-block bench with wood top (add cushions)
- Oversized planter turned side table (flip a tray on top)
- Stump stool or plant stand (seal it, done)
Affordable Textiles (Rugs, Cushions, Curtains) That Survive Outdoors
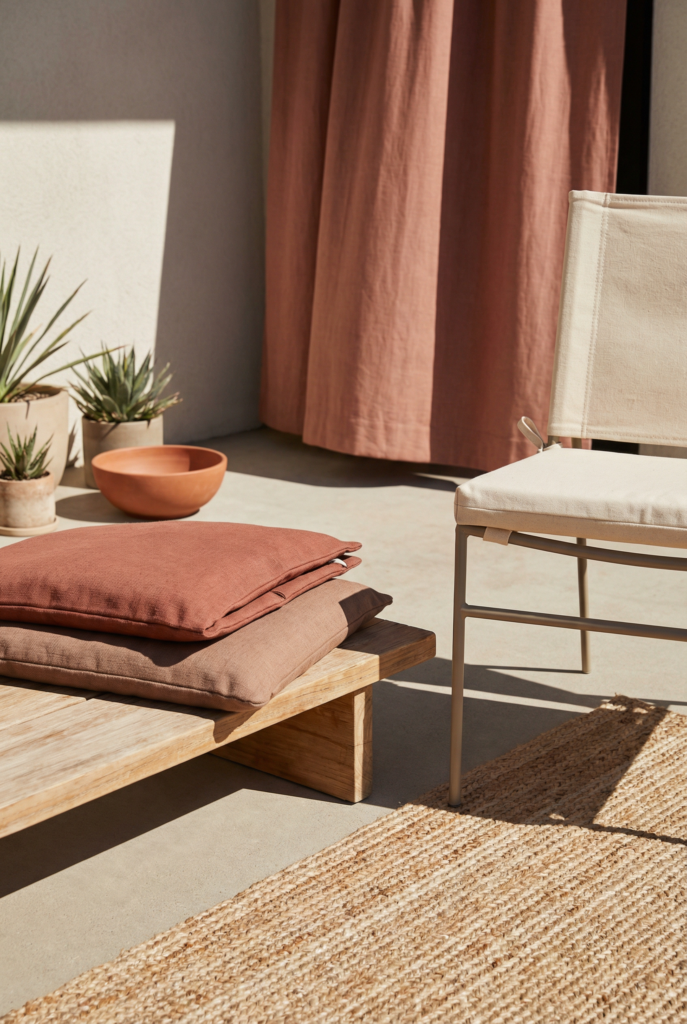
Textiles are the quickest way to make your garden furniture and decor feel finished. They’re also the easiest thing to swap when you want a new look without buying new furniture. If your space feels flat, it’s usually missing softness, pattern, and something underfoot.
For outdoor fabrics, look for solutions that are fade-resistant and easy to clean. Polypropylene rugs, outdoor-rated pillow covers, and quick-dry fabrics are your best friends. If you rent, I’d focus on non-permanent upgrades: rugs, cushions, curtain panels on tension rods, and removable hooks. This is how you get those cozy outdoor spaces that feel like a real room, without drilling into anything.
Outdoor Rugs Under $50–$100 (And DIY Alternatives)
An outdoor rug makes mismatched furniture feel like a set. It’s also the easiest way to add a pattern without committing to a paint color you’ll hate later.
Sizing tips: front legs of seating should sit on the rug if possible. If not, at least center it under the coffee table.
Ideas + price ranges:
- Polypropylene rug, $45–$120, check price at Wayfair or Target
- Outdoor runner for narrow patios, $25–$70, check price at Amazon
- DIY painted drop cloth “rug,” $15–$35 in supplies
Cushions + Covers (Cheap Comfort Upgrade)
Cushions are where comfort lives. If your seating is fine but not cozy, this is the fix.
Ideas + price ranges:
- Outdoor pillow covers, $8–$25 each, check price at Amazon or IKEA
- Seat pads, $15–$40, check price at Target
- Mix patterns mini guide: one stripe, one small-scale print, one solid texture
Outdoor Curtains / Shade Cloth (Instant Cabana Vibe)
Curtains add privacy, shade, and softness. They’re basically the patio version of “I put on lip balm, and now I’m thriving.”
Non-permanent hanging methods:
- Tension rods under an overhang
- Outdoor command hooks with a rod
- Zip ties on a pergola or railing
- Curtain wire between two anchor points
Price ranges:
- Outdoor curtain panels, $20–$70, check price at Target or Amazon
- Shade cloth, $25–$80, check price at Home Depot
Textile Shopping Checklist:
- Washable or hose-friendly
- Fade-resistant when possible
- Neutral base plus one pattern
- Comfort first for seating you use daily
- Storage plan for storms
Small Decor, Big Impact (The Budget Styling Layer)
Small decor is where your patio starts to feel personal. This is the “oh, you live here” layer. And yes, it’s also where it can get cluttery fast, so we’re going for curated, not chaotic.
I treat outdoor decor like I treat indoor styling. I want a few pieces with height, a few with texture, and one living thing. Then I stop. That’s the part I forget sometimes, and then I’m holding a third lantern like it’s a requirement. It’s not.
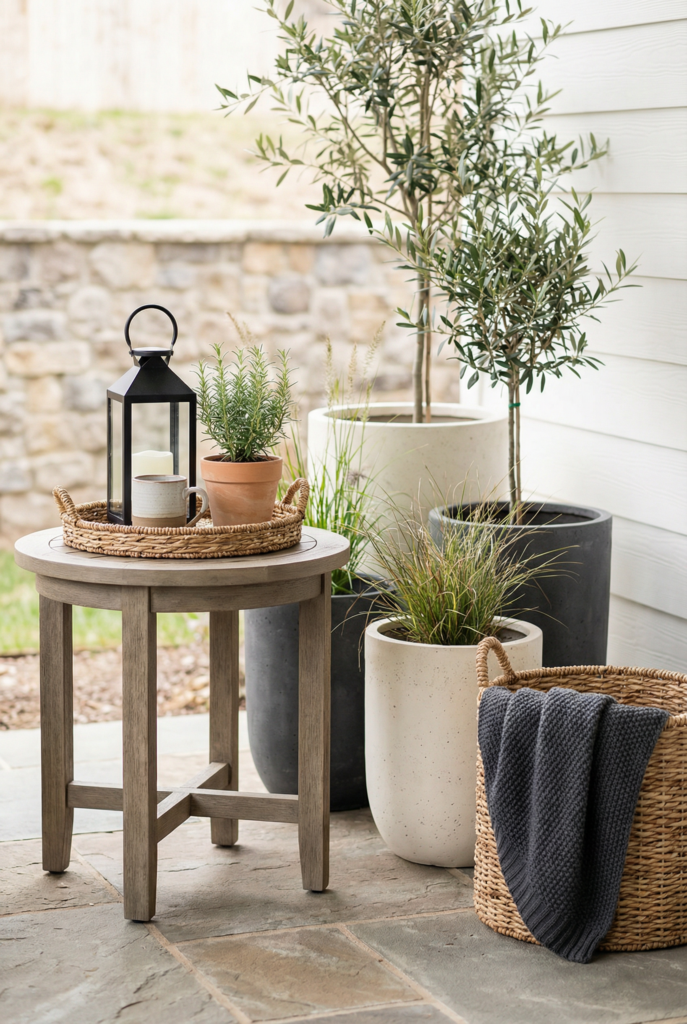
Planters That Look Boutique (DIY + Store Finds)
Planters look high-end when they’re grouped and intentional.
Ideas:
- Paint mismatched pots one color for a cohesive set
- Use baskets as cachepots (with a plastic liner inside)
- Thrifted urns or buckets for character
- One oversized planter with a tall plant for height
- Hang two planters at eye level for instant layering
Trays, Lanterns, Wall Accents, and “Styled Corners”
Styled corners make a patio feel designed, not accidental.
Ideas:
- A tray on the table to corral “stuff.”
- Lantern cluster on the ground for glow
- Outdoor-safe mirror or wall art on a fence
- A small stool that holds a drink and a plant
- One basket for throws and towels
The 3-Item Styling Formula (Works Every Time)
This is my lazy-person formula, and it works on every patio table.
Formula: tray + something living + something with height.
Example: a tray, a small potted herb, and a lantern. Done.
Outdoor Lighting on a Budget (The Glow Rule)
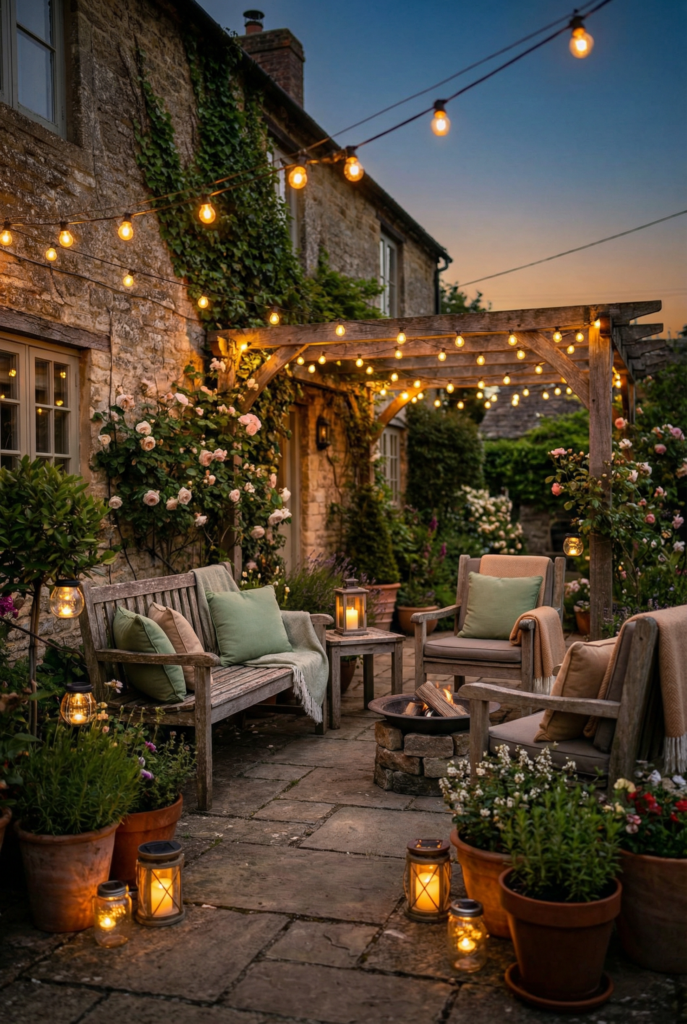
Lighting is the fastest way to make your patio feel expensive. It’s also the fastest way to actually use it at night. If you only do one “decor” thing, do lights. Truly.
I follow a simple glow rule: you want light from above, light at table height, and light down low for edges and paths. That layered look creates depth, and it turns even basic furniture into something cozy. This is where outdoor lighting earns its keep, and where a little candlelit charm makes everything feel more intentional.
The Glow Rule (3 Layers: Overhead + Table + Path/Accent)
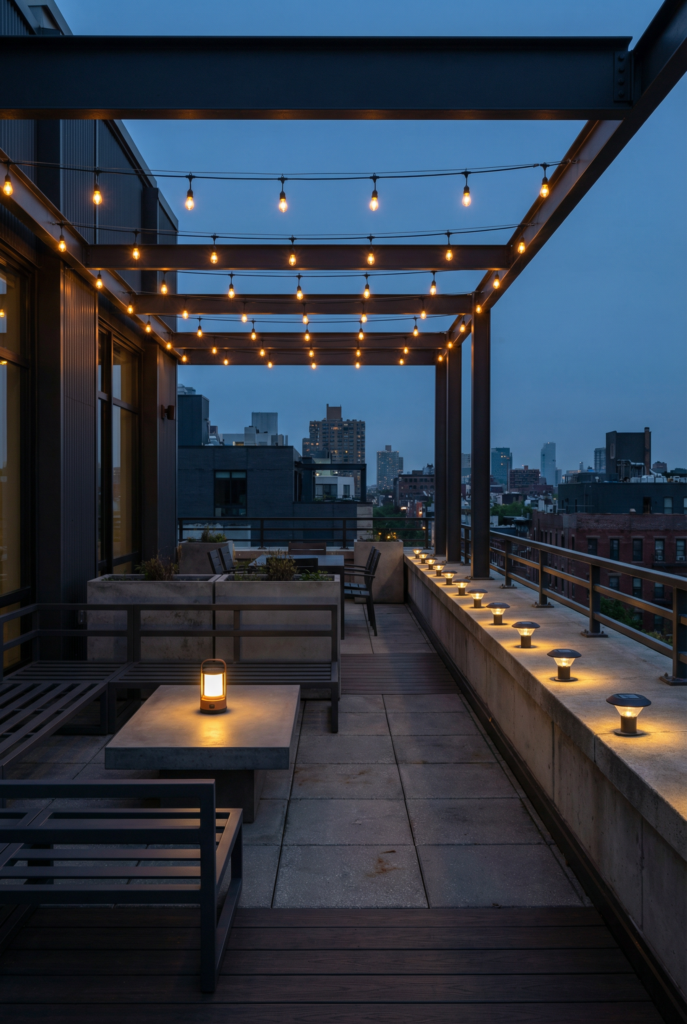
You don’t need to hardwire anything. You need layers.
- Overhead: string lights, lanterns hung from hooks, or a pendant-style lantern
- Table: a lantern, battery candle, or small rechargeable lamp
- Path/Accent: solar stakes, step lights, or ground lantern clusters
Quick diagram description for an image: a simple patio rectangle with three dots above for overhead lights, two dots on the table for lanterns, and a dotted line along the edge for path lights.
Safety notes: use outdoor-rated cords, keep flames away from fabric, and secure lights so wind doesn’t rip them down.
Budget Lighting Ideas That Feel Expensive
Ideas + quick notes:
- Warm white string lights over seating
- Solar stake lights to outline a path
- Lantern cluster with LED candles for a “glow puddle.”
- Mason jar lights forthe tabletop sparkle
- Rechargeable table lamp for dining nights
- Clip-on light for grilling or task lighting
- Timer plug so lights turn on automatically
Outdoor Dining on a Budget (Elevated Tableware for Less)
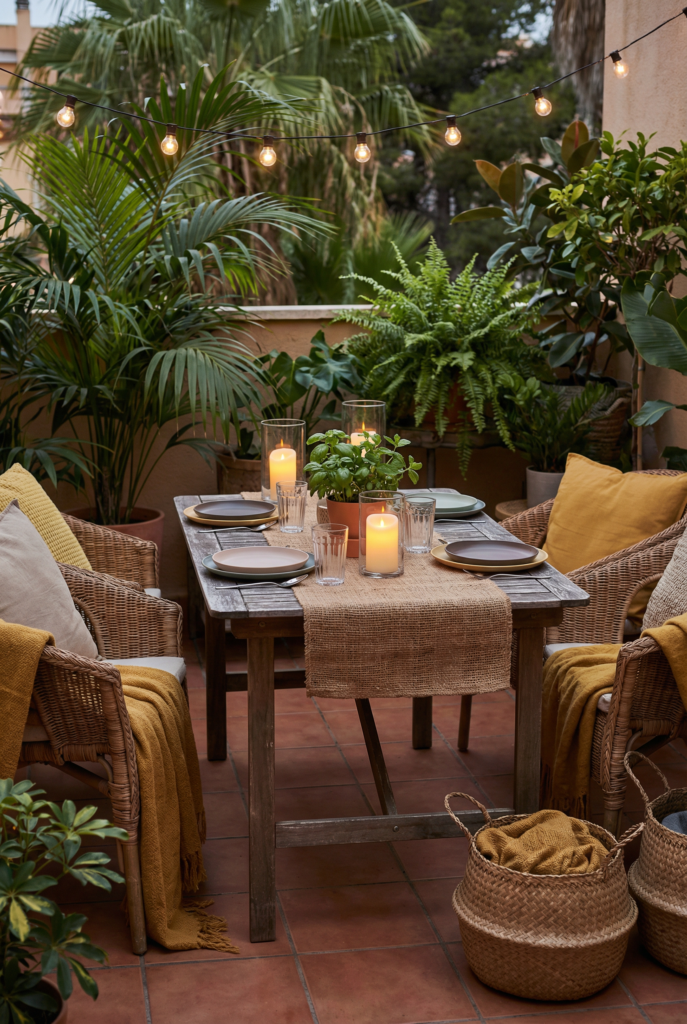
Outdoor dining can be simple and still feel special. You don’t need a matching set and twelve place settings. You need a comfortable seat, a surface that works, and a few pieces that make meals feel like an occasion.
If you’re short on space, think “small but complete.” A bistro table, a folding setup you dress up, or a bench plus chairs situation can all work. Then you add two things: lighting and elevated tableware that won’t break. I’m a fan of things that look nice but survive real life, especially durable tableware that can handle a kid dropping it or me getting distracted mid-carry.
Cheap Dining Setups (Even for Small Patios)
Ideas:
- Bistro set for two with a runner and lantern
- Folding table dressed with a tablecloth and cushions
- Bench on one side, chairs on the other for flexibility
- Outdoor coffee table turned low “picnic” table with floor cushions
Elevated Tableware + Durable Tableware (Melamine, Acrylic, Enamel)
Options + price ranges:
- Melamine plates, $20–$60 for a set, check price at Target
- Acrylic drinkware, $12–$35, check price at Amazon
- Enamelware for a campy vibe, $18–$50, check price at World Market
5-Minute Table Styling Formula
Placemat + runner + centerpiece + candles.
Centerpiece can be a potted herb, citrus in a bowl, or a vase of grocery flowers. Nothing fancy required.
Seasonal Swaps + Deal Shopping (Clearance, Free Shipping, Black Friday)
Keeping your patio feeling fresh does not mean replacing everything. It means swapping a few small things and buying smart. I’m big on seasonal rotation because it scratches the “new vibe” itch without wrecking your budget.
I also time bigger purchases around sales. End-of-summer clearance is huge. Black Friday can be weirdly good for outdoor items too, especially when stores drop a holiday catalog early and sneak patio pieces into promos. This is where you stack deals: coupons, bundles, and free shipping thresholds. It’s not glamorous, but it works.
The “Seasonal Cheer” Swap List (What to Rotate, Not Replace)
Rotate these, keep the anchors:
- Pillow covers and throws
- Lanterns and candle holders
- Door or fence wreath
- Planter filler (seasonal greens, branches, flowers)
- Table linens and runners
Best Times to Buy Outdoor Items (Month-by-Month Cheat Sheet)
- Late winter: early-season launches, smaller discounts
- Spring: best selection, fewer deals
- Late summer: biggest clearance for furniture and rugs
- Fall: thrift finds spike, people purge
- Black Friday: surprise deals on lights, rugs, storage
- Post-holiday: clearance on seasonal decor and lighting
Holiday Magic Outdoors (Budget Decor Ideas)
This is how I do holiday magic outside without it turning into a plastic explosion.
- A shatterproof holiday ornament garland on a railing
- Pewter ornaments mixed into greenery for a softer, vintage feel
- One “joyful traditions ornament” you hang every year, like a tiny ritual
- Window hugger candles in the windows for a cozy glow
- A flower bulb gift garden tucked into a planter, so spring surprises you later
That mix gives you charm, not clutter. It also makes great holiday gifts if you’re the type who buys “one for you, one for me.” I am.
Deal Tips: Free Shipping, Bundles, Coupons
- Hit free shipping thresholds by bundling basics (lights + hooks + covers)
- Check bundles for cushions and pillow covers
- Use store pickup to avoid delivery fees on bulky items
- Screenshot prices and watch for quick drops
- Buy seasonal decorations after the season, always
Quick Budget Examples (Copy-Paste Plans)
If you want the simplest possible path, pick one of these and run with it. These are meant to be realistic. No “just buy a pergola” energy.
$50 Patio Refresh Essentials (Exact Shopping List)
- String lights or solar lights, $15–$30
- Two pillow covers, $10–$18
- One thrifted tray or small table decor, $5–$12
- Battery candle set, $10–$18
- One plant or herb pot, $6–$15
$150 Patio Refresh Essentials (Exact Shopping List)
- Outdoor rug or runner, $45–$90
- String lights, $15–$35
- Pillow covers or seat pads
- Two planters, $20–$40
- Outdoor hooks or hanging kit, $10–$20
- Small side table or stool, $20–$45
$300 Patio Refresh Essentials (Exact Shopping List)
- One anchor upgrade chair set or bench, $120–$220
- Outdoor rug, $60–$130
- Shade solution (umbrella or shade sail), $45–$120
- Lighting bundle (string lights + lantern), $30–$70
- Cushions or covers, $25–$60
- Storage bench or deck box, $60–$140
FAQs
How can I decorate my garden without spending much money?
Start with cleaning and rearranging what you already have. It changes everything. Then add two cheap layers that create instant “done”: lighting and textiles. A strand of string lights and two pillow covers can turn a plain corner into an actual hangout. After that, add greenery in simple pots. If you’re tempted to buy lots of small stuff, pause and pick one styled corner instead. You’ll get more impact for less money.
What affordable garden furniture options offer the best value?
I look for materials that survive your weather and won’t feel wobbly in a year. Resin wicker sets and aluminum sets tend to be the best value for many climates. If you like wood, acacia can be a great budget pick, but plan on sealing it. The real value move is buying one comfortable anchor piece, then styling around it. Comfort beats quantity every time.
How do I refresh old garden furniture on a budget?
Clean it first, then decide if the fix is paint, stain, or new cushions. Metal usually needs rust removal and a rust-blocking primer. Wood often needs sanding and a fresh coat of stain or paint. If the frame is sturdy but the cushions are gross, replace covers instead of buying new furniture. It’s the cheapest way to make something look intentional again.
How can I create seating areas without buying new furniture?
Use what you have and add flexible pieces. A bench can act as seating and a table. Floor cushions can create a casual lounge zone. Crates or stools can become side tables that make seating feel usable. If you can thrift just one additional chair or a small bench, do that. Then unify everything with a rug and pillows so it reads like a set.
What budget-friendly lighting ideas work for outdoor spaces?
String lights are the biggest mood shift for the least money. Then add a couple of battery candles or LED lanterns at table height for warmth. Solar path lights are great if you need safety and glow. I like layering: something overhead, something on the table, something low. It makes the space feel deeper and more expensive, even if every piece was basic.
What inexpensive textiles and cushions work outdoors?
Look for polypropylene rugs and outdoor-rated pillow covers when you can. If you can’t, use indoor pillows temporarily and bring them inside at night or during rain. Seat pads and washable covers are the best comfort upgrade. For throws, I like things that dry fast, like lightweight blankets or towels. The goal is softness without mildew drama.
What patio furniture materials last longest outdoors?
It depends on your climate, but generally, aluminum holds up really well because it resists rust. HDPE-style “poly” furniture is also extremely durable and low-maintenance. Resin wicker can last a long time, too, especially if the frame is solid. Wood can last, but it needs sealing or oiling. If you want “set it and forget it,” go with aluminum or poly.
How do I protect budget furniture from the weather?
Covers help a lot, especially in winter. Store cushions inside or in a deck box so they don’t mold. Use a sealer on painted pieces, and re-seal wood yearly if needed. Keep furniture slightly off the ground if water pools on your patio. Also, secure lightweight items so the wind doesn’t flip them. Budget furniture lasts longer when you treat it like it matters.
Conclusion
If you remember nothing else, remember this: pick one anchor, then build your layers. That’s how you get a patio that feels pulled together without spending like you’re furnishing a resort. Start with the one-weekend plan, even if you only do the free step and one small upgrade. A clean layout plus lights is already a win.
Then choose your anchor based on how you actually live. Coffee outside every morning. Dinner outside twice a week. Reading corner after work. Once that anchor is in place, add three layers: a rug, a little lighting, and one planter moment. You can always swap the small stuff seasonally later.
Pick one anchor + three layers today. You’ll be shocked at how fast it turns into a space you actually use.