Balcony wall decor, but for people who rent, live in a wind tunnel, and refuse to drill tile (same). You’ll get the real-life plan for hanging planters that add privacy, outdoor art that won’t fade, and vertical shelves plus eye-level solar lantern glow without the midnight crash situation.
Let’s talk about the part of balcony decorating that makes people quietly give up and go back inside to stare at their sad houseplants. The wall. The vertical space.
The “I guess I’ll hang something?” zone that turns into a whole saga the second you remember you rent, it’s windy, the sun is basically a laser, and your neighbor’s cigarette smoke has a personal vendetta against anything made of fabric.
Most advice I see skips the annoying realities: tiny square footage, rental rules, gusts that treat your decor like a frisbee, weird sun exposure, privacy issues, safety, and that sneaky weather damage that turns “cute” into “mildew experiment” by week three.
So this is my practical, renter-aware, weather-aware guide to balcony wall decor, and yes I’m saying it plainly: balcony wall decor is not about adding random pretties. It’s about using the wall for function and atmosphere at the same time.
Supplies Quick Checklist
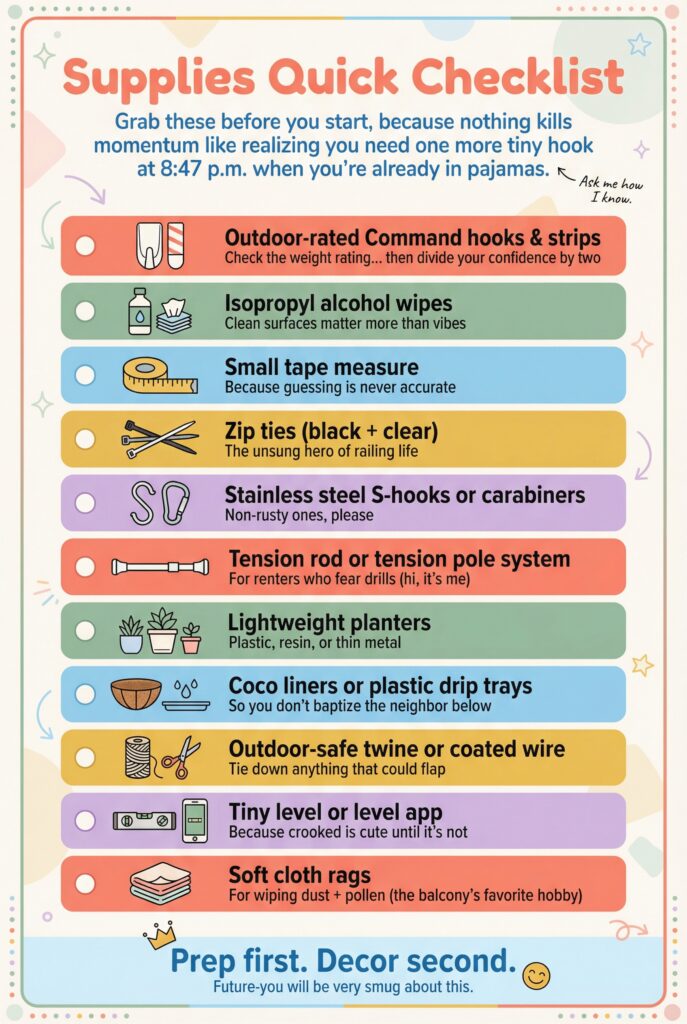
- Outdoor-rated Command hooks and strips (check the weight rating, then divide your confidence by two)
- Isopropyl alcohol wipes or rubbing alcohol + paper towels (clean surfaces matter more than vibes)
- A small tape measure
- Zip ties in black and clear (the unsung hero of railing life)
- Stainless steel S-hooks or carabiners (non-rusty ones, please)
- A tension rod or tension pole system (for renters who fear drills, hi it’s me)
- Lightweight planters (plastic, resin, or thin metal)
- Coco liners or plastic drip trays (so you don’t baptize the neighbor below)
- Outdoor-safe twine or coated wire (for tying down anything that could flap)
- A tiny level or a level app (because crooked is cute until it’s not)
- Soft cloth rags (for wiping down dust and pollen, the balcony’s favorite hobby)
Read Your Balcony like a Tiny Weather Station
Before you hang anything, you need to know what you’re actually dealing with. Stand out there for five minutes and look at it like a suspicious detective. Where does the wind hit first? Which corner gets blasted with afternoon sun? Where does water collect after rain?
This is the part that makes the difference between “I love it out here” and “why is everything sticky, faded, and slightly haunted?”
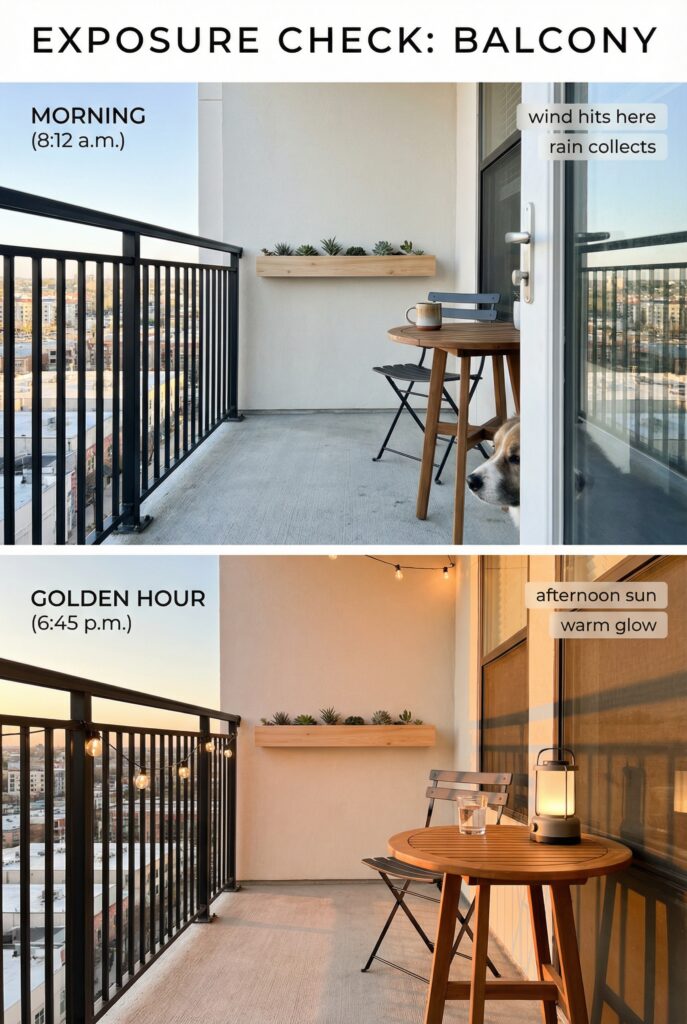
If you have a small apartment balcony, this matters even more because every inch is doing triple duty. On a larger patio, you can sometimes cheat by spreading things out, but on a skinny balcony, the wall is your best friend. I like to do a quick exposure check at two times of day.
Morning coffee time (mine is usually around 8:12 a.m., with the dog trying to sneak outside) and golden hour (around 6:45 p.m., when everything looks better and I make questionable decorating decisions). Take a photo both times. You’ll see glare, shadows, and privacy issues you didn’t notice while you were just standing there.
Also, read your lease. I know. I hate it too. But it’s cheaper than a fine.
- Wind test: hang a dish towel on the railing for 30 seconds. If it whips like a flag, you need lower-profile decor.
- Sun test: if the wall is in full sun for hours, assume fading is inevitable and choose UV-stable materials.
- Water test: after rain, note where drips land. Planters need drip control, or you’ll become the balcony villain downstairs.
- Privacy check: sit in your chair and notice what you can see and what others can see of you (this is where hanging greenery becomes magic).
Quick win: Take two photos today, morning and evening, so you stop guessing and start designing.
Tiny Detour: My Five-minute Hook Spiral
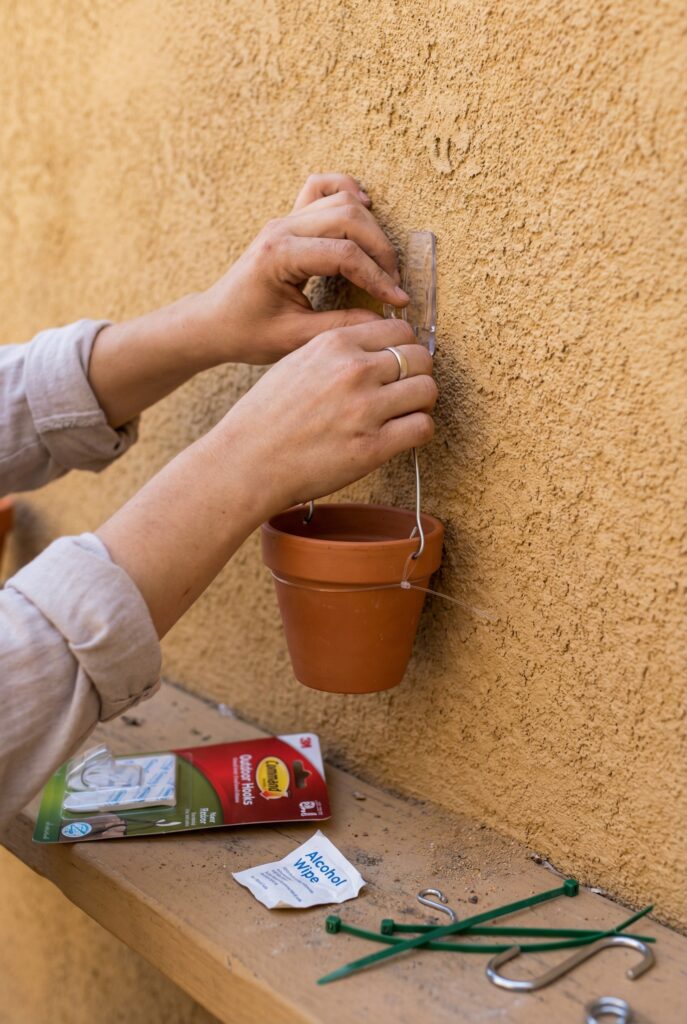
This is the part where I confess I have personally spent more time thinking about adhesive hooks than any adult human should. But outdoors is where hooks either become your best friend or betray you in a very public way.
Here’s what I’ve learned the mildly embarrassing way: outdoor-rated adhesive is not the same as indoor adhesive, and even outdoor stuff needs a clean, dry surface. If your wall is dusty stucco or textured concrete, you may not get a reliable bond no matter how much you whisper affirmations at it.
I also think people forget that wind creates a tugging motion, not just weight. Something can be “under the limit” and still pop off because it acts like a little sail.
My personal rule: if you would feel sad or alarmed hearing it crash at 2:00 a.m., it does not get hung with adhesive alone. That’s when you use railing mounts, a tension system, or a combo approach like hook plus a discreet safety tie. And yes, I test everything with a gentle but firm tug, like I’m checking a watermelon at the grocery store.
Quick win: If you’re using adhesive outside, clean the surface with rubbing alcohol and let it dry fully before sticking anything up.
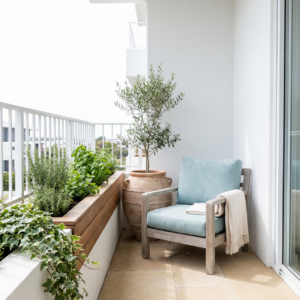
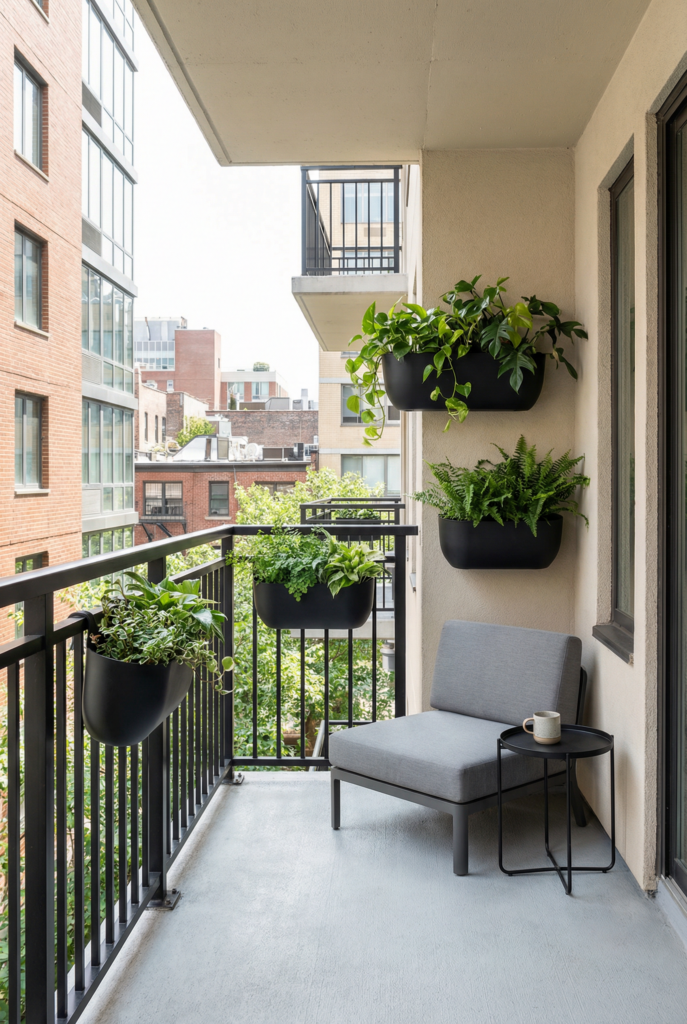
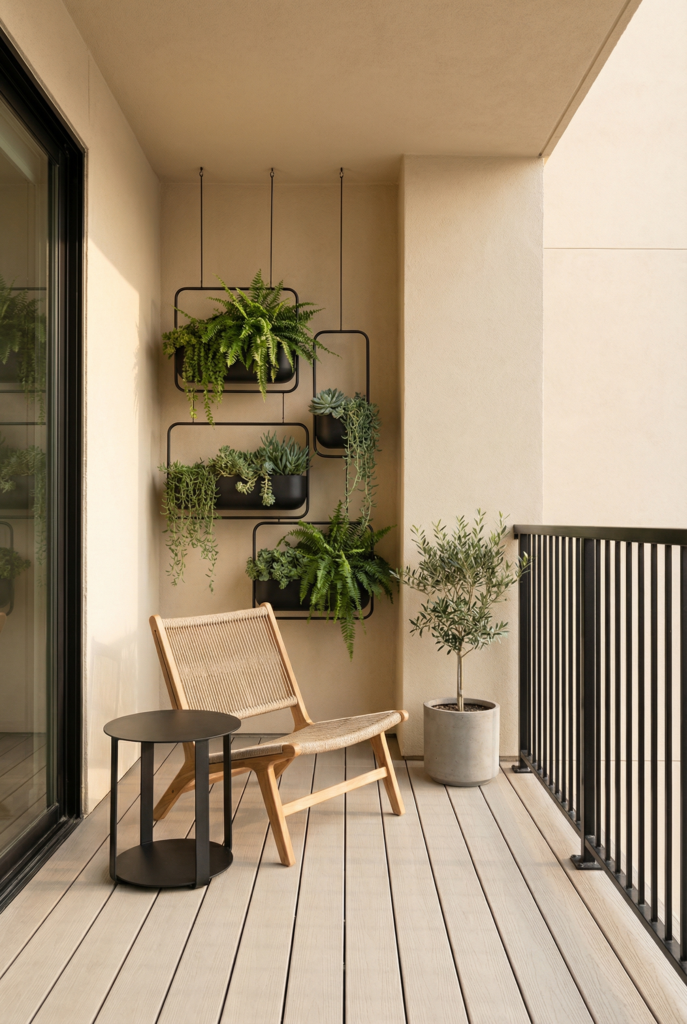
Step 1: Hanging Planters that Fix Sightlines and Privacy
Hanging planters work because they change what you see and what others see. They’re not just cute, they’re strategic.
On a small balcony, they pull greenery up into your line of sight so you feel surrounded by plants instead of hemmed in by railings and neighboring windows. On a bigger patio, they can define a zone, like a soft “wall” that makes a seating area feel intentional.
This is also where “apartment balcony decorating” gets real. You want privacy, you want softness, you want something living, but you do not want a heavy ceramic pot swinging in the wind like a wrecking ball.
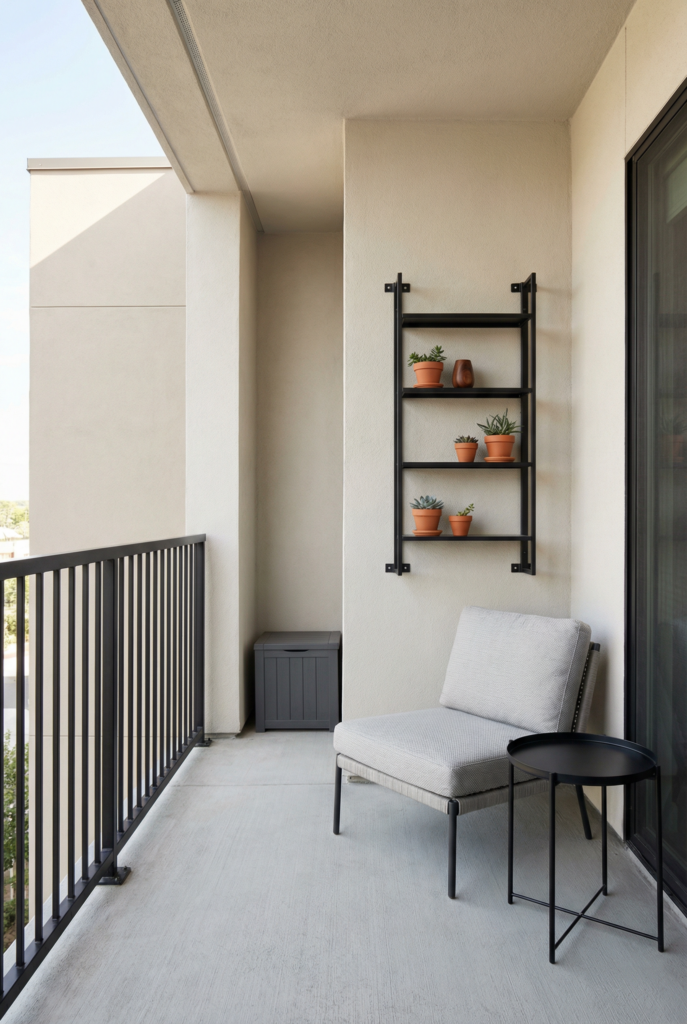
My favorite approach is creating a staggered vertical layer: one or two planters higher, one mid-level, and one low enough that it frames your view when you’re sitting.
That shift in sightlines is what turns a balcony from exposed to cozy. It’s basically a leafy little curtain, but better because it doesn’t flap around like fabric.
And yes, this is the easiest way to get that cozy balcony garden feeling without losing floor space.
Where Hanging Planters Work Best
They’re great on narrow balconies because they keep the floor clear and make the space feel taller. They also shine on patios, but there you can be pickier about placement and go for a bigger “moment.”
- Small balcony: use the wall and railing edges to keep your walkway open (nobody wants to sideways-shuffle past a pot).
- Larger patio: cluster them near seating so the greenery feels like part of the room, not scattered plant storage.
Materials that survive outside
You want lightweight and weather-tough. Think: powder-coated metal, resin, plastic, and sealed wood used sparingly.
- Best bets: resin planters, thin metal pots, plastic nursery pots hidden inside prettier sleeves
- For hangers: coated steel chains, stainless hooks, outdoor rope that won’t rot
- If you’re tempted by real wood: make sure it’s sealed and not constantly soaking after rain
What to avoid (wind will humble you)
This is where I gently take the heavy ceramics away from you like a concerned friend.
- Heavy ceramic hanging pots, especially on high hooks
- Anything that drips freely over the edge (your downstairs neighbor did not sign up for plant showering)
- Macramé that turns into a wet mop in rain or a sail in gusts
- Unsecured hanging baskets that swing into your wall and chip paint
Renter-safe ways to install
This is the “balcony hanging decor” moment, but make it safe and removable.
- Railing planters: the easiest, but add zip ties so they can’t lift in wind
- Railing clamp hooks: clamp on, hold weight, remove cleanly
- Tension rod systems: wedge between floor and ceiling, then hang planters off adjustable hooks
- Outdoor adhesive hooks: only for very lightweight items and on smooth surfaces, with a safety tie as backup
The sightline trick (my favorite part)
If privacy is your biggest pain point, hang planters where your eyes naturally land when you sit. Not at the top like a sad museum display. Mid-height. Eye level-ish. It blocks views without making you feel boxed in.
- For tall neighboring windows, go higher and layer in trailing plants.
- For rail-level visibility, go lower and fill gaps with fuller foliage.
And yes, fake greenery can absolutely be part of this if your balcony is a plant murder zone. Just anchor it well and avoid anything too wispy that will flap.
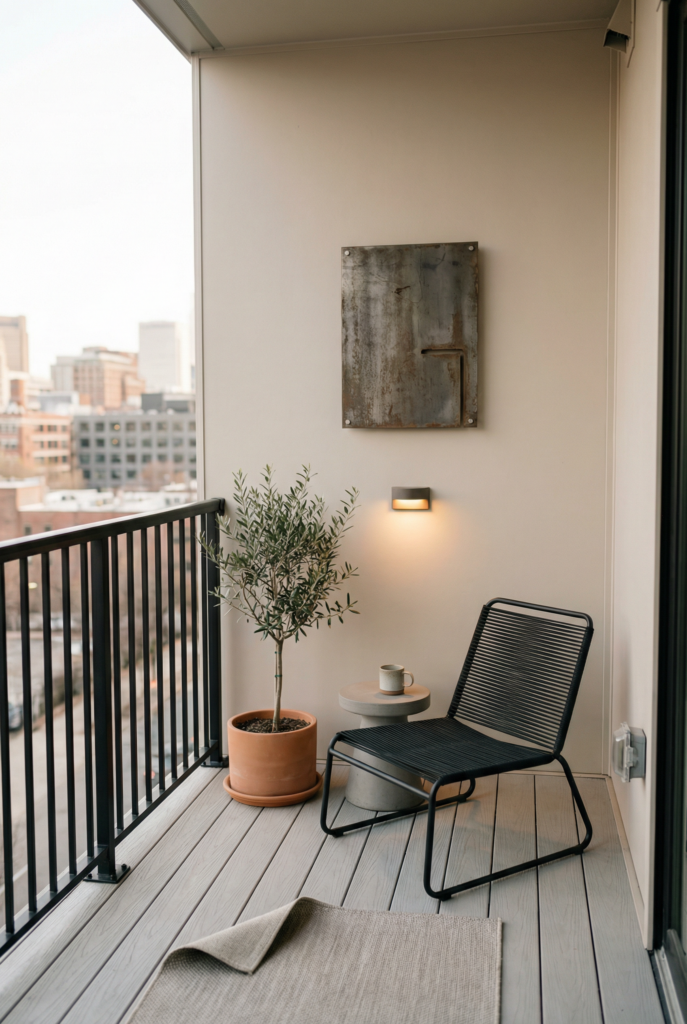
Step 2: Outdoor Artwork that Won’t Fade, Warp, or Fly Away
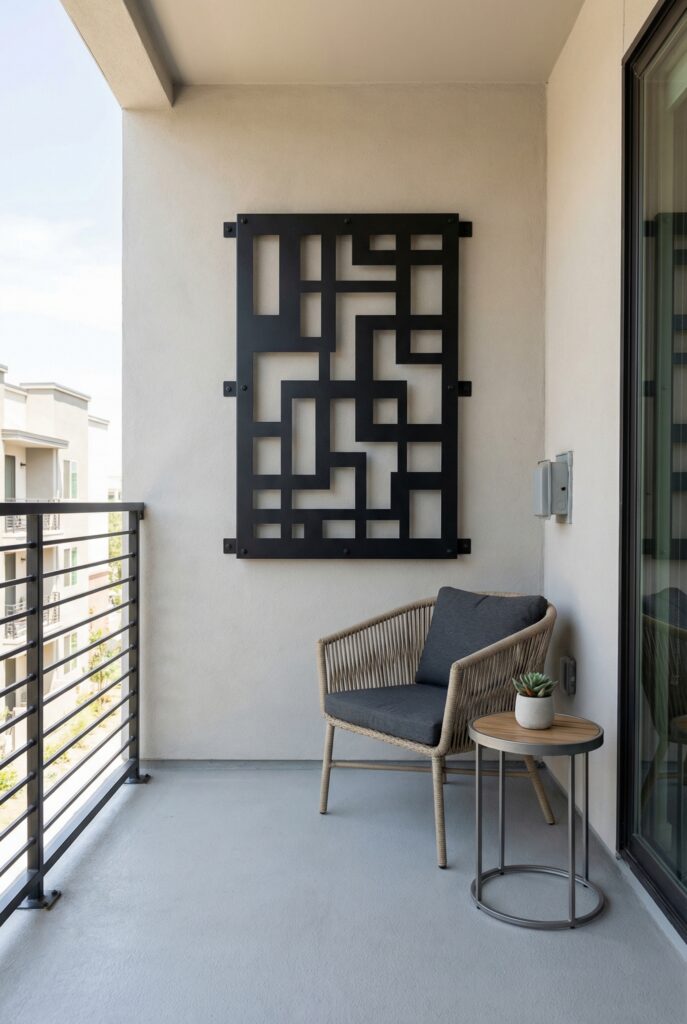
Outdoor wall art works when it’s lightweight, UV-stable, and mounted like it expects weather. Indoors, you can frame a print and call it a day.
Outside, the sun will bleach it, moisture will warp it, and wind will try to make it leave you. So the goal is simple: bring personality to the wall without introducing fragile stuff that needs babysitting.
If you have a small balcony, one piece of outdoor artwork is usually enough to create a focal point. It makes your seating area feel “designed” instead of “I dragged a chair out here.”
On a larger patio, you can do a small grouping, but keep it restrained. Too many pieces starts to read cluttery, and outdoors clutter looks like you forgot to bring things inside before a storm.
I also love art outside because it distracts from unchangeable rental weirdness. Weird beige stucco.
That one random utility box. The landlord’s light fixture that gives me boob light trauma all over again, but this time it’s outdoors and aimed directly at my eyeballs. Art helps you reclaim the vibe.
Where outdoor art works best
- Small balcony: one statement piece behind seating, so your eye lands somewhere soothing
- Larger patio: a series of two or three pieces in a tight cluster, not spread across the whole wall
Materials that actually survive outdoors
This is where you want “weather-resistant decor” energy, not “I hope this works.”
- Powder-coated metal panels
- Outdoor-rated resin art
- Aluminum composite prints (lightweight and stable)
- Outdoor fabric panels made from UV-resistant materials, but only if they’re secured at multiple points
What to avoid (please trust me)
- Indoor frames, especially wood or MDF
- Glass in frames (wind and glass is not my favorite pairing)
- Canvas stretched on indoor bars (it can sag and get gross fast)
- Anything that acts like a flag in wind
Renter-safe installation options
This is the part where I remind you: you do not need to drill tile. You do not. (I can feel you thinking about it. Don’t.)
- Railing-mounted grids or trellises: attach a lightweight panel to the railing, then hang art on that
- Tension systems: a tension rod or pole can become a mini wall for hanging
- Outdoor adhesive strips: only on smooth, clean surfaces and only for very light pieces
- Cable ties and hooks: if you’re attaching to a railing or existing structure, make it tidy and intentional
The UV and Glare Problem, Solved With Light Placement
Let’s talk lighting because it’s part of the wall story. Solar lanterns are a gift, but only if you place them like a human who wants ambiance, not like a raccoon who found shiny things.
Mount them at eye level or slightly above, and aim for soft glow, not direct glare. That’s how you get “I want to sit here” instead of “why does my balcony feel like a parking lot?”
For balcony lighting ideas that don’t require wiring:
- Clip-on lantern hooks attached to railings
- Adhesive hooks for feather-light string lights on smooth surfaces
- A tension rod with small lanterns hung at staggered heights
Also, if your neighbor has a bright light that blasts your space at night (hi, unresolved annoyance), a piece of art plus a strategically placed lantern can help rebalance the mood without starting a lighting war.
Step 3: Shelves and Vertical Accents that Make the Wall do Actual Work

Shelves are the grown-up answer to “I have stuff and nowhere to put it.”
They turn your wall into storage, a plant stand, and a styling moment all at once, which is why I love them for space saving decor.
On a tiny balcony, shelves keep the floor clear so you can still walk, sit, and exist without banging your shin on a planter every day.
On a larger patio, they can anchor a whole zone, like an outdoor bar moment or a plant wall that feels intentional instead of chaotic.
The key is choosing shelf systems that can handle weather and can be installed without drilling into forbidden surfaces.
Outdoor shelving also needs to be lower profile than indoor shelves because wind doesn’t care about your styling. If something can wobble, it will. If something can tip, it will.
And if you put a heavy pot up high, gravity will eventually try to make a point.
I like shelves for the “small patio decor” situation too, because they add height and layers without taking up that precious floor footprint that your chair and tiny table desperately need.
Where shelves work best
- Small balcony: one narrow vertical shelf unit near a corner, so it feels like a feature, not an obstacle
- Larger patio: a longer shelf run or a taller unit that acts like a backdrop for seating
Materials that survive outside
For outdoor storage solutions, you want materials that don’t swell, rust, or peel.
- Powder-coated steel or aluminum shelves
- Resin shelving that won’t rot
- Sealed hardwood that’s designed for outdoor use (and maintained)
- Outdoor-rated composite materials
What to avoid (the silent shelf killers)
- Particleboard or MDF (it will puff up like a sad pastry in moisture)
- Untreated wood
- Heavy ceramics on upper shelves
- Anything top-heavy that could tip if bumped or caught by wind
Renter-safe ways to add shelving
This is where you get to be clever.
- Clamp-on railing shelves: they attach to the railing and can hold plants, lanterns, or small accessories
- Tension pole shelving: floor-to-ceiling poles with adjustable shelves, great for renters
- Freestanding narrow shelf ladders: placed against the wall, secured with discreet ties if needed
- Wall grids: lightweight metal grids attached to railings that act like a vertical organizer
How to style shelves without making a mess
I know you want to put everything on them. I know. But outdoors, too many small items reads like clutter fast. Use a few bigger things, repeat materials, and leave breathing room.
- One or two medium plants, not twelve tiny ones
- A lantern or candle holder that’s stable
- A small tray or basket for keys, matches, or outdoor bits
- One piece of texture, like a weather-safe woven element, but secured
Also, outdoor rugs are my recurring nemesis. They make everything feel finished, then the wind flips a corner up like it’s waving at you. I still do it. I just use rug tape and accept the tiny lifted edge that refuses to behave. Imperfection lives here now.
Quick win: Add one slim shelf solution and style it with three larger items so it feels calm, not cluttered.
Step 4: Safety, wind, and not becoming the neighborhood cautionary tale
Balcony safety is not the fun part, but it’s the part that keeps your decor from becoming airborne. Wind load is real. Railings have limits. Buildings have rules.
And if you’re renting, drilling is often a hard no, especially into exterior walls that could mess with waterproofing. The safest balcony is the one where nothing can fall, nothing blocks exits, and nothing creates a fire hazard.
I think we also forget that balconies are elevated platforms. Anything that could tip or be lifted by wind is a bigger deal than it would be in a backyard. If you have kids or pets, you need to be extra mindful about climbable furniture near railings and any decor that could become a ladder.
I’m not saying this to be dramatic. I’m saying it because I have watched a chair migrate closer to a railing over the course of a week like it had its own goals.
If you only take one thing from this section: tie down and test anything that could move. Then test it again after the first windy day.
What not to put on your balcony
- Heavy items balanced on railings
- Unsecured tall planters that can tip
- Anything glassy that could shatter outdoors
- Flammable clutter near heat sources
- Items that block your door or walkway
- Decor that can be lifted by wind and fall
Quick safety checks I actually do
- Tug every hanging item like I’m trying to steal it
- Check weight ratings, then reduce the load because wind is sneaky
- Keep anything climbable away from the railing
- Make sure water can drain and won’t drip straight down onto neighbors
Quick win: Add one discreet safety tie to anything hanging, even if it feels “secure.”
Weather Backup Plan: When the Forecast Gets Rude
Outdoor spaces are seasonal, and that’s not a failure, it’s reality. If you live somewhere with heavy rain, snow, or relentless wind, your balcony needs a little plan B so you’re not constantly replacing stuff.
If a storm is coming, I bring in anything lightweight and anything fabric-y that can hold moisture. If it’s a windy season, I swap flappy textures for sturdier shapes.
And if it’s blazing hot sun all summer, I accept that some fading will happen and choose materials that age gracefully. Metal patinas. Resin stays stable. Outdoor fabrics designed for UV will hold up better than anything “cute” from inside.
Also, give yourself a storage plan. A small bin or bench with storage can save your sanity. I once stuffed a bunch of lanterns into a random tote at 10:38 p.m. because rain was coming and I refused to deal with it properly. Not my proudest moment, but it worked.
Does This Actually Add Value, or Just Look Like Clutter?
A well-styled balcony can absolutely read like added living space, which is the kind of thing that helps a home feel more valuable, even if you’re not literally adding square footage.
When a balcony looks cohesive, it photographs better, it feels more usable, and it signals “this home is cared for.” When it looks cluttered, it reads like overflow storage, and the vibe gets bleak fast.
The wall is the difference. A few intentional vertical moves can make the whole space feel designed: one art piece, a tidy shelf moment, or a layered planter setup that adds privacy. It’s the visual equivalent of making your bed. The room isn’t bigger, it’s just…pulling itself together.
If you’re thinking about resale or rental appeal, aim for calm and consistent materials. Keep the palette limited. Hide the mess. Choose pieces that look purposeful and are easy to maintain.
The goal is not to show off how much decor you own. It’s to make the balcony feel like a tiny outdoor room you’d actually want to use.
Quick win: Remove one random item that doesn’t belong out there and see how instantly the space feels more intentional.
The Calm Part: Restraint is the Whole Point
If your balcony wall feels confusing, it’s usually because you’re trying to make it decorative without making it functional. Once you flip that, everything gets easier.
Hanging planters can give you privacy and softness. Outdoor art gives you personality and a focal point. Shelves make the wall pull its weight with storage and styling. And lighting placed at eye level makes the whole space feel like an invitation instead of a glare trap.
The secret is not more stuff. It’s better choices. Choices that respect wind, sun, rules, and the fact that you want to relax out there, not babysit decor.
Start with one wall strategy, make it secure, see how it feels, then layer in the next piece. Your balcony doesn’t need to be packed to be pretty. It needs to be intentional.
And if something stays a little imperfect, that’s allowed. My rug corner still flips up sometimes. The outlet is still in the dumbest possible spot. I still refuse to drill into anything that sounds expensive to repair.
But the space works, and that’s the win.
FAQs
What should I put on a balcony wall?
Put something up there that improves how the balcony functions, not just how it looks. I’d start with a lightweight art piece or a hanging planter layer that helps privacy, then add a shelf only if you truly need storage.
How can I decorate my balcony without breaking rental rules?
Use removable systems: outdoor-rated adhesive for very light items, clamp-on railing mounts, and tension poles for heavier setups. If it can fall, add a backup tie so you can sleep without listening for a crash.
What balcony decor increases property value?
The decor that makes the balcony read as usable living space. One focal point on the wall, cohesive materials, and a clean layout. Calm wins. Clutter loses.
What should you not put on your balcony?
Anything heavy or unstable on the railing, anything that can blow away, and anything that creates a hazard or blocks your exit. If you wouldn’t trust it during a windy day, it doesn’t get prime balcony placement.