• About
  • Contact
  • Privacy Policy
  • Home
  • Decor
    • Bedroom
    • Bathroom
    • Kitchen
    • Living Room
    • Decor Styles
      • Japandi Decor
      • Farmhouse Decor
      • Boho Decor
      • Eclectic Decor
      • Minimalist Decor
      • 70s Decor
      • Vintage Decor
      • Scandinavian Decor
      • Modern Decor
      • Industrial Decor
    • Office Decor
    • Kids Decor
    • Holiday Decor
      • Thanksgiving Decor Ideas
      • 4th of July Decor Ideas
      • Easter Decor Ideas
      • St. Patrick’s day decor​
      • Halloween Decor Ideas
      • Christmas Decor Ideas
    • Outdoor
      • Balcony Decor
      • Garden Decor
  • College
  • Projects
    • My House
    • My Apartment
  • Quiz
  • Recipes
  • Lifestyle
  • DIY Crafts
  • Renovations
  • About
  • Contact
  • Privacy Policy

  • Home
  • Decor
    • Bedroom
    • Bathroom
    • Kitchen
    • Living Room
    • Outdoor
      • Garden Decor
      • Balcony Decor
    • Decor Styles
      • Japandi Decor
      • Farmhouse Decor
      • Eclectic Decor
      • Boho Decor
      • Scandinavian Decor
      • Vintage Decor
      • 70s Decor
      • Minimalist Decor
      • Modern Decor
      • Industrial Decor
    • Office Decor
    • Kids Decor
    • Holiday Decor
      • Christmas Decor Ideas
      • Easter Decor Ideas
      • St. Patrick’s day decor​
      • Thanksgiving Decor Ideas
      • Halloween Decor Ideas
      • 4th of July Decor Ideas
  • College
    • College Party
    • Dorm Room
  • Projects
    • My House
    • My Apartment
  • Renovations
  • Quiz
  • Recipes
  • Lifestyle
    • DIY Crafts
    • Halloween
    • Gifts
  • Shop

Recipes · February 24, 2025

4th of July Rice Krispie Dessert with Straws

  • Facebook
  • Twitter
Jump to Recipe·Print Recipe
jullysplace
Jully

Add some festive fun to your Independence Day celebration with 4th of July Rice Krispie treats on straws. I’ll show you how to make these easy and colorful desserts that are perfect for parties.
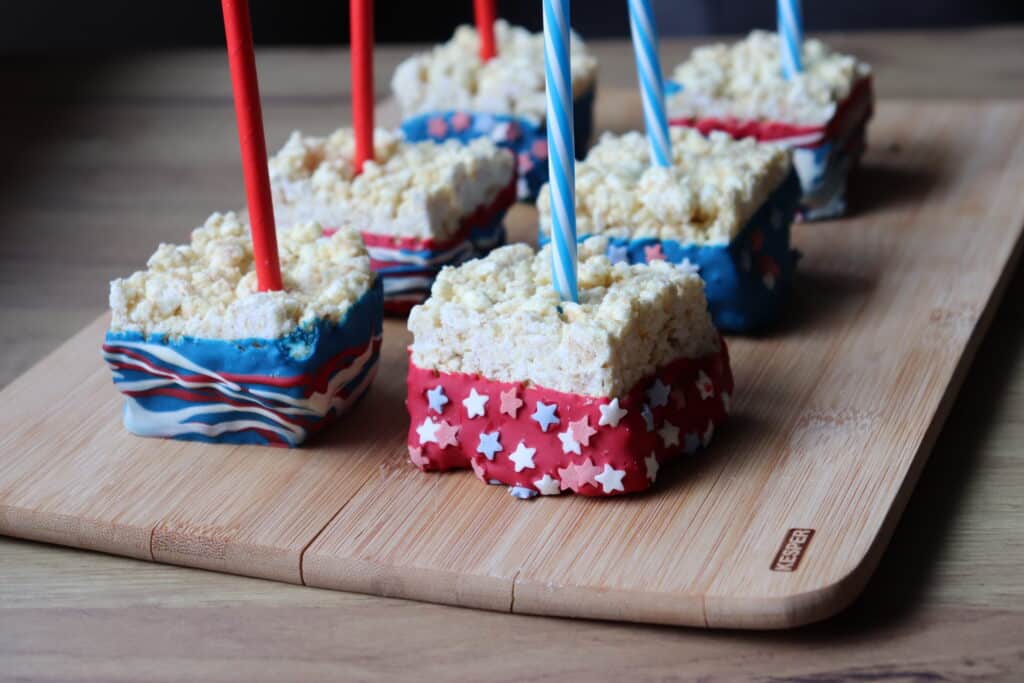
4th of July Rice Krispie Dessert with Straws

With the 4th of July just around the corner, I wanted to share a fun and festive treat that’s perfect for your celebrations — 4th of July Rice Krispie Desserts with Straws!

These are super easy to make and will definitely add a pop of color to your party spread. Let’s get started!

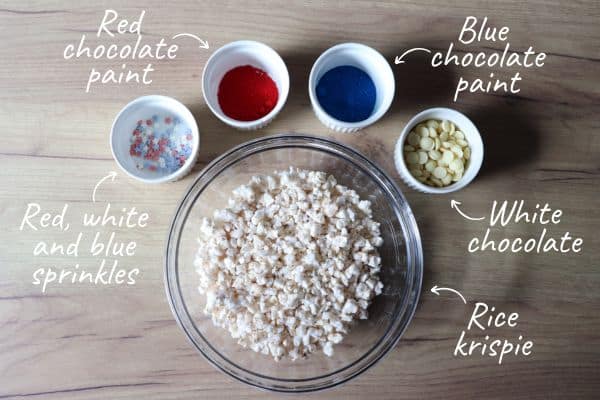
Ingredients
4th of July Rice Krispie Dessert with Straws
  • 130g rice krispies
  • 200g chocolate for paint (400g total)
  • 200g chocolate melts for the krispies
  • Optional decorations in colors white, blue, and red (like stars)
  • 50g chocolate for decoration
  • Red and blue candy melts

Prepare the Chocolate

4th of July Rice Krispie Dessert with Straws

First things first, let’s melt the chocolate! You’ll need 200g of white chocolate for the rice krispies.

The best way to melt the chocolate is a water bath. Easy peasy!

Mix with Rice Krispies

4th of July Rice Krispie Dessert with Straws

In a large bowl, mix the melted chocolate with 130g of rice krispies.

Make sure every little piece is coated. It’s going to be delicious!

Shape the Mixture

4th of July Rice Krispie Dessert with Straws

Spread the rice krispie mixture in a square dish to get a proper shape.

Press it well to stick all the parts together.

Straws

4th of July Rice Krispie Dessert with Straws

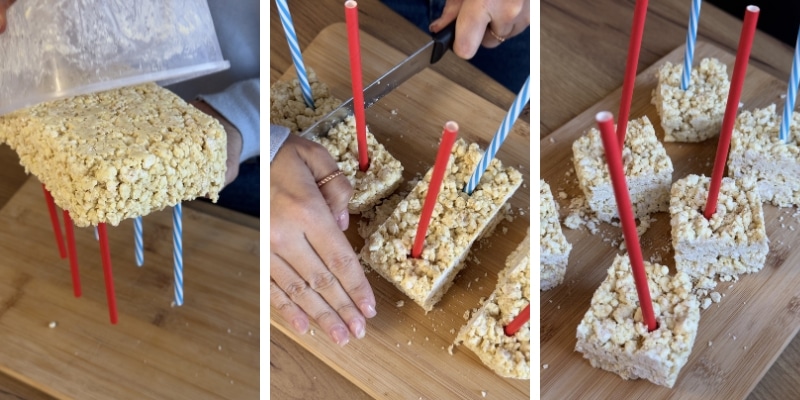
Put the straws into the mixture, estimating how many desserts you want to make, and use that many straws.

Let it cool in the fridge and set!

Cut into Shapes
4th of July Rice Krispie Dessert with Straws

Once the mixture has set, use a knife to cut it into squares.

Arrange them on parchment paper.

And let the decorating begin.

Melt the Chocolate

4th of July Rice Krispie Dessert with Straws

Next, let’s melt the chocolate.

You’ll need 200g of white chocolate for each of the paints.

Melt them the same way as before, in a water bath.

Then add the colors to the chocolate and mix well. (it must be specially made for chocolate)

Paint and Decorate

4th of July Rice Krispie Dessert with Straws

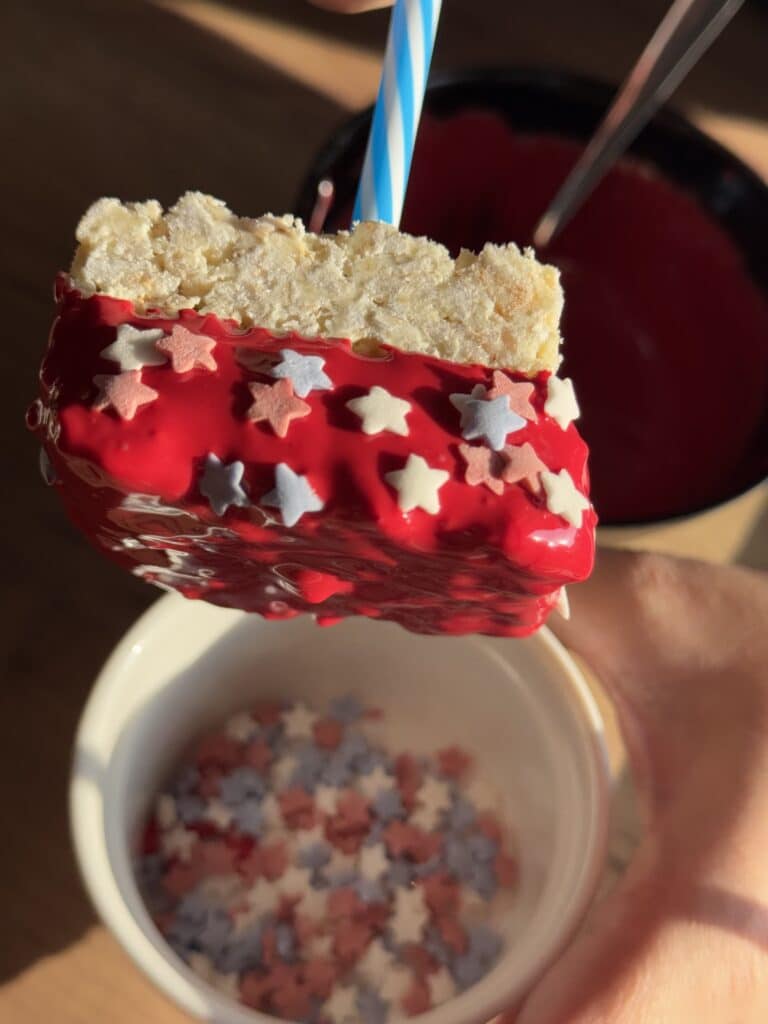
Now comes the fun part! Dip each rice krispie shape into the melted colored chocolates.

You can use red, blue, or white colors to stick to the patriotic theme.

Let the excess drip off and place them back on the parchment paper to set.

Add Decorations
4th of July Rice Krispie Dessert with Straws

Before the chocolates set completely, sprinkle on your optional decorations.

Think red, white, and blue sprinkles, glitter, or even small stars.

Get creative and have fun with it!

Drizzle with Chocolate
4th of July Rice Krispie Dessert with Straws

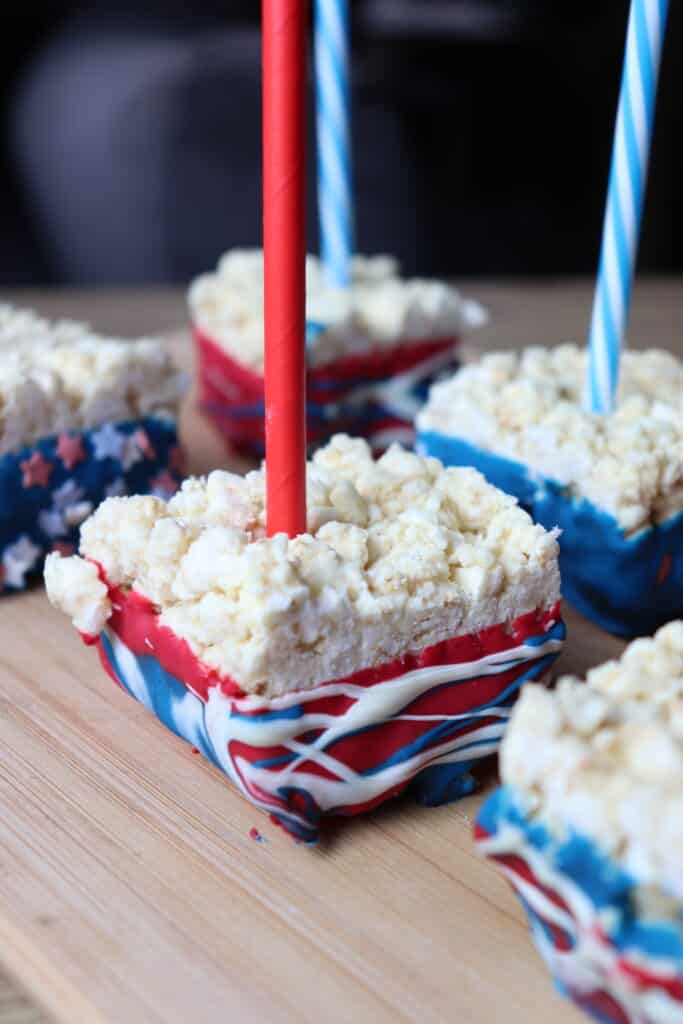
Melt the remaining 50g of chocolate and drizzle it over the rice krispie treats for an extra touch of yumminess.

It looks fancy and tastes amazing!

Let Them Set
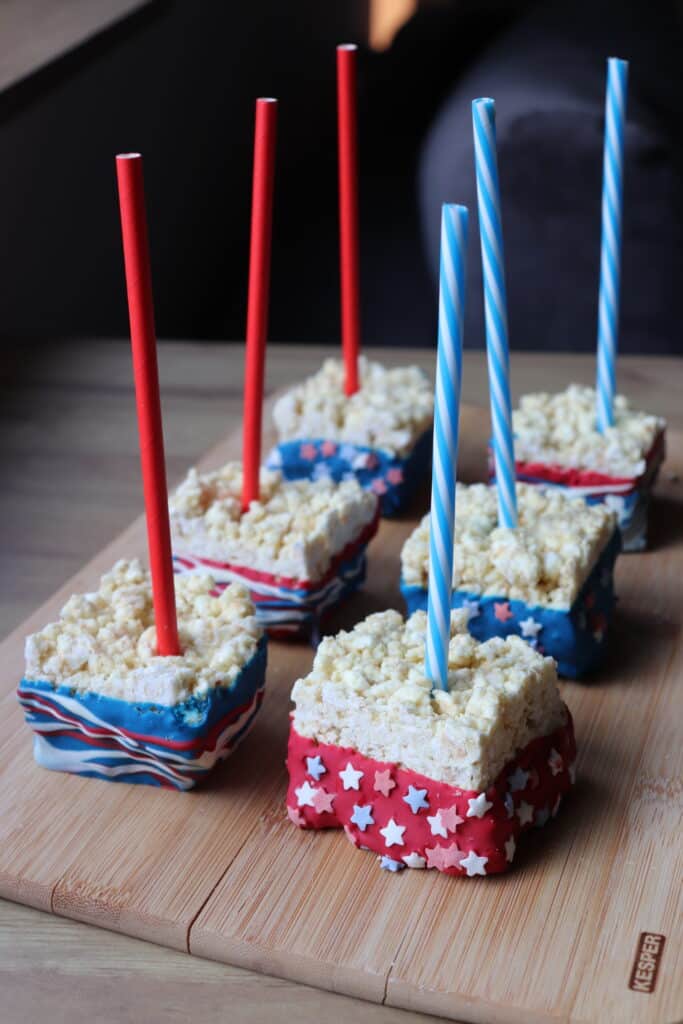
4th of July Rice Krispie Dessert with Straws

Allow the decorated rice krispie treats to set completely.

If you’re in a hurry, you can put them back in the fridge for a bit.

Serve and Enjoy!

And there you have it! Your 4th of July Rice Krispie Desserts with Straws are ready to wow your guests.

They’re colorful, delicious, and oh-so-festive.

Enjoy your Independence Day celebration with these tasty treats!

Print
clock clock iconcutlery cutlery iconflag flag iconfolder folder iconinstagram instagram iconpinterest pinterest iconfacebook facebook iconprint print iconsquares squares iconheart heart iconheart solid heart solid icon
4th of July Rice Krispie Dessert with Straws

4th of July Rice Krispie Dessert with Straws

Print Recipe
Pin Recipe

Celebrate the 4th of July with these colorful and festive Rice Krispie Desserts with Straws! These no-bake treats are easy to make and perfect for adding a patriotic touch to your Independence Day celebrations. With a combination of crispy rice cereal, creamy chocolate, and fun decorations, these treats are sure to be a hit with both kids and adults.

  • Total Time: 45min to 1hr
  • Yield: 6–10 1x

Ingredients

Scale
  • 130g rice krispies
  • 200g white chocolate for the rice krispies
  • 400g white chocolate for painting (divided into 200g portions for each color)
  • Optional decorations in colors white, blue, and red (sprinkles, edible glitter, small stars)
  • 50g white chocolate for drizzling
  • Red and blue chocolate coloring
  • Straws

Instructions

  1. Prepare the Chocolate: Melt 200g of white chocolate for the rice krispies using a water bath.
  2. Mix with Rice Krispies: Combine the melted chocolate with 130g of rice krispies in a large bowl until well coated.
  3. Shape the Mixture: Press the mixture into a square dish, insert straws, and let it set in the fridge.
  4. Cut into Shapes: Cut the set mixture into squares and arrange on parchment paper.
  5. Melt the Chocolate for Painting: Melt 200g of white chocolate for each color using a water bath. Add food coloring and mix.
  6. Paint the Treats: Dip each square into the colored chocolates and let excess drip off.
  7. Add Decorations: Sprinkle on optional decorations before the chocolate sets completely.
  8. Drizzle with Chocolate: Melt the remaining 50g of white chocolate and drizzle over the treats.
  9. Let Them Set: Allow the treats to set completely, using the fridge if needed.
  10. Serve and Enjoy: Your 4th of July Rice Krispie Desserts with Straws are ready to serve! Enjoy!

Notes

  • Tighten: Use the fridge to tighten the rice krispies with chocolate faster.
  • Storage: Store in an airtight container at room temperature for up to 3 days or in the fridge for longer.
  • Customization: Use different shapes and decorations for added fun.
  • Author: Jully
  • Prep Time: 15-20min
  • Fridge time: 20min
  • Cook Time: 10-15min
  • Category: Dessert
  • Method: No-bake

Did you make this recipe?

Share a photo and tag us — we can’t wait to see what you’ve made!

  • Facebook
  • Twitter

In: Recipes

You’ll Also Love

tiramisu recipeClassic Tiramisu: The Ultimate Italian Dessert (Recipe + Video)
Fall Charcuterie Board Ideas28 Fall Charcuterie Board Ideas: Make Your Autumn Snack Fancy!
halloween dessert ideas29 Halloween Dessert Ideas That’ll Make Your Taste Buds Scream with Joy
Next Post >

25 Earth Day Craft Ideas: Fun Projects for Everyone

jullysplace
Jully

Hey, I'm Julia! I'm a home decor blogger currently building a house from scratch and documenting every decision, mistake, and small victory along the way. I bought and renovated my first apartment at 22, and now I'm taking on the biggest project yet - a full new build with my partner. When I'm not on a construction site or arguing about tile colors, I'm here sharing what I've learned about making a home feel like yours.

JOIN THE CLUB

Join the club with more than 100,000 monthly visitors and get access to our FREE Printables

Instagram

We’ve been having quite the adventure with our hou We’ve been having quite the adventure with our house for the past two years. Somehow, the time has flown by… and crawled by at the exact same time. 😄 Soon, we’ll finally reveal the main color we chose — and trust us, we’ve spent enough time staring at paint samples to earn that privilege. Stay tuned! 💁‍♀️🫶
I can assure you that my husband doesn’t have it e I can assure you that my husband doesn’t have it easy with me. But at least he’s never bored 🤷‍♀️

#newhome #newhouse
If you know.. you know 😂🥲 Everyone loves to talk If you know.. you know 😂🥲

Everyone loves to talk about the exciting parts of building or renovating a home—the mood boards, the beautiful finishes, and the dream of seeing it all come together. What people don’t talk about nearly enough are the endless decisions, unexpected surprises, and those moments when you find yourself wondering why choosing a simple light fixture suddenly feels like a life-changing event.

The truth is, this journey can test your patience more often than you’d like. But somehow, between the dust, delays, and daily challenges, there’s also a lot of excitement, laughter, and pride.

So we keep going. Because at the end of the day, every choice, every setback, and every little victory is part of creating a home filled with love. And that makes all the chaos worth it. 🤍
We had a little secret. 🤫 During these past months We had a little secret. 🤫 During these past months, we’ve been building not only a home, but also a family. ❤️ Love is magic, and it creates beautiful things. ✨ Our magic is happening, and we are quietly rejoicing as we look forward to everything that lies ahead. 🥹

#newadventure
Every morning, I wake up feeling a little more cer Every morning, I wake up feeling a little more certain that “follow your dreams” isn’t just a phrase—it’s a way of life. And somehow, it’s even more beautiful when those dreams are shared… when there’s someone beside you, looking in the same direction, building the same future 🤍

What started as a simple green field, scattered with bushes, is slowly turning into something so much bigger—our home. A two-story house, a beautiful roof, and that veranda we’ve been dreaming about for the past two years… it’s all becoming real, step by step.

And the truth is, none of this would mean the same without the right person by your side. The right team changes everything.

This one is for you. For the man who refuses to stop, no matter the obstacles, and who keeps pushing forward to turn our dreams into reality.

Thank you, my love 🖇️

All you need

  • HOME
  • LIFESTYLE
  • RECIPES
  • MY APARTMENT

LET'S WORK

  • ABOUT
  • CONTACT
  • PRIVACY POLICY

Follow me

  • My Favorite
  • Get to know me
  • Bonus Content
  • More

JOIN THE CLUB

Join the club with more than 100,000 monthly visitors and get access to our FREE Printables

Jully's Place is a participant in the Amazon Services LLC Associates Program, an affiliate advertising program designed to provide a means for sites to earn advertising fees by advertising and linking to Amazon.com

© | All Rights Reserved, Jully's Place
footer-logo

Copyright © 2026 · Theme by 17th Avenue